Using Igor
This help file covers the essential aspects of working with Igor Pro, including language selection, accessing help resources, using the command window, and managing windows. Whether you're new to Igor or looking to work more efficiently, these topics will help you navigate the application and make the most of its features.
Language Selection
Igor Pro 10 and later support muitiple languages for Igor's user interface (dialogs, menus, etc.) and some documentation (Igor help files). Igor will use the operating system's language if it is available; otherwise, English is used. If the translation is not complete, English strings and documentation will be displayed. There is currently no built-in support for translating user-defined menus or Igor procedure code, so some Igor features are not translatable. One example is the Analysis→Filter dialog.
You can configure the language selection behavior from the Miscellaneous Settings dialog. Select the Misc→Miscellaneous Settings menu item to open the dialog, then select the Environment category on the left. If you select a specific language, that language will be used regardless of which language the operating system uses. Note that you must restart Igor after changing the selected language for it to go into effect.
The language can also be controlled by starting Igor with the /LANG flag. When you use the /LANG flag, the specified language is used only for that instance of Igor. See Calling Igor From Scripts for more information.
If you would like to see Igor translated into a different language, or are interested in doing a translation, please contact support@wavemetrics.com.
Getting Help
There are a number of sources of information for learning about Igor Pro. The most important are:
-
The Guided Tour
-
The Igor Help system
-
The example experiments in the Examples folder
-
The Igor mailing list
-
The IgorExchange user-to-user support web page
The Guided Tour
The Igor Guided Tour is indispensible for learning Igor.
The time you spend doing the guided tour will be repaid many times over in productivity. To do the guided tour, choose Help→Getting Started.
Help in Igor
Igor's Help system consists of these components:
-
The Igor help browser
-
Igor help files
-
Tooltips
The Igor Help Browser
The Igor Help Browser is designed to provide quick access to the most frequently-used Igor reference material and also to provide a starting point in searching for other kinds of information. You can display the Igor Help Browser by:
-
Choosing Help→Igor Help Browser
-
Pressing the F1 key
-
Clicking the question-mark icon in the lower/right corner of the command window
Igor Help Files
The Igor installer places help files primarily in "Igor Pro Folder/Igor Help Files" and in "Igor Pro Folder/More Help Files".
When Igor starts up, it automatically creates help windows by opening the Igor help files stored in "Igor Pro Folder/Igor Help Files" and in "Igor Pro User Files/Igor Help Files". You can display a help window using the Help Files tab of the Help Browser or by choosing it from the Help Windows submenu in the Help menu.
To see a list of topics in open help files, use the Igor Help Browser Help Topics tab.
To search all installed help files, whether open or not, use the Igor Help Browser Search Igor Files tab.
Hiding and Killing a Help Window
When you click the close button in an Igor help window, Igor hides it.
Usually there is no reason to kill a help file, but if you want to kill one, you must press Alt while clicking the close button.
Executing Commands from a Help Window
Help windows often show example Igor commands. To execute a command or a section of commands from a help window, select the command text and press Control-Enter or Control-Return. This sends the selected text to the command line and starts execution.
Tooltips
Igor provides tooltips for various icons, dialog items, and other visual features. You can turn these tips on or off using the Show Tooltips checkbox in the Miscellaneous Settings dialog. To display this setting, choose Misc→Miscellaneous Settings and select the Help category.
You can also use tooltips to get information about traces in graphs and columns in tables. Use Graph→Show Trace Info Tags and Table→Show Column Info Tags to turn these tips on and off.
Searching Igor Files
You can search Igor help files and procedure files using the Search Igor Files tab of the Igor Help Browser.
The search expression can consist of one or more (up to 8) terms. Terms are separated by the word "and". Here are some examples:
interpolation                             // One term
spline interpolation                      // One term
spline and interpolation                  // Two terms
spline and interpolation and smoothing    // Three terms
The second example finds the exact phrase "spline interpolation" while the third example finds sections that contain the words "spline" and "interpolation", not necessarily one right after the other.
The only keyword supported in the search expression is "and". Quotation marks in the search expression don't mean anything special and should not be used.
If your search expression includes more than one term, a text box appears in which you can enter a number that defines what "and" means. For example, if you enter 10, this means that the secondary terms must appear within 10 paragraphs of the primary term in order to constitute a hit. A value of 0 means that the terms must appear in the same paragraph. In a plain text file, such as a procedure file, a paragraph is a single line of text. Blank lines count as one paragraph.
To speed up searches when entering multiple search terms, enter the least common term first. For example, searching Igor help files for "hidden and axis and graph" is faster than searching for "graph and axis and hidden" because "hidden" is less common than "graph".
Example Experiments
Igor Pro comes with a large collection of examples which demonstrate Igor features and techniques. You can access them using the File→Example Experiments submenu.
The Igor Mailing List
The Igor mailing list is an Internet discussion list that provides a way for Igor Pro users to help one another and to share solutions and ideas. WaveMetrics also uses the list to post information on the latest Igor developments. For information about subscribing and other details about the mailing list, please visit this web page:
http://www.wavemetrics.com/users/mailinglist.htm
IgorExchange
IgorExchange is a user-to-user support and collaboration web site sponsored by WaveMetrics, but run by and for Igor users. For information about IgorExchange, please visit this web page:
Updating Igor
WaveMetrics periodically releases free updates for Igor. Updates provide bug fixes and sometimes new features.
Igor Pro checks for available updates during startup by contacting one of our web sites. This update check is implemented to minimize any performance impact on starting Igor.
If an update is found, Igor presents a dialog in which you can choose to download the update, skip notifications about the current update, or be reminded later about the update. You can also choose to view the release notes for the update.
You can disable automatic update checking using the Updates section of the Miscellaneous Settings dialog. You can also enable checking for beta versions.
You can manually check for updates at any time by choosing Help→Updates for Igor Pro. This works regardless of whether automatic update checking is enabled.
If your Internet access requires a proxy server or other unusual configuration, Igor's update checking mechanism may fail. In those cases you can always go to http://www.wavemetrics.net to see if an update is available.
Technical Support
WaveMetrics provides technical support via email.
To send an email to WaveMetics support, start by choosing Help→Contact Support. This creates an email containing information about your Igor installation, such as your Igor serial number and the Igor version, which we need to provide support.
In most cases, we need to reproduce your problem in order to solve it. It is best if you can provide a simplified example showing the problem.
For information on upgrades and other nontechnical information, send queries to:
sales@wavemetrics.com
You will find our web site at https://www.wavemetrics.com/. You can also choose Help→WaveMetrics Home Page.
The Samples Galleries section of our website contains a number of cool graphs. We are always grateful for new cool graphs. Contact us at sales@wavemetrics.com if you have a cool graph to share.
Command Window
You can control Igor using menus and dialogs or using commands that you execute from the command window. Some actions, for example waveform assignments, are much easier to perform by entering a command. Commands are also convenient for trying variations on a theme -- you can modify and reexecute a command very quickly. If you use Igor regularly, you may find yourself using commands more and more for those operations that you frequently perform.
In addition to executing commands in the Command window, you can also execute commands in a notebook, procedure or help window. These techniques are less commonly used than the command window. See Notebooks as Worksheets for more information.
This section describes the command window and general techniques and shortcuts. See Working with Commands for details on command usage and syntax.
The command window consists of a command line and a history area. When you enter commands in the command line and press Return or Enter, the commands are executed. Then they are saved in the history area for you to review. If a command produces text output, that output is also saved in the history area. A bullet character is prepended to command lines in the history so that you can easily distinguish command lines from output lines.
The Command window includes a help button just below the History area scroll bar. Clicking the button displays the Help Browser window.
The total length of a command on the command line is limited to 2500 bytes. A command executed in the command line must fit on one line.
Command Window Example
Here is a quick example designed to illustrate the power of commands and some of the shortcuts that make working with commands easy.
-
Choose New Experiment from the File menu.
-
Execute the following command by typing in the command line and then pressing Return or Enter.
Make/N=100 wave0; Display wave0This displays a graph.
-
Press Ctrl+J.
This activates the command window.
-
Execute
SetScale x, 0, 2*PI, wave0; wave0 = sin(x)The graph shows the sine of x from 0 to 2π.
Now we are going to see how to quickly retrieve, modify and reexecute a command.
-
Press Up Arrow.
This selects the command that we just executed.
-
Press Return or Enter.
This transfers the selection back into the command line.
-
Change the "2" to "4".
The command line should now contain:
SetScale x, 0, 4*PI, wave0; wave0 = sin(x) -
Press Return or Enter to execute the modified command.
This shows the sine of x from 0 to 4π.
-
While pressing Alt, click the last command in the history.
This is another way to transfer a command from the history to the command line. The command line should now contain:
SetScale x, 0, 4*PI, wave0; wave0 = sin(x) -
Press Ctrl+K.
This "kills" the contents of the command line.
Now let's see how you can quickly reexecute a previously executed command.
-
While pressing Ctrl+Alt, click the second-to-last command in the history.
This reexecutes the clicked command (the 2*PI command).
Repeat this step a number of times, clicking the second-to-last command each time. This will alternate between the 2PI command and the 4PI command.
-
Execute
WaveStats wave0Note that the WaveStats operation has printed its results in the history where you can review them. You can also copy a number from the history to paste into a notebook or an annotation.
There is a summary of all command window shortcuts in Command Window Shortcuts.
The Command Buffer
The command line shows the contents of the command buffer.
Normally the command buffer is either empty or contains just one line of text. However you can copy multiple lines of text from any window and paste them in the command buffer and you can enter multiple lines by pressing Shift-Return or Shift-Enter to enter a line break. You can drag the red divider line up to show more lines or down to show fewer lines.
You can clear the contents of the command buffer by choosing the Clear Command Buffer item in the Edit menu or by pressing Ctrl+K.
When you invoke an operation from a typical Igor dialog, the dialog puts a command in the command buffer and executes it. The command is then transferred to the history as if you had entered the command manually.
If an error occurs during the execution of a command, Igor leaves it in the command buffer so you can edit and reexecute it. If you don't want to fix the command, you should remove it from the command buffer by pressing Ctrl+K.
Because the command buffer usually contains nothing or one command, we usually think of it as a single line and use the term "command line".
Command Window Title
The title of the command window is the name of the experiment that is currently loaded. When you first start Igor or if you choose New from the File menu, the title of the experiment and therefore of the command window is "Untitled".
When you save the experiment to a file, Igor sets the name of the experiment to the file name minus the file extension. If the file name is "An Experiment.pxp", the experiment name is "An Experiment". Igor displays "An Experiment" as the command window title.
For use in procedures, the IgorInfo(1) function returns the name of the current experiment.
History Area
The history area is a repository for commands and results.
Text in the history area cannot be edited but can be copied to the clipboard or to the command line. Copying text to the clipboard is done in the normal manner. To copy a command from the history to the command buffer, select the command in the history and press Return or Enter. An alternate method is to press Alt and click in the history area.
To make it easy to copy a command from the history to the command line, clicking a line in the history area selects the entire line. You can still select just part of a line by clicking and dragging.
Up Arrow and Down Arrow move the selection range in the history up or down one line selecting an entire line at a time. Because you normally want to select a line in the history to copy a command to the command line, Up Arrow and Down Arrow skip over non-command lines. Left Arrow and Right Arrow move the insertion point in the command line.
When you save an experiment, the contents of the history area are saved. The next time you load the experiment the history will be intact. Some people have the impression that Igor recreates an experiment by reexecuting the history. This is not correct. See How Experiments Are Loaded for details.
Limiting Command History
The contents of the history area can grow to be quite large over time. You can limit the number of lines of text retained in the history using the Limit Command History feature in the Command Window section of the Miscellaneous Settings dialog which is accessible through the Misc menu.
If you limit command history, when you save the experiment, Igor checks the number of history lines. If they exceed the limit, the oldest lines are deleted.
History Archive
When history lines are deleted through the Limit Command History feature, the History Archive feature allows you to tell Igor to write the deleted lines to a text file in the experiment's home folder.
To enable the History Archive feature for a given experiment, create a plain text file in the home folder of the experiment. The text file must be named
<Experiment Name> History Archive UTF-8.txt
where <Experiment Name> is the name of the current experiment. Now, when you save the experiment, Igor writes any deleted history lines to the history archive file.
Prior to Igor Pro 7.00 the history archive file was written in system text encoding and was named
<Experiment Name> History Archive.txt
If you use the history archive in Igor Pro 6 you need to create a new history archive file whose name includes "UTF-8".
If the history archive file is open in another program, including Igor, the history archive feature may fail and history lines may not be written.
History Carbon Copy
You can designate a notebook to be a "carbon copy" of the history area by creating a plain text or formatted notebook and setting its window name, via Windows→Window Control, to HistoryCarbonCopy. If the HistoryCarbonCopy notebook exists, Igor inserts history text in the notebook as well as in the history. However, if a command is initiated from the HistoryCarbonCopy notebook (see Notebooks as Worksheets), Igor suspends sending history text to that notebook during the execution of the command.
If you rename the notebook to something other than HistoryCarbonCopy, Igor will cease sending history text to it. If you later rename it back to HistoryCarbonCopy, Igor will resume sending history text to it.
The history trimming feature accessed via the Miscellaneous Settings dialog does not apply to the HistoryCarbonCopy notebook. You must trim it yourself. Notebooks are limited to 16 million paragraphs.
When using a formatted notebook as the history carbon copy, you can control the formatting of commands and results by creating notebook rulers named Command and Result. When Igor sends text to the history carbon copy notebook, it always applies the Command ruler to commands. It applies the Result ruler to results if the current ruler is Normal, Command or Result. You must create the Command and Result rulers if you want Igor to use them when sending text to the history carbon copy.
This function creates a formatted history carbon copy notebook with the Command and Result rulers used automatically by Igor as well as an Error ruler which we will use for our custom error messages:
Function CreateHistoryCarbonCopy()
	NewNotebook /F=1 /N=HistoryCarbonCopy /W=(50,50,715,590)

	Notebook HistoryCarbonCopy backRGB=(0,0,0)	// Set background to black

	Notebook HistoryCarbonCopy showRuler=0

	// Define ruler to govern commands.
	// Igor will automatically apply this to commands sent to history carbon copy.
	Notebook HistoryCarbonCopy newRuler=Command, rulerDefaults={"Geneva",10,0,(65535,65535,0)}

	// Define ruler to govern results.
	// Igor will automatically apply this to results sent to history carbon copy.
	Notebook HistoryCarbonCopy newRuler=Result, rulerDefaults={"Geneva",10,0,(0,65535,0)}

	// Define ruler to govern user-generated error messages.
	// We will apply this ruler to error messages that we send to history carbon copy via Print commands.
	Notebook HistoryCarbonCopy newRuler=Error, rulerDefaults={"Geneva",10,0,(65535,0,0)}
End
If the current ruler is not Normal, Command or Result, it is assumed to be a custom ruler that you want to use for special messages sent to the history using the Print operation. In this case, Igor does not apply the Result ruler but rather allows your custom ruler to remain in effect.
This function sends an error message to the history using the custom Error ruler in the history carbon copy notebook:
Function PrintErrorMessage(message)
	String message

	Notebook HistoryCarbonCopy, ruler=Error
	Print message

	// Set ruler back to Result so that Igor's automatic use of the Command
	// and Result rulers will take effect for subsequent commands.
	Notebook HistoryCarbonCopy, ruler=Result
End
XOP programmers can use the XOPNotice3 XOPSupport routine to control the color of text sent to the History Carbon Copy notebook.
Searching in the Command Window
You can search the command line or the history by choosing Find from the Edit menu or by using the keyboard shortcuts as shown in the Edit menu. Ctrl+F displays the Find bar and automatically populates it with the text currently under the cursor. Ctrl+R displays both the Find and Replace bars, and for a new session automatically populates the Find bar with the current text under the cursor, or with text from the last Find in the session.
Searching the command line is most often used to modify a previously executed command before reexecuting it. For example, you might want to replace each instance of a particular wave name with another wave name.
If the history area has keyboard focus, usually indicated by an active selection in the history, the find bar searches the history area. If the command line has keyboard focus, the find bar searches the command line. To be sure that Find will search the area that you want, you can click in that area before starting the search.
Command Window Magnification
You can magnify the size of text in the command line and history area.
To magnify the command line text, right-click in the command line and select an item from the Magnification submenu. To make the new magnifcation your default magnification for new experiments, right-click again and choose Set as Default for Command Line from the same submenu.
To magnify the history area text, right-click in the history area and select an item from the Magnification submenu. To make the new magnifcation your default magnification for new experiments, right-click again and choose Set as Default for History Area from the same submenu.
Command Window Formats
You can change the text format used for the command line. For example, you might prefer a different color. To do this, click in the command line and then choose Set Text Format from the Command Buffer submenu of the Misc menu. To set the text format for the history area, click in the history area and then choose Set Text Format from the History Area submenu of the Misc menu. To do this, the history area must have some text in it.
You can set other properties, such as background color, by choosing Document Settings from the Command Buffer or History Area submenus. The Document Settings dialog also sets the header and footer used when printing the history.
When you change the text format or document settings, you are changing the current experiment only. You may want to capture the new format and settings as a preference for new experiments. To do this, choose Capture Prefs from the Command Buffer and History Area submenus.
Getting Help from the Command Line
When working with the command line, you might need help in formulating a command. There are shortcuts that allow you to insert a template, view help, or find the definition of a user function. The command window also supports Command Completion.
To insert a template, type the name of the operation or function, right-click, and choose Insert Template.
To view help or to view the definition of a user function, type the name of the operation or function, right-click, and choose Help for <name>.
Windows
This section describes Igor's windows in general terms, the Windows menu, and window recreation macros.
Detailed information about each type of window can be found in these sections:
| Window Type | Section |
|---|---|
| Command window | Command Window |
| Working with Commands | |
| Procedure windows | Procedure Windows |
| Help windows | Getting Help |
| Graphs | Graphs |
| Tables | Tables |
| Layouts | Page Layouts |
| Notebooks | Notebooks |
| Control panels | Controls and Control Panels |
| Gizmo windows | 3D Graphics |
| Camera windows | NewCamera |
Command Window
When Igor first starts, the command window appears at the bottom of the screen.
Commands are automatically entered and executed in the command window's command line when you use the mouse to "point-and-click" your way through dialogs. You may optionally type the commands directly and press Return or Enter. Igor preserves a history of executed commands in the history area.
For more about the command window, see Command Window, and Working with Commands.
There are some very handy shortcuts for dealing with commands. See Command Window Shortcuts for details.
The Rest of the Windows
There are also a number of additional windows which are initially hidden:
-
The main procedure window
-
The Igor Help Browser
-
Help window for files in "Igor Pro Folder/Igor Help Files" and "Igor Pro User Files/Igor Help Files"
You can create additional windows for graphs, tables, page layouts, notebooks, control panels, Gizmos (3D plots), and auxiliary procedure windows, as well as more help windows.
The Target Window
Igor commands and menus operate on the target window. The target window is the top graph, table, page layout, notebook, control panel, Gizmo or XOP target window. The term "target" comes from the fact that these windows can be the target of command line operations such as ModifyGraph, ModifyTable and so on. The command window, procedure windows, help windows and dialogs cannot be targets of command line operations and thus are not target windows.
The menu bar changes depending on the top window and the target window. For instance, if a graph is the target window the menu bar contains the Graph menu. However, you may type any command into the command line, including commands that do not apply to the target window. Igor will apply the command to the top window of the correct type.
Sometimes the top window isn't a target window, but it changes the menu bar. For example, if you activate a procedure window, the Procedure menu appears in the menu bar.
Window Names and Titles
Each graph, table, page layout, control panel, notebook, and Gizmo has a title and a name.
The title is what you see at the top of the window frame and in the Windows menu. Its purpose is to help you visually identify the window, and is usually descriptive of its contents or purpose.
The window name is not the same as the title. The purpose of the name is to allow you to refer to the window from a command, such as the DoWindow or AppendToGraph operations.
When you first create one of these windows, Igor gives it a name like Graph0, Table0, Layout0 or Panel0, and a title based on the name and window contents. You can change the window's title and name to something more descriptive using the Window Control dialog (Windows→Control submenu). Among other things, it renames and retitles the target window.
The Window Control dialog is also a good way to discover the name of the top window, since the window shows only the window title.
The command window, procedure windows, and help windows have only a title. The title is the name of the file in which they are stored. These windows do not have names because they cannot be affected by command line operations.
Allowable Window Names
A window name is used for commands and therefore must follow the standard rules for naming Igor objects:
-
The name must start with a letter.
-
Additional characters can be alphanumeric or the underscore character.
-
No other characters, including spaces, are allowed in standard Igor object names.
-
No more than 255 bytes are allowed.
-
The name must not conflict with other object names (Igor will tell you if it does).
Prior to Igor Pro 8.00, window names were limited to 31 bytes. If you use long window names, your experiments will require Igor Pro 8.00 or later.
For more information, see Object Names.
The Open File Submenu
The File menu contains the Open File submenu for opening an existing file as a notebook, Igor help window, or procedure window.
When you choose an item from the submenu, the Open File dialog appears for you to select a file.
The Windows Menu
You can use the Windows menu for making new windows, and for showing, arranging and closing (either hiding or "killing") windows. You can also execute "window recreation macros" that recreate windows that have been killed and "style macros" that modify an existing window's appearance.
Making a New Window
You can use the various items in the Windows menu and Windows→New submenu to create new windows. Most of these items invoke dialogs which produce commands that Igor executes to create the windows.
You can also create windows by typing these commands yourself directly in the command line. For example,
Display yData vs xData
creates a graph of the wave named yData on the Y axis, versus xData on the X axis.
You can create a new window by selecting the name of a window recreation macro from the Windows menu. See Window Macros Submenus.
You can also create a window using the File→Open File submenu.
Activating Windows
To activate a window, click it, or choose an item from Windows menu or its submenus.
The Recent Windows submenu shows windows recently activated. This information is saved when you save an experiment to disk and restored when you later reopen the experiment.
By default, just the window's title is displayed in the Windows menu. You can choose to display the title or the name for target windows using the Windows Menu Shows pop-up menu in the Miscellaneous section of the Miscellaneous Settings dialog.
Showing and Hiding Windows
All types of Igor windows can be hidden.
To hide a window, press Shift and choose Windows→Hide or use the keyboard shortcut Ctrl+Shift+W. You can also hide a window by pressing Shift and clicking the close button.
You can hide multiple windows at once using the Windows→Hide submenu. For example, to hide all graphs, choose Windows→Hide→All Graphs. If you press Shift while clicking the Windows menu, the sense of the menu items changes. For example, Hide→All Graphs changes to Hide→All Except Graphs.
The command window is not included in mass hides of any kind. If you want to hide it you must do so manually.
Similarly, you can show multiple windows at once using the Windows→Show submenu. For example, to show all graphs, choose Windows→Show→All Graphs. If you press Shift while clicking the Windows menu, the sense of the menu items changes. For example, Show→All Graphs changes to Show→All Except Graphs.
The Show All Except menu items do not show procedure windows and help files because there are so many of them that it would be counterproductive.
The Windows→Show→Recently Hidden Windows item shows windows recently hidden by a mass hide operation, such as Hide→All Graphs, or windows recently hidden manually (one-at-a-time using the close button or Ctrl+Shift+W). In the case of manually hidden windows, "recently hidden" means within the last 30 seconds.
XOP windows do participate in Hide All XOP Windows and Show All XOP Windows only if XOP programmers specifically support these features.
Closing a Window
You can close a window by either choosing the Windows→Close menu item or by clicking in the window's close button. Depending on the top window's type, this will either kill or hide the window, possibly after a dialog asking for confirmation.
Killing Versus Hiding
"Killing" a window means the window is removed from the experiment. The memory used by the window is released and available for other purposes. The window's title is removed from the Windows menu. Killing a window that represents a file on disk does not delete the file. You can also kill a window with a KillWindow command.
"Hiding" a window simply means the window is made invisible, but is still part of the experiment and uses the same amount of memory. It can be made visible again by choosing its title from the Windows menu.
The command window and the built-in procedure window can be hidden but not killed. All other built-in windows can be hidden or killed.
When you create a window from a procedure, you can control what happens when the user clicks the close button using the /K=<num> flag in the command that creates the window.
You can hide a window programmatically using the DoWindow/HIDE=1 operation.
Saving the Window Contents
Notebooks and procedure windows can be saved either in their own file, or in a packed experiment file with everything else. You can tell which is the case by choosing Notebook→Info or Procedure→Info. When you kill a notebook or a procedure window that contains unsaved information, Igor will ask if you want to save before killing the window.
Graph, table, control panel, page layout, and Gizmo windows are not saved as separate files, and are lost when you kill them unless you save a window recreation macro which you can execute to later recreate the window. Killing these windows and saving them as window recreation macros (stored in the built-in procedure window) frees up memory and reduces window clutter without losing any information. You can think of window recreation macros as "freeze-dried windows".
Close Window Dialogs
When you close a graph, table, layout, control panel, or Gizmo window, Igor presents a Close dialog.
If you click the Save button Igor creates a window recreation macro in the main procedure window. It sets the macro's subtype to Graph, Table, Layout, Panel, or Gizmo, so the name of the macro appears in the appropriate Macros submenu of the Windows menu. You can recreate the window using this menu.
If you don't plan to use the window again, you should click the No Save button and no window recreation macro will be created.
If you have previously created a recreation macro for the window then the dialog will have a Replace button instead of a Save button. Clicking Replace replaces the old window recreation macro with a new one. If you know that you won't need to recreate the window, you can delete the macro (see Saving a Window as a Recreation Macro).
When you close a notebook or procedure window (other than the built-in procedure window), Igor presents a "hide or kill dialog".
To hide a window, press Shift while clicking the close button.
To kill a graph, table, layout, control panel, or Gizmo window without going through the Close dialog, press Alt while clicking the close button.
If you create a window programmatically using the Display, Edit, NewLayout, NewPanel, NewNotebook, or NewGizmo operation, you can modify the behavior of the close button using the /K flag.
Saving a Window as a Recreation Macro
When you close a window that can be saved as a recreation macro, Igor offers to create one by displaying the Close Window dialog. Igor stores the window recreation macro in the main procedure window of the current experiment. The macro uses much less memory than the window, and reduces window clutter. You can invoke the window recreation macro later to recreate the window. You can also create or update a window recreation macro using the Window Control dialog.
The window recreation macro contains all the necessary commands to reconstruct the window provided the underlying data is still present. For instance, a graph recreation macro contains commands to append waves to the graph, but does not contain any wave data. Similarly, a page layout recreation macro does not contain graphs or tables or the commands to create them. The macros refer to waves, graphs and tables in the current experiment by name.
The window recreation macro is evaluated in the context of the root data folder. This detail is of consequence only to programmers. See Data Folders and Commands for more information.
You can create or replace a window macro without killing the window using the Window Control Dialog. The most common reason to replace a window recreation macro is to keep the macro consistent with the window that it creates.
When Igor displays the Close Window dialog, the proposed name of the window recreation macro is the same as the name of the window. You can save the window recreation macro under a different name, if you want, by entering the new name in the dialog. If you do this, Igor creates a new macro and leaves the original macro intact. You can run the new macro to create a new version of the window or you can run the old macro to recreate the old version. This way you can save several versions of a window, while displaying only the most recent one.
Window recreation macros stay in an experiment's procedure window indefinitely. If you know that you won't need to recreate a window for which a window recreation macro exists, you can delete the macro.
To locate a window recreation macro quickly:
- Activate any procedure window, press Alt, and choose the window recreation macro name from the appropriate macro submenu in the Windows menu.
To delete the macro, if you're sure you won't want it again, simply select all the text from the Macro declaration line to the End line. Press Delete to remove the selected text.
See Saving and Recreating Graphs for details specific to graphs.
Window Macros Submenus
The Windows menu has submenus containing graph, table, page layout, control panel, and Gizmo recreation macros. These menus also include graph, table, and page layout style macros.
Window recreation macros are created by the Close Window and Window Control dialogs, and by the DoWindow/R command. Style macros are created by the Window Control dialog and the DoWindow/R/S command.
Igor places macros into the appropriate macro submenu by examining the macro's subtype. The subtypes are Graph, Table, Layout, Panel, Gizmo, GraphStyle, TableStyle and LayoutStyle. See Procedure Subtypes for details.
When you choose the name of a recreation macro from a macro submenu, the macro runs and recreates the window. Choosing a style macro runs the macro which changes the target window's appearance (its "style").
However, if a procedure window is the top window and you press Alt and then choose the name of any macro, Igor displays that macro but does not execute it.
The Name of a Recreated Window
When you run a window recreation macro, Igor recreates the window with the same name as the macro that created it unless there is already a window by that name. In this case, Igor adds an underscore followed by a digit (e.g. _1) to the name of the newly created window to distinguish it from the preexisting window.
Changing a Window's Style From a Macro
When you run a style macro by invoking it from the Windows menu, from the command line or from another macro, Igor applies the commands in the macro to the top window. Usually these commands change the appearance of the window. For example, a graph style macro may change the color of graph traces or the axis tick marks.
Style macros are used most effectively with graph windows. For more information, see Saving and Recreating Graphs and Graph Style Macros.
The Window Control Dialog
Choosing Control→Window Control displays the Window Control dialog which you can use to change the top window's title and name, and create or update its recreation and style macros. You can access this dialog quickly by pressing Ctrl+Y.
You can also change the window's name. The window name is used to address the window from command line operations such as MoveWindow and also appears in the macro submenus of the Windows menu.
For more about names and titles, see Window Names and Titles. Also see Saving a Window as a Recreation Macro for a discussion of window recreation macros, and see Graph Style Macros for details on style macros.
The Window Browser
The Window Browser allows you to find and manage windows of interest. Choose Windows→Window Browser to activate it.
The window list on the right side lists windows that meet the current filtering criteria. You can filter windows by name, by type, by visibility (visible or hidden), and based on whether they display a specific wave. Clicking the funnel icon at the bottom of the list toggles the display of advanced filtering controls. Clicking the gear icon displays the options menu in which you can set sorting and display options.
If a single window is selected in the window list, the controls on the left display information about the window. The buttons at the top of the Selection area control the types of information that are displayed. You can choose to display the following types of information:
-
Window Information
Includes the window name, window title, and window note. See Window Names and Titles for a discussion of the distinction between names and titles.
-
Waves in Window
Displays a list of waves used by the window. Right-click a wave icon to edit the wave in a table, view it in the Data Browser, or set the current data folder to the wave's data folder. You can also toggle display of full paths by right clicking anywhere in the list.
You can select one or more waves in the list and drag them into an existing graph or table window to append them to the target window. See Appending Traces by Drag and Drop for details.
-
Layout Objects
Displays information about the pages in the selected page layout window and the objects on each page.
If multiple windows are selected, the Window Information control displays a list of window names.
The buttons above the window list allow you to show, hide, close the selected windows and to bring them to the front or send them to the back.
You can append selected graph, table, and Gizmo windows to a page layout by dragging them from the window list into a layout or by right clicking in the window list and choosing the appropriate item.
You can add menu items to the contextual menu in the window list. See WindowBrowserWindowsPopup Menu for details.
Arranging Windows
You can tile or stack windows by choosing the appropriate items from the Control submenu in the Windows menu.
You can customize the behavior of the Tile and Stack items using the Tile or Stack Windows dialog.
You can also move windows around using the MoveWindow, StackWindows, and TileWindows commands.
The Tile or Stack Windows Dialog
The Tile or Stack Windows dialog is useful for tiling a few windows or even for setting the size and position of a single window.
Select individual windows from the Windows to Arrange list, and entire classes of windows with the checkboxes.
If you want subsequent selections of the Tile (or Stack) menu item to stack the same types of windows with the same rows, columns, grout, tiling area, etc., check the "Capture as pref" checkbox. Windows selected in the Windows to Arrange menu aren't remembered by the preferences; only the window type checkboxes are remembered. There are separate settings and preferences for Stack and for Tile.
Although the TileWindows and StackWindows operations can tile and stack panels, panels don't show up here because they don't resize very well.
The Window Tiling Area subdialog specifies the area where tiling and stacking take place.
You can specify the tiling area in one of four ways:
-
By entering screen positions in units of points
-
By dragging the pictorial representation of the tiling area
-
By clicking the "Use default area" button to use the default tiling area
-
By positioning any non-dialog window before you enter the dialog, and clicking the "Use top window" button
Window Position and Size Management
There are four items in the Control submenu of the Windows menu that help you manage the position and size of windows.
Move to Preferred Position
Moves the active window to the position and size determined by preferences. For each type of window, you can set the preferred position and size using the Capture Prefs dialog (e.g., Capture Graph Prefs for graphs).
Move to Full Size Position
Moves and sizes the active window to display as much of the content as practical. The size is limited to the size of the frame window.
Retrieve Window
Moves the active window and sizes it if necessary so that all of the window is visible.
Retrieve All Windows
Moves all windows and sizes them if necessary so that all of each window is within the frame. This is often useful when you open an experiment that was created on a system with a larger screen or Windows frame than yours.
Send to Back - Bring to Front
The Send to Back item in the Windows menu sends the top window to the bottom of the desktop, behind all other windows. This function can also be accessed by pressing Ctrl+E. After sending a window behind, you can bring it to the front by choosing Bring to Front or by pressing Ctrl+Shift+E. You can also press these keys repeatedly to cycle through all windows.
You can also send a window to the back with the DoWindow/B command and bring it to the front with the DoWindow/F command.
Text Windows
Igor Pro displays text in procedure, notebook, and Igor help windows as well as in the command and history areas of the command window. This section discusses behavior common to all of these windows.
Executing Commands
You can execute commands selected in a notebook, procedure or help window by pressing Control-Enter or Control-Return. You can also execute selected commands by right-clicking and choosing Execute Selection.
For more on this, see Notebooks as Worksheets.
Text Window Navigation
The term "keyboard navigation" refers to selection and scrolling actions that Igor performs in response to the arrow keys and to the Home, End, Page Up, and Page Down keys.
| No Modifier | Ctrl | |||
| Left Arrow | Move selection left one character | Move selection left one word | ||
| Right Arrow | Move selection right one character | Move selection right one word | ||
| Up Arrow | Move selection up one line | Move selection up one paragraph | ||
| Down Arrow | Move selection down one line | Move selection down one paragraph | ||
| Home | Move selection to start of line | Move selection to start of document | ||
| End | Move selection to end of line | Move selection to end of document | ||
| Page Up | Scroll up 1 screen | Scroll up 1 screen | ||
| Page Down | Scroll down 1 screen | Scroll down 1 screen | ||
Text Window Go Back and Go Forward
Certain actions add entries to a go-back stack that Igor maintains in memory. These actions include opening a text window, doing a find, clicking a help link, right-clicking and choosing the Help For and Go To menu items, and using the navigation bar.
You can return to locations in text windows that you recently visited using the Go Back and Go Forward buttons. These appear in the navigation bar of procedure and help windows and in the status area of notebook windows. The Go Back button looks like a "less-than" symbol and the Go Forward button looks like a "greater-than" symbol. You can also use the Edit menu Go Back and Go Forward items or their keyboard equivalents:
| Go Back | Alt+Left-Arrow | |
| Go Forward | Alt+Right-Arrow | |
If your mouse has Go Back and Go Forward buttons, you can use them also.
Between the Go Back and Go Forward buttons is a button which when clicked displays the Go Back pop-up menu. You can return to a specific recently-visited location by choosing an item from a submenu in the Go Back pop-up menu.
Igor can keep the go back locations for all text windows in one stack or it can keep separate stacks for procedure windows, notebook windows and help windows. You control this using the "Separate stacks for procedure, notebook, help windows" menu item in the Go Back pop-up menu. When that item is checked, Igor maintains separate stacks. When it is unchecked, Igor maintains one stack for all three types of windows. Which you choose is a matter of taste. The advantage of keeping multiple stacks is that it most of the time you are interested in windows of the same type. The advantage of keeping just one stack is that it allows you to go back to a procedure file after right-clicking for help for an Igor operation or function.
Igor keeps a maximum of 25 locations in each stack and discards older locations when necessary.
Finding Text In The Active Window
You find text in the active window by choosing Edit→Find Text or by pressing Ctrl+F. This displays the Find bar. The Find bar will automatically populate with the text currently under the cursor.
Find and Replace
You can find and replace text by choosing Edit→Replace Text or by pressing Ctrl-R. This displays the Find and Replace bar.
Here is another method for finding and replacing text:
-
Move the selection to the top of the active window.
-
Use Edit→Find to find the first instance of the target string.
-
Manually change the first instance, then copy the new text to the Clipboard.
-
Press Ctrl-G to find the next occurrence.
-
Press Ctrl-V to paste.
-
Repeat steps 4 and 5 until done.
Finding Text In Multiple Windows
You can find text in multiple windows by choosing Edit→Find in Multiple Windows. This displays the Find in Multiple Windows window which allows you to search all help windows, all procedure windows, and all notebooks.
You can also use the Igor Help Browser to search in multiple files, including files that are not open in your current experiment. See The Igor Help Browser for details.
Text Magnification
You can magnify the text in any window to make it bigger or smaller to suit your taste.
In help windows, procedure windows, plain text notebooks, and formatted text notebooks, you can use the magnifying glass icon in the bottom-left corner of the window. You can also use the Magnification submenu in the contextual menu for the window. To display the contextual menu, Right-click in the body of the window.
You can also set the magnification for the command line, history area, and the debugger. These areas do not display the magnifying glass icon so you must use the contextual menu.
You may notice some anomalies when you use text magnification. For example, in a formatted text notebook, text may wrap at a different point in the paragraph and may change in relation to tab stops. This happens because fonts are not available in fractional sizes and because the actual width of text does not scale linearly with font size.
You can set the default magnification for each type of text area by choosing a magnification from the Magnification popup menu and then choosing Set As Default from the same popup menu. Any text areas whose magnification is set to Default will use the newly specified default magnification. For example, if you want text in all help files to appear larger, open any help file, choose a larger magnification, 125% for example, and then choose Set As Default For Help Files. All help files whose current magnification is set to Default will be updated to use the new default.
The default magnification for the command line and history area controls the magnification that will be used the next time you launch Igor Pro.
The magnification setting is saved in formatted notebooks and help files only. If you change the magnification setting for one of these files and then save and close the file, the magnification setting will be restored when you reopen the file. For all other types of text areas, including procedure windows and plain text notebooks, the magnification setting is not stored in the file. If you close and reopen such a file, it will reopen using the default magnification for that type of text area.
The Find Bar
The find bar is available in help, procedure and notebook windows, and other places where you might need to search for text. To display it, choose Edit→Find or press Ctrl+F. The Find Bar appears at the top of the host window and will automatically populate with the current text under the cursor:
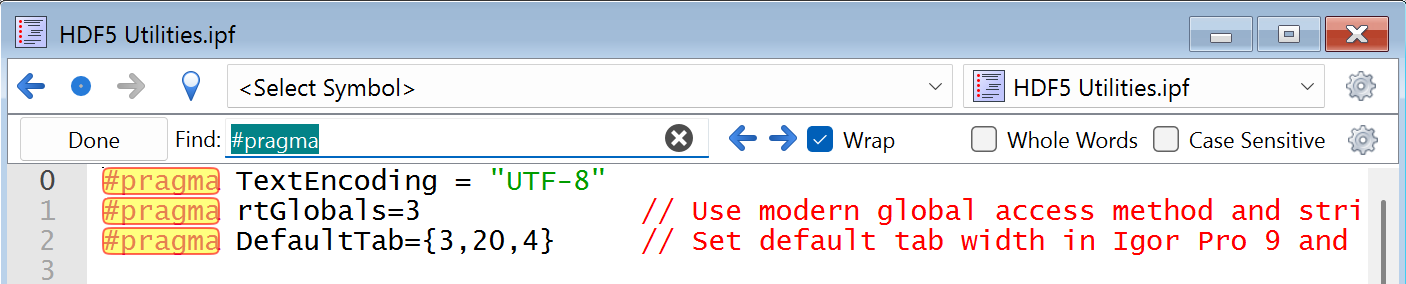
Edit the text in the Find edit box if necessary, and press the right arrow icon to find the next occurrence of the text. Press the left arrow icon to find the preceding occurrence.
You can also find the next occurrence by pressing Ctrl+G. You can also find the preceding occurrence by pressing Ctrl+Shift+G.
By default, when you use these keyboard equivalents, if the find bar is not showing, Igor displays it. If you prefer that Igor not display the Find bar when you use these equivalents, click the gear icon and check the Show Find Bar on Edit→Find Only checkbox.
You can set the size of the Find bar using the gear icon.
To hide the Find bar, click the Done button or press the Esc key.
Search and Replace
If the window you are working on contains editable text, you can choose Edit→Replace or press Ctrl+R to display the replace text portion of the Find bar:
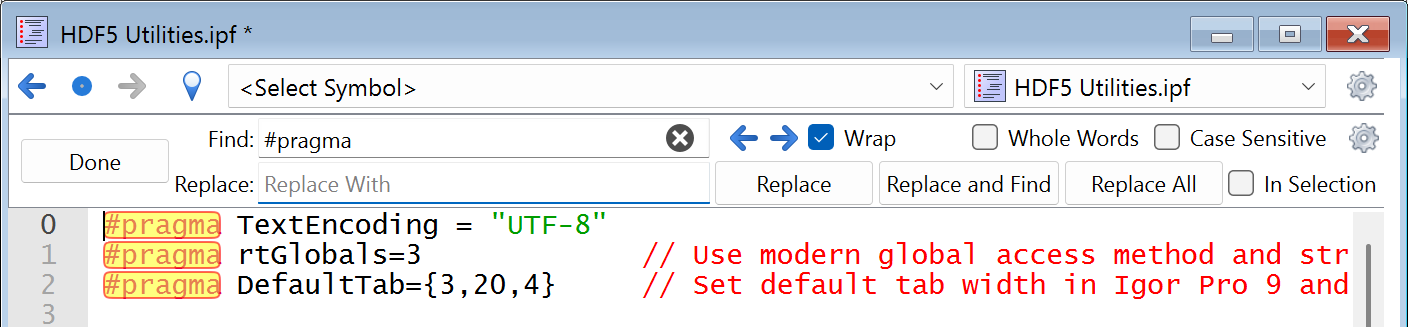
While replacing text is undoable, the potential for unintended and wide-ranging consequences is such that we recommend saving the file before doing a mass replace using Replace All so you can revert-to-saved if necessary.
The Find Text in Multiple Windows Dialog
You can perform a Find on multiple help, procedure and notebook windows at one time by choosing Edit→Find in Multiple Windows or by pressing Ctrl+Shift+F. This invokes the Find Text in Multiple Windows dialog:
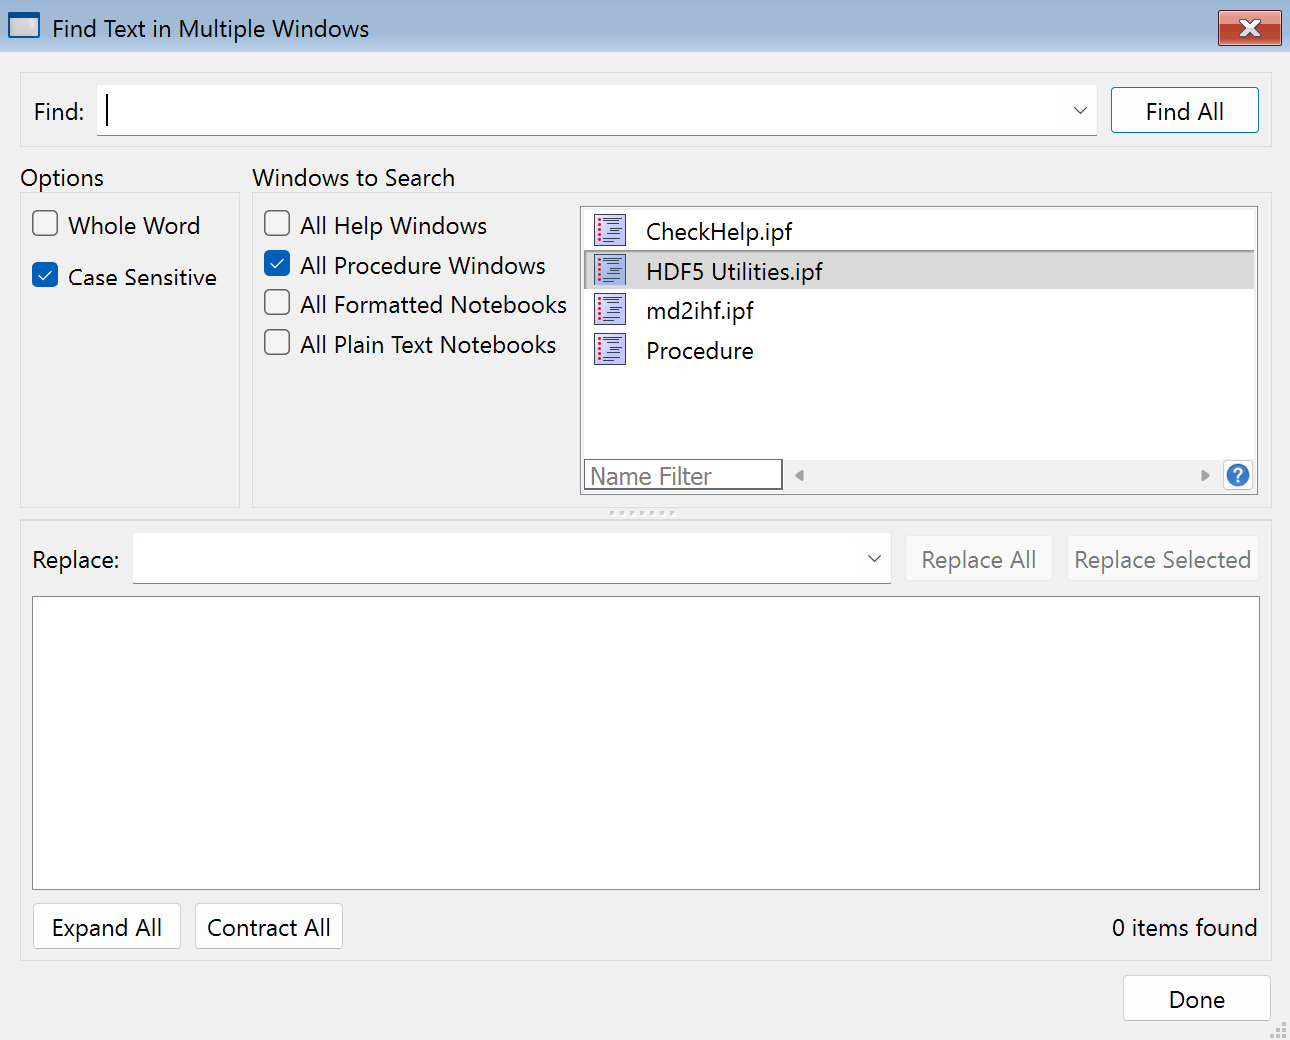
Enter text to be found in the Find box. Use the checkboxes to select the types of windows to search. To narrow the list of files to search, you can enter a filter string in the Filter box at the bottom of the window list. The list then shows only list items whose names contain the filter string.
When you click the Find All button, Igor commences searching all the text in the listed windows. During the search, Igor displays a small progress dialog showing how far through the window list the search has gotten. You can stop the search by clicking the Cancel button.
For each window in which the text is found, an entry appears in the panel at the bottom of the dialog. A number in parentheses indicates how many instances of the search text were found in that window.
Each of these window entries can be opened using the disclosure control at the left end of the item. Then a snippet of text around the search string is shown, with the search string highlighted. The number at the left end of the found text snippet is the line number within the searched window.
Double-clicking a text snippet item takes you to the found text in the window containing the text.
Search and Replace in Multiple Windows
After a search is finished, you can use the found text items to replace all instances of the text that were found in editable windows. Enter the replacement text in the Replace edit box.
Clicking the Replace All button replaces all the found instances with the replacement text.
Replace All in multiple windows cannot be undone. Use it with great care.
If you make a mistake, choose File→Revert Experiment, File→Revert Notebook, or File→Procedure and make sure you have reverted all affected windows. This is the only way to recover.
You can limit the replacement by selecting a subset of the found text items and clicking the Replace Selected button. Click a found text item to select it. Shift-click another item to select all items between that item and the one previously clicked. To select non-contiguous items, Ctrl-click. You can also click and drag over multiple items. It is still a good idea to save before replacing.
Home Versus Shared Text Files
A text file that is stored in a packed experiment file, or in the experiment folder for an unpacked experiment, is a "home" text file. Otherwise it is a "shared" text file.
Home text files are typically intended for use by their owning experiment only. Shared text files are typically intended for use by by multiple experiments.
When you create a text file in a packed experiment, it saved by default in the packed experiment file and is a home text file. It becomes a shared text file only if you explicitly save it to a standalone file.
When you create a text file in an unpacked experiment, it saved by default in the experiment folder and is a home text file. It becomes a shared text file only if you explicitly save it to a standalone file outside of its experiment folder.
When you save a packed experiment as unpacked, home text files are stored in the experiment folder.
When you save an unpacked experiment as packed, home text files are saved in the packed experiment file.
You can use the File Information dialog, which you access by choosing Procedure→Info or Notebook→Info, to determine if a text file is shared. For shared text files, the dialog says "This file is stored separate from the experiment file" for packed and unpacked experiments. For home text, the dialog says "This file is stored in packed form in the experiment file" for packed experiments and "This file is in the experiment folder" for unpacked experiments.
You can convert a shared text file to a home text file by adopting it. See Adopting Notebook and Procedure Files for details.
Using an External Text Editor
Igor supports the use of external editors for editing Igor procedure files and plain text notebooks. This allows you to use your favorite text editor rather than Igor for editing plain text files if you prefer. This is mostly intended for use by advanced programmers who are accustomed to using external editors in other programming environments.
Prior to Igor 7, Igor kept plain text files open as long as the corresponding procedure or notebook window was open in Igor. This interfered with the use of external editors.
Now a procedure or plain text notebook window opens its file just long enough to read the text into memory and then close it. If you modify the text in Igor and do a save, Igor reopens the file, writes the modified text to it, and closes the file.
If you modify the file using an external text editor instead of Igor, Igor notices the change, reopens the file, reloads the modified text into memory, and closes the file.
Supporting external editors creates issues that Igor must deal with:
-
If you modify the file in an external editor, the text is now out of sync with the text in Igor's window. In this case, Igor notices that the file has been changed and either reloads the text into memory or notifies you of the change, depending on your external editor miscellaneous settings.
-
If you save modifications to the file in an external editor and also edit the document in Igor, the text in Igor is in conflict with the external file. In this case Igor informs you of the conflict and lets you choose which version to keep.
-
If you move the disk file to new location, delete the file or rename it, Igor's information about the file is no longer valid. In this case Igor notices that the file has disappeared and gives you options for dealing with it.
The following sections explain how Igor deals with these issues in more detail.
A Plain Text File Has Been Modified Externally
Once per second Igor checks every procedure and plain text notebook window to see if its file has been modified externally. If so then it either automatically reloads the file into memory or notifies you about the external modification and allows you to reload the file at your leisure. The factory default behavior is to automatically reload externally modified files and to check for modified files only when Igor is the active application.
You can control Igor's behavior using the Miscellaneous Settings dialog. Choose Misc→Miscellaneous Settings, click Text Editing in the lefthand pane, and click the External Editor tab.
If you select Ask Before Reloading, two things happen when the file is modified externally:
-
Igor displays a Reload button in the status area at the bottom of the document window:
The Reload button will be visible only if the window is visible.
-
Igor displays a small floating notification window:
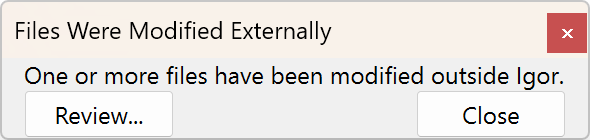
Clicking the Reload button causes Igor to reload the file's text.
Clicking the Review button in the notification window displays a dialog in which you can review all the files that are currently modified externally:
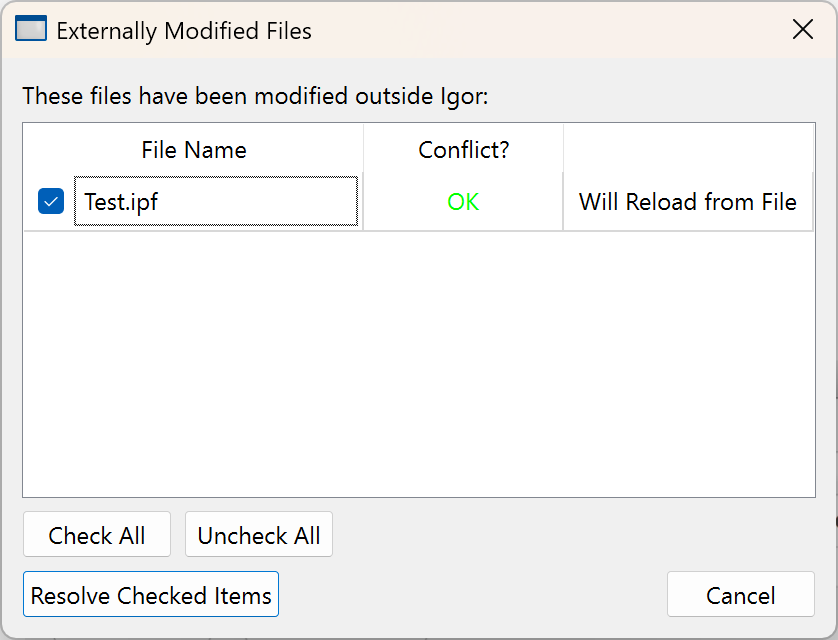
Click Resolve Checked Items to reload the file into memory.
A Plain Text File Has Been Modified Externally and In Igor
When a file has been modified both in an external editor and by editing in an Igor window, we say it is "in conflict". Igor never automatically reloads a file that is in conflict.
When a file is in conflict, Igor displays a Resolve Conflict button in the status area in the Igor document window. Clicking that button brings up a dialog giving four choices to deal with the conflict:
-
Reload External Changes
Loads the contents of the file into memory, discarding changes made in Igor.
-
Adopt Document
Severs the tie between the document and the file, keeping the Igor changes and discarding the changes to the file. To learn more about adopting a file, see Adopting Notebook and Procedure Files.
-
Close the Window
Closes the procedure or notebook window in Igor, discarding changes made in Igor.
-
Save Igor Changes
Writes changes made in Igor to the file. This resolves the conflict in Igor and creates a conflict in the external editor. Different external editors have different approaches to such conflicts.
Files that are in conflict also cause the notification window to appear. Clicking the Review button in the notification window displays a dialog which gives you the same options for resolving the conflict.
Editing a File with External Modifications
If a file has been modifed externally and not re-loaded in Igor, typing in the Igor window creates a conflict even if there wasn't one previously. This may be undesirable, so when Igor detects this situation, it displays a dialog, similar to the Resolve Conflict dialog, asking you what should be done. The choices are:
-
Allow Typing
This choice tells Igor that you want to be allowed to modify the document in Igor. You are putting off resolving the conflict for later. You will have to decide at some point to resolve the conflict in one of the ways described above.
-
Reload External Changes
The external modifications will be loaded into the Igor window. Modifications in Igor's copy are discarded.
-
Adopt Document
Severs the tie between the document and the file. To learn more about adopting a file, see Adopting Notebook and Procedure Files.
You also have the option of clicking the Cancel button. In that case, the situation is not resolved, and any further attempt to type in the window will cause the dialog to be displayed again.
A Plain Text File Is Missing
If the file associated with an Igor plain text document window is moved, renamed or deleted, Igor will note that the file is missing. In this case, Igor displays a File Missing button in the status area in the Igor document window. Clicking that button displays a File Missing dialog giving four choices to deal with the conflict:
-
Adopt Document
Severs the tie between the document and the file. To learn more about adopting a file, see Adopting Notebook and Procedure Files.
-
Close the Window
Closes the procedure or notebook window in Igor.
-
Find Missing File
Displays an Open File dialog allowing you to locate the moved or renamed file.
-
Save As
Displays a Save As dialog allowing you to save the document to a new file.
Missing or Modified Text Files Dialog
A plain text file (procedure file or plain text notebook) may be missing because you deleted it, renamed it, or moved it, or it was deleted, renamed or moved by a program.
A plain text file may have been modified by another program if you edited it in an external editor, for example.
If you try to do a save while a plain text file is missing or modified, Igor displays the Missing or Modified File dialog which asks if you want to cancel the save or continue it. Usually you should cancel the save and use the Files Were Modified Externally window, which appears in the top/right corner of the screen, to review and address the situation.
If you elect to continue the save, it is likely that an error will occur.
To prevent an unattended procedure from hanging, the check for missing or modified files is not done if the save is invoked from a procedure.
Object Names
Every Igor object has a name which you give to the object when you create it or which Igor automatically assigns. You use an object's name to refer to it in dialogs, from commands and from Igor procedures. The named objects are:
| Data folders | Waves | Variables (numeric and string) | ||
| Windows | Axes | Annotations | ||
| Controls | Rulers | Special characters (in notebooks) | ||
| Symbolic paths | Pictures | |||
| FIFOs | FIFO channels | XOPs | ||
In Igor Pro, the rules for naming waves and data folders are not as strict as the rules for naming all other objects, including string and numeric variables, which are required to have standard names. These sections describe the standard and liberal naming rules.
Standard Object Names
Here are the rules for standard legal object names:
-
May be 1 to 255 bytes in length.
Prior to Igor Pro 8.00, names were limited to 31 bytes. See Long Object Names for a discussion of issues related to names longer than 31 bytes.
-
Must start with an alphabetic character (A-Z or a-z).
-
May include ASCII alphabetic or numeric characters or the underscore character.
-
Must not conflict with other names (of operations, functions, etc.).
All names in Igor are case insensitive. "wave0" and "WAVE0" refer to the same wave.
Characters other than letters and numbers, including spaces and periods, are not allowed. We put this restriction on names so that Igor can identify them unambiguously in commands, including waveform arithmetic expressions.
Liberal Object Names
Liberal name rules are allowed for waves and data folders only. If you are willing to expend extra effort when you use liberal names in commands and waveform arithmetic expressions, you can use wave and data folder names containing almost any character. If you create liberal names then you will need to enclose the names in single (not curly) quotes whenever they are used in commands or waveform arithmetic expressions. This is necessary so that Igor can tell where the name ends. Liberal names have the same rules as standard names except you may use any character except control characters and the following:
" ' : ;
Here is an example of the creation and use of liberal names:
Make 'wave 0';	// 'wave 0' is a liberal name
'wave 0' = p
Display 'wave 0'
Providing for liberal names requires extra effort and testing on the part of Igor programmers (see Programming with Liberal Names). You may occasionally experience problems using liberal names with user-defined procedures.
Namespaces
When you refer to an object by name, in a user function for example, Igor must be able to unambiguously determine which object you are referencing. In general, an object must have a unique name so that Igor can tell which object you are referring to. Sometimes Igor can tell from context what the object type is, in which case the name can be the same as objects of other types. Objects whose names can be the same are said to be in different namespaces.
Data folders are in their own name space. Therefore the name of a data folder can be the same as the name of any other object, except for another data folder at the same level of the hierarchy.
Waves and variables (numeric and string) are in the same name space and so Igor will not let you create a wave and a variable in a single data folder with the same name.
An annotation is local to the window containing it. Its name must be unique only among annotations in the same window. The same applies for controls and rulers. Data folders, waves, variables, windows, symbolic paths and pictures are global objects, not associated with a particular window.
The names of global objects, except for data folders, are required to be distinct from the names of macros, functions (built-in, external or user-defined) and operations (built-in or external).
Here is a summary of the four global namespaces:
| Name Space | Requirements |
|---|---|
| Data folders | Names must be distinct from other data folders at the same level of the hierarchy. |
| Waves, variables, windows | Names must be distinct from other waves, variables (numeric and string), windows. |
| Pictures | Names must be distinct from other pictures. |
| Symbolic paths | Names must be distinct from other symbolic paths. |
Object Name Functions
These functions are useful for programmatically generating object names: CreateDataObjectName, CheckName, CleanupName, and UniqueName.
Long Object Names
Prior to Igor Pro 8.00, names were limited to 31 bytes. Now names can be up to 255 bytes in length.
The following types of objects support long names in Igor Pro 8.00 or later:
-
Data folders
-
Waves
-
Variables
-
Windows
-
Axes
-
Annotations
-
Controls
-
Special characters in formatted notebooks
-
Symbolic paths
-
XOPs, external operations, external functions
In addition, in Igor 8, wave dimension labels and procedure names can be up to 255 bytes in length.
The following types of objects are still limited to names of 31 bytes or less:
-
Rulers in formatted notebooks
-
Global picture names
-
Page setup names
-
FIFOs
-
FIFO channels
If you do not create objects with names longer than 31 bytes, wave and experiment files that you create will be compatible with earlier versions of Igor. However, if you do create objects with long names, older versions of Igor will report errors when opening wave and experiment files containing long names.
If you use long names, your wave and experiment files will require Igor Pro 8.00 or later and will return errors when opened by earlier versions of Igor.
You can choose File→Experiment Info to determine if the current experiment uses long object names or has waves with long dimension labels. You can also use the ExperimentInfo operation programmatically. These check only wave, variable, data folder, target window, and symbolic path names, and wave dimension labels. They do not check axis, annotation, control, procedure or other names.
If you attempt to save an experiment file that uses long wave, variable, data folder, target window or symbolic path names, or that has waves with long dimension labels, Igor displays a warning dialog telling you that the experiment will require Igor Pro 8.00 or later. The warning dialog is presented only when you save an experiment interactively, not if you save it programmatically using SaveExperiment. You can suppress the dialog by clicking the "Do not show this message again" checkbox.
Global picture names (see The Picture Gallery) are limited to 31 bytes but names of Proc Pictures are not.
Page setup names are used behind the scenes to save a page setup record for each page layout window. The experiment file format limits the name of a page setup record to 31 bytes. If a layout window name exceeds 31 bytes, when you save the experiment, the page setup record for that window is not written to the experiment file. When you reopen the experiment, the layout window receives a default page setup. Since long page layout names are rare and page setups affect printing but not the dimensions of the page (see Page Layout Page Sizes), this issue will have little impact.
An XOP name is the name of the XOP file without the ".xop" extension. In Igor 8, XOP names can be up to 255 bytes. However, if an XOP name exceeds 31 bytes, Igor does not send the SAVESETTINGS message to the XOP. Most XOP names are shorter than 31 bytes and most XOPs do not save experiment settings, so this is not likely to cause a problem.
Long Object Names With Old Igor Versions
If you use long names, your wave and experiment files will require Igor Pro 8.00 or later and will return errors when opened by earlier versions of Igor.
You can choose File→Experiment Info to determine if the current experiment uses long object names or has waves with long dimension labels. You can also use the ExperimentInfo operation programmatically.
If you open an experiment file that uses long wave, variable, data folder, window or symbolic path names while running Igor Pro 7.xx, where xx is 01 or later, the old Igor version displays an error dialog explaining that the experiment requires Igor Pro 8.00 or later. This mechanism for informing you that a later version of Igor is required works for long wave, variable, data folder, window and symbolic path names only. It does not work for long axis, annotation, control, special character, procedure or XOP names. For those object types, you will get an error later, when the old version of Igor first encounters the long name.
If you open an experiment file that uses long names of any kind in Igor Pro 7.00 or before, you will get an error such as "name too long" or "incompatible Igor binary version" or some other error.
In Igor Pro 6.38 and Igor Pro 7.01, a bug was fixed that cause Igor to crash if you load a file containing long wave names and the file contains wave reference waves or data folder reference waves. You are very unlikely to have such files.
In Igor Pro 6.38 and Igor Pro 7.01, a bug was fixed that cause Igor to crash if you load a formatted notebook file containing a long special action name and you attempt to modify that special action.
Programming With Long Object Names
If your code must run with Igor 7 or before, the best strategy is to avoid using long object names. Attempting to conditionally support long object names will make your code complex and fragile. A better approach is to freeze your Igor 7 code and add new features to an Igor 8 or later branch.
If you must use conditional programming, you can test whether the running version of Igor supports long object names like this:
Variable maxObjectNameLength = 31
if (IgorVersion() >= 8.00)
	maxObjectNameLength = 255
endif
The names of functions, constants, variables and other programming entities can be up to 255 bytes, but if you use names longer than 31 bytes, your procedures will require Igor Pro 8.00 or later.
Package names can be up to 255 bytes, but if you use a name longer than 31 bytes, your package will require Igor Pro 8.00 or later.
Long Object Names and XOPs
For most of recorded history, XOPs supported a maximum object name length of 31. Igor now supports long object names, but pre-existing XOPs continue to work as before. However, if you attempt to use a long object name with a pre-existing XOP, you will get an error. For example:
NewPath SymbolicPathWithANameThatExceeds31Bytes, <path>
OldFileLoader /P=SymbolicPathWithANameThatExceeds31Bytes <path>
This returns an error because the hypothetical OldFileLoader XOP has not been updated to work with long object names. It continues to work with short object names.
If a pre-existing XOP attempts to retrieve the name of a wave or data folder which has a long name, Igor returns an error to the XOP. If the XOP is properly written, it will generate a "name too long" error and Igor will report the error.
As of XOP Toolkit 8, the XOP Toolkit supports creating XOPs that work with long object names. Supporting long names requires that the XOP programmer modify and recompile the XOP. XOPs compiled to support long object names will require Igor Pro 8 or later. Consequently, many XOPs will not support them.
As of this writing, if the name of the XOP itself, without the ".xop" extension, exceeds 31 bytes in length, the XOP will not be able to save settings using the SAVESETTINGS message or load settings using the LOADSETTINGS message. Consequently it is best to avoid creating an XOP whose name exceeds 31 bytes.
Renaming Objects
You can use Misc→Rename Objects or Data→Rename to rename waves, variables, strings, symbolic paths, and pictures. Both of these invoke the Rename Objects dialog.
Graphs, tables, page layouts, notebooks, control panels, Gizmo windows, and XOP target windows are renamed using the DoWindow operation which you can build using the Window Control dialog (see The Window Control Dialog).
You can use The Data Browser to rename data folders, waves and variables.
Object Name Conflicts
In general, Igor does not allow two objects in the same namespace to have the same name. (To see a list of Igor namespaces, see Namespaces.) The rest of this section discusses some exceptions to this rule and related issues. Most users will not need to know this material.
Object Name Conflicts That Igor Allows
Igor allows you to create name conflicts between waves, variables, and data folders with certain exceptions listed below. For example:
Function DemoAllowedNameConflicts() // Execute this in a new experiment
   Make/O root:test                 // to demonstrate that Igor allows
   Variable/G root:test             // name conflicts in some cases
   NewDataFolder/O root:test
End
This shows that Igor allows you to create a wave and a global variable with the same name and to create a data folder with the same name as a wave or a global variable.
Allowing a wave and a global variable to have the same name is a historical accident that should not have been allowed because waves and variables are in the same namespace, called the "main namespace". This may be disallowed in a future version of Igor.
Allowing a data folder to have the same name as a wave or variable is intended because data folders are in their own namespace.
The following exceptions specify the name conflicts in the main namespace that are not allowed:
-
It is an error to create a variable with the same name as an existing wave from a macro, proc, or from the command line (but it is not an error from a user-defined function as shown above).
-
It is an error to create a wave with the same name as an existing variable from any context (function, macro, proc, or from the command line).
The table below expresses those rules. The left column shows the type of object created first and the top row shows the type of object created second.
F means that Igor returns an error if you attempt to create the objects in a function.
M means that Igor returns an error if you attempt to create the objects in a macro, proc, or from the command line.
--- means Igor returns no error from a function, macro, proc, or from the command line.
| Wave | Variable | Data Folder | ||||||||
| Wave | N/A | M | --- | |||||||
| Variable | F, M | N/A | --- | |||||||
| Data Folder | --- | --- | N/A | |||||||
Object Name Conflicts and HDF5 Files
When saving an experiment in packed or unpacked format, these name conflicts do not cause a problem. If you save and reload the experiment, you get back to where you started.
However, name conflicts do cause problems with HDF5 files, saved via Save Experiment or via the HDF5SaveGroup operation, because HDF5 does not allow a group and a dataset to have the same name.
-
If there is a conflict between a wave or variable and a data folder, you get an error when you attempt to save as HDF5.
-
If there is a conflict between a wave and a variable, if overwrite is off, you get an error; if overwrite is on, the dataset for the variable overwrites the dataset for the wave so the wave is not saved to the resulting HDF5 file. In Igor Pro 9.00, when writing an HDF5 packed experiment file, Igor turned overwrite on; in Igor Pro 9.01 we changed overwrite to off so that an error will be flagged in this situation.
It is conceptually possible for Igor to handle these conflicts by changing the name of one of the conflicting objects when the file is saved, somehow marking the fact that this change was made, and reversing the process when the file is loaded. When we tried to implement this scheme, we found that it added a significant amount of complexity to already complex code. Adding complexity introduces the possibility of creating new bugs and slowing operations down. Since these name conflicts are rare, the downside of implementing such a workaround outweighed the benefits so we decided to decline to support name conflicts in HDF5 files.
Memory Management
Igor can theoretically address about a billion gigabytes. However, actual operating systems impose far lower limits. On Windows 10, 64-bit programs can address between 128 GB (home edition) and 512 GB (professional edition).
If you load more data than fits in physical memory, the system starts using "virtual memory", meaning that it swaps data between physical memory and disk, as needed. This is very slow. Consequently, you should avoid loading more data into memory than can fit in physical memory.
Even if your data fits in physical memory, graphing and manipulating very large waves, such as 10 million, 100 million, or 1 billion points, will be slow.
All of this boils down to the following rules:
-
If you don't need to load gigabytes of data into memory at one time, then you don't need to worry about memory management.
-
Install enough physical memory to avoid the need for virtual memory swapping.
For further information about very large waves, see IGOR64 Experiment Files.
Igor Extensions
Igor includes a feature that allows a C or C++ programmer to extend its capabilities. An Igor extension is called an "XOP" (short for "external operation"). The term XOP comes from the fact that, originally, adding a command line operation was all that an extension could do. Now extensions can add operations, functions, menus, dialogs and windows.
WaveMetrics XOPs
The "Igor Pro Folder/Igor Extensions (64-bit)" and "Igor Pro Folder/More Extensions (64-bit)" folders contain XOPs that we developed at WaveMetrics. These add capabilities such as file-loading and instrument control to Igor and also serve as examples of what XOPs can do. These XOPs range from very simple to rather elaborate. Most XOPs come with help files that describe their operation.
The WaveMetrics XOPs are described under External Operations Index, accessible through the Help→Help Windows submenu.
Third Party Extensions
A number of Igor users have written XOPs to customize Igor for their particular fields. Some of these are freeware, some are shareware and some are commercial programs. WaveMetrics publicizes third party XOPs through our web page. User-developed XOPs are available from http://www.igorexchange.com.
See Creating Igor Extensions if you are a programmer interested in writing your own XOPs.
Activating 64-bit Extensions
To activate a 64-bit extension, you put it, or a shortcut pointing to it, in the "Igor Extensions (64-bit)" folder in your "Igor Pro User Files" folder.
For illustration purposes, we show here the steps you need to take to activate Igor's SQL XOP which provides access to databases.
-
In Igor, choose Help→Show Igor Pro User Files to open your "Igor Pro User Files" folder on the desktop.
-
In Igor, choose Help→Show Igor Pro Folder to open your "Igor Pro Folder" on the desktop.
-
Open the "Igor Pro Folder\More Extensions (64-bit)\Utilities" folder on the desktop.
-
Make a shortcut for "SQL64.xop" and put it in the "Igor Extensions (64-bit)" folder inside your "Igor Pro User Files" folder.
-
Restart Igor64.
If you want to activate an XOP for all users on a given machine, you can put the shortcut in the "Igor Extensions (64-bit)" folder inside your Igor Pro Folder. You may need to run as administrator to do this.
Changes that you make to either "Igor Extensions (64-bit)" folder take effect the next time Igor is launched.
Activating 32-bit Extensions
If you are running the 32-bit version of Igor, you can activate the 32-bit version of an XOP following the instructions in the preceding section with a few modifications.
Use "Igor Extensions" instead of "Igor Extensions (64-bit)" and "More Extensions" instead of "More Extensions (64-bit)". Activate the 32-bit version of the XOP, for example SQL.xop, instead of SQL64.xop.
Miscellaneous Settings
You can customize many aspects of how Igor works using the Miscellaneous Settings dialog. Choose Misc→Miscellaneous Settings to display the dialog.
Most of the settings are self-explanatory. Many have tooltips that describe what they do.
Preferences
Preferences affect the creation of new graphs, panels, tables, layouts, notebooks, and procedure windows, and the appending of traces to graphs and columns to tables. In addition, preferences affect the command window and default font for graphs.
You can turn preferences off or on using the Misc menu. Normally you will run with preferences on.
Preferences are automatically off while a procedure is running so that the effects of the procedure will be the same for all users. See Operations[Preferences] for further information.
When preferences are off, factory default values are used for settings such as graph size, position, line style, size and color. When preferences are on, Igor applies your preferred values for these settings.
Preferences differ from settings, as set in the Miscellaneous Settings dialog, in that settings generally take effect immediately, while preferences are used when something is created.
Igor Preferences Directory
Igor preferences are stored in a per-user directory. The location of this directory depends on your operating system and configuration. You generally don't need to access your Igor preferences directory, but you can open it in the desktop by pressing the Shift key while choosing Help→Show Igor Preferences Folder.
You can also determine the location of yout Igor preferences directory by executing this command:
Print SpecialDirPath("Preferences", 0, 0, 0)
For technical reasons, most of the built-in preferences are stored not in the Igor preferences directory but rather one level up in a file named "Igor Pro 10.ini".
Deleting the preferences directory and the "Igor Pro 10.ini" file effectively reverts all preferences to factory defaults. You should use the Capture Prefs dialogs, described in Captured Preferences, to revert preferences more selectively.
Other information is stored in preferences, such as the screen position of dialogs, a few dialog settings, colors recently selected in the color palette, window stacking and tiling information, page setups, font substitution settings, and dashed line settings.
How to Use Preferences
Preferences are always on when Igor starts up. You can turn preferences off by choosing Preferences Off in the Misc menu.
You can also turn preferences on and off with the Preferences operation.
Preferences are set by Capture Preferences dialogs, the Tile or Stack Windows dialog, and some dialogs such as the Font Substitutions and Dashed Lines dialogs.
In general, preferences are applied only when something new is created such as a new graph, a new trace in a graph, a new notebook, a new column in a table, and then only if preferences are on.
Preferences are normally in effect only for manual ("point-and-click") operation, not for user-programmed operations in Igor procedures. See Procedures and Preferences.
Captured Preferences
You set most preference values by capturing the current settings of the active window with the Capture Prefs item in the menu for that window. (The dialog to capture the Command Window preferences is found in the Command/History Settings submenu of the Misc menu.) The dialogs are described in more detail in the help file that discusses each type of window. For instance, see Graph Preferences.
Windows System Requirements
Igor Pro requires Windows 7 or later.