Notebooks
A notebook is a window in which you can store text and graphics, very much like a word processor document. Typical uses for a notebook are
- Keeping a log of your work
- Generating a report
- Examining or editing a text file created by Igor or another program
- Documenting an Igor experiment
A notebook can also be used as a worksheet in which you execute Igor commands and store text output from them. See Notebooks as Worksheets.
Plain and Formatted Notebooks
There are two types of notebooks: plain notebooks and formatted notebooks.
Formatted notebooks can store text and graphics and are useful for reports. Plain notebooks can store text only. They are good for examining data files and other text files where line-wrapping and fancy formatting is not appropriate.
This table lists the properties of each type of notebook.
| Property | Plain | Formatted | ||
|---|---|---|---|---|
| Can contain graphics | No | Yes | ||
| Allows multiple paragraph formats | No | Yes | ||
| (margins, tabs, justification, line spacing) | ||||
| Allows multiple test formats | No | Yes | ||
| (fonts, text styles, text sizes, text colors) | ||||
| Does line wrapping | No | Yes | ||
| Has Rulers | No | Yes | ||
| Has headers and footers | Yes | Yes | ||
| File name extension | *.txt | *.ifn | ||
| Can be opened by most other programs | Yes | No | ||
| Exportable to word processors via Rich Text file | Yes | Yes | ||
Plain text files can be opened by many programs, including virtually all word processors, spreadsheets and databases. The Igor formatted notebook file format is a proprietary WaveMetrics format that other applications cannot open. However, you can save a formatted notebook as a Rich Text file, which is a file format that many word processors can open.
Igor does not store settings (font, size, style, etc.) for plain text files. When you open a file as a plain text notebook, these settings are determined by preferences. You can capture preferences choosing Notebook→Capture Notebook Prefs.
Notebook Text Encodings
Igor uses UTF-8, a form of Unicode, internally. Prior to Igor 7, Igor used non-Unicode text encodings such as MacRoman, Windows-1252 and Shift JIS.
All new notebook files should use UTF-8 text encoding. When you create a new notebook using Windows→New→Notebook, Igor automatically uses UTF-8. Also, the NewNotebook operation defaults to UTF-8.
Igor must convert from the old text encodings to Unicode when opening old files. It is not always possible to get this conversion right. You may get incorrect characters or receive errors when opening files containing non-ASCII text.
For a discussion of these issues, see Text Encodings, Plain Text File Text Encodings, and Formatted Text Notebook File Text Encodings.
Creating a New Notebook File
To create a new notebook, choose Windows→New→Notebook. This displays the New Notebook dialog.
The New Notebook dialog creates a new notebook window. The notebook file is not created until you save the notebook window or save the experiment.
Normally you should store a notebook as part of the Igor experiment in which you use it. This happens automatically when you save the current experiment unless you do an explicit Save Notebook As before saving the experiment. Save Notebook As stores a notebook separate from the experiment. This is appropriate if you plan to use the notebook in multiple experiments.
There is a risk in sharing notebook files among experiments. If you copy the experiment to another computer and forget to also copy the shared files, the experiment will not work on the other computer. See References to Files and Folders.
If you do create a shared notebook file then you are responsible for copying the shared file when you copy an experiment that relies on it.
Opening an Existing File as a Notebook
You can create a notebook window by opening an existing file. This might be a notebook that you created in another Igor experiment or a plain text file created in another program. To do this, choose File→Open File→Notebook.
Opening a File for Momentary Use
You might want to open a text file momentarily to examine or edit it. For example, you might read a Read Me file or edit a data file before importing data. In this case, you would open the file as a notebook, do your reading or editing and then kill the notebook. Thus the file would not remain connected to the current experiment.
Sharing a Notebook File Among Experiments
On the other hand, you might want to share a notebook among multiple experiments. For example, you might have one notebook in which you keep a running log of all of your observations. In this case, you could save the experiment with the notebook open. Igor would then save a reference to the shared notebook file in the experiment file. When you later open the experiment, Igor would reopen the notebook file.
As noted above, there is a risk in sharing notebook files among experiments. You might want to "adopt" the opened notebook. See References to Files and Folders for more explanation.
Saving All Standalone Notebook Files
When a notebook window is active, you can save all modified standalone notebook files at once by choosing File→Save All Standalone Notebook Files. This saves only standalone notebook files. It does not save packed notebook files, or notebook windows that were just created and never saved to disk; these are saved when you save the experiment.
Autosaving Standalone Notebook Files
Igor can automatically save modified standalone notebook files. See Autosave for details.
Notebooks as Worksheets
Normally you enter commands in Igor's command line and press Return or Enter to execute them. You can also enter and execute commands in a notebook window. Some people may find using a notebook as a worksheet more convenient than using Igor's command line.
You can also execute commands from procedure windows and from help windows. The former is sometimes handy during debugging of Igor procedures. The latter provides a quick way for you to execute commands while doing a guided tour or to try example commands that are commonly presented in help files. The techniques described below for executing commands from a notebook also apply to procedure and help windows.
To execute a command from a notebook, enter the command in a notebook, or select existing text, and press Ctrl+Enter. You can also right-click selected text and choose Execute Selection from the resulting pop-up menu.
When you press Ctrl+Enter, Igor transfers text from the notebook to the command line and starts execution. Igor stores both the command and any text output that it generates in the notebook and also in the history area of the command window. If you don't want to keep the command output in the notebook, just undo it.
Command output is never sent to a procedure window or help window.
Command output is not sent to the notebook if it is open for read only, or if you clicked the write-protect icon, or if you disabled it by unchecking the Copy Command Output to the Notebook checkbox in the Command Window section of the Miscellaneous Settings dialog.
If you don't want to store the commands or the output in the history area, you can disable this using the Command Window section of the Miscellaneous Settings dialog. However, if command output to the notebook is disabled, the command and output are sent to the history area even if you have disabled it.
Showing, Hiding and Killing Notebooks
Notebook files can be opened (added to the current experiment), hidden, and killed (removed from the experiment).
When you click the close button of a, notebook window, Igor presents the Close Notebook File dialog to find out what you want to do. You can save and then kill the notebook, kill it without saving, or hide it.
If you just want to hide the window, you can press Shift while clicking the close button. This skips the dialog and just hides the window.
Killing a notebook window closes the window and removes it from the current experiment but does not delete the notebook file with which the window was associated. If you want to delete the file, do this on the desktop.
The Close item of the Windows menu and the keyboard shortcut, Ctrl+W, behave the same as the close button, as indicated in these tables.
| Action | Modifier Key | Result |
|---|---|---|
| Click close button, choose Close or press Ctrl+W | None | Displays dialog |
| Click close button, choose Close or press Ctrl+W | Shift | Hides window |
Parts of a Notebook
This illustration shows the parts of a formatted notebook window. A plain notebook window has the same parts except for the ruler.
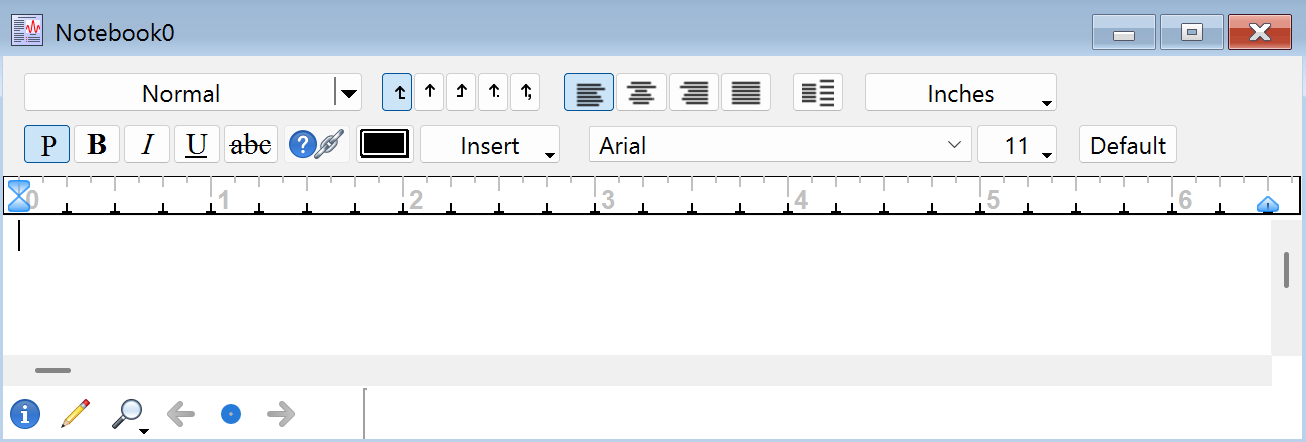
Ruler Bar
Rulers define paragraph formatting, including font, text size, text style, indents, tabs, and spacing.
You can use the ruler bar to apply a ruler to the selected paragraphs, to modify a ruler, or to apply changes to the selected text only without changing the current ruler.
In a formatted text notebook, you can show and hide the ruler bar using the Notebook menu. You cannot show the ruler bar in a plain text notebook.
You can create as many rulers as you want in a formatted text notebook. A plain text notebook has just one ruler.
Document Info Icon
The icon in the bottom/left corner of the notebook window is the document info icon. When you click it, Igor displays information about the notebook and its associated file, if any.
Write-protect Icon
Notebooks (as well as procedure windows) have a write-enable/write-protect icon which appears in the lower-left corner of the window and resembles a pencil. If you click this icon, Igor Pro will draw a line through the pencil, indicating that the notebook is write-protected. The main purpose of this is to prevent accidental manual alteration of shared procedure files, but you can also use it to prevent accidental manual alteration of notebooks.
Note that write-protect is not the same as read-only. Write-protect prevents manual modifications while read-only prevents all modifications. See Notebook Read/Write Properties for details.
Magnifier Icon
You can magnify notebook text and graphics to make them more readable. See Text Magnification for details.
Notebook Properties
Everything in a notebook that you can control falls into one of four categories, as shown in this table.
| Category | Settings |
|---|---|
| Document properties | Page margins, background color, default tab stops, headers and footers. |
| Paragraph properties | Paragraph margins and indents, tab stops, line alignment, line spacing, default text format. |
| Character properties | Font, text size, text style, text color, vertical offset. |
| Read/write properties | Read-only, write-protect and changeableByCommandOnly. |
Notebook Document Properties
To set document properties, choose Notebook→Document Settings. These are properties that apply to the notebook as a whole, such as page margins, headers, footers, background color and default tab stops.
The next illustration shows the effects of the page margins and header and footer position settings. In addition, these settings affect the Rich Text format file which you can use to export a notebook to a word processor.
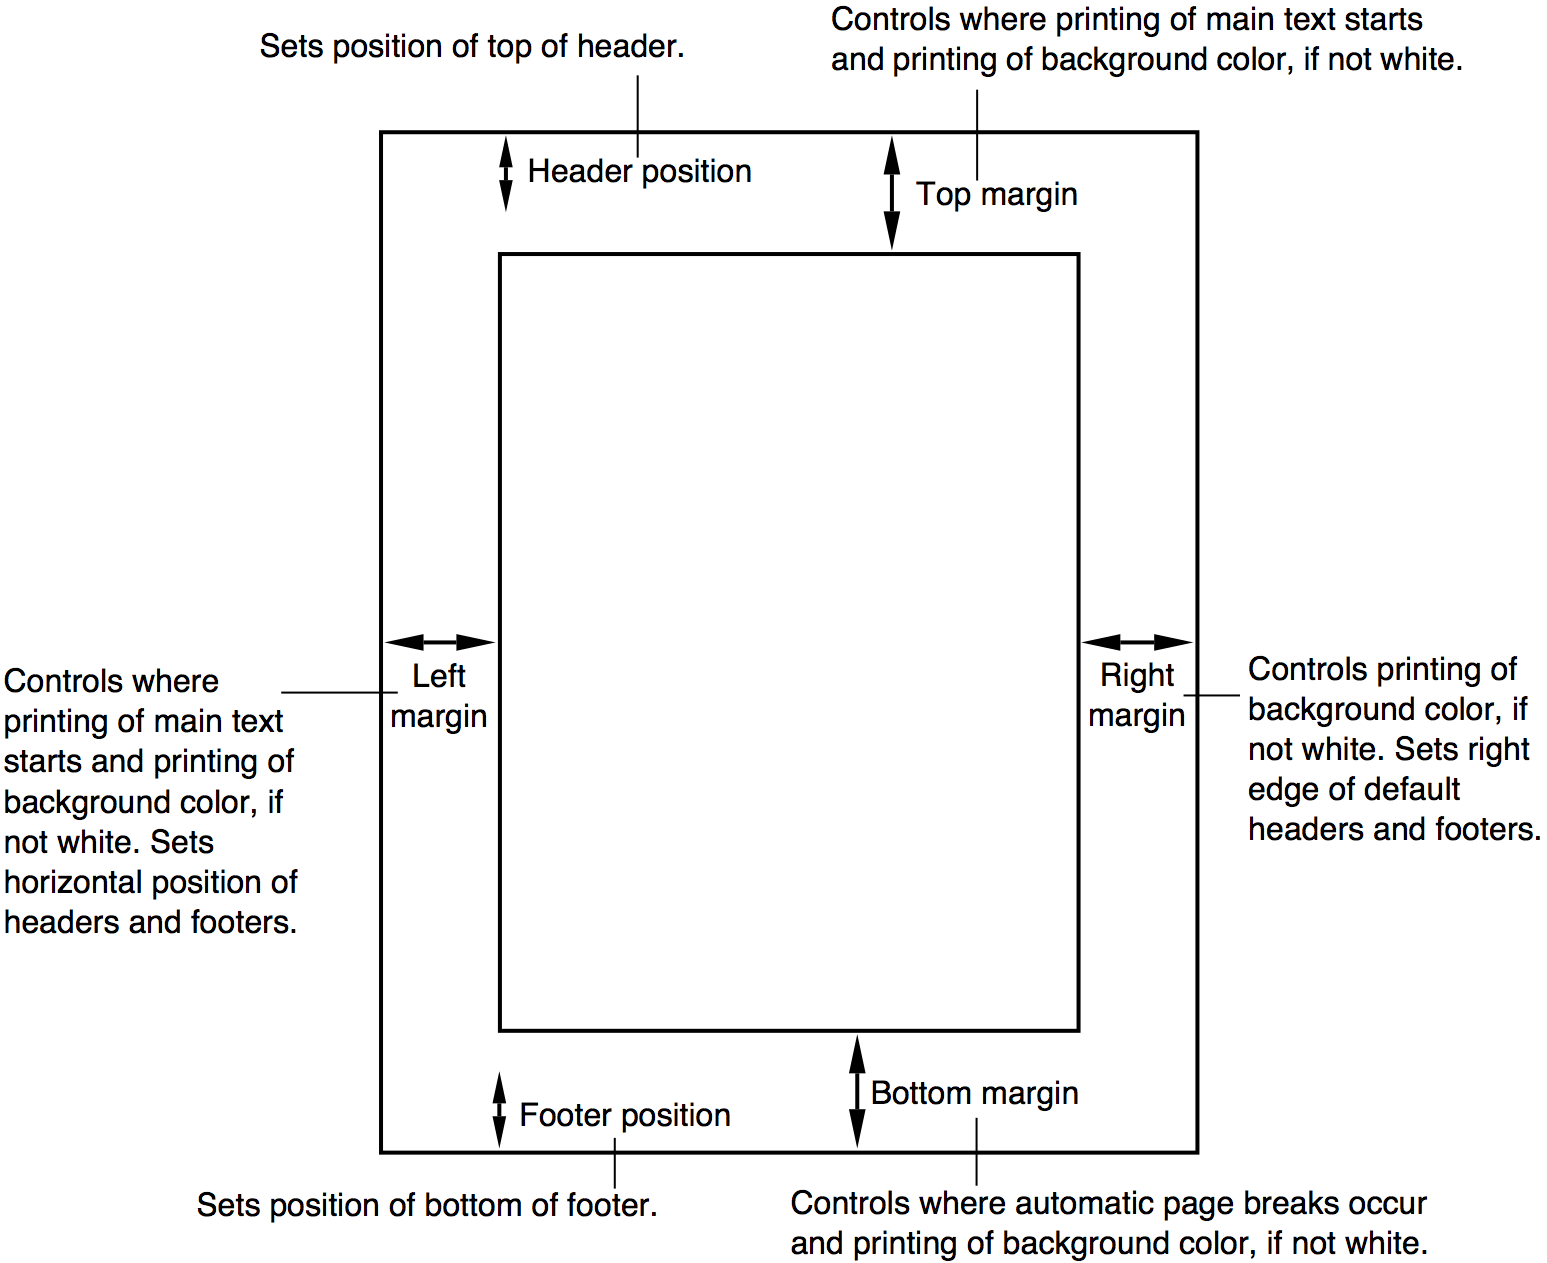
The notebook page margins override margins set via the Page Setup dialog and the PrintSettings operation margins keyword.
Notebook Default Tabs
The default tab width setting controls the location of all tab stops in plain text notebooks and of all tab stops after the last explicit tab stop in formatted notebooks. You set this using the Document Settings dialog in the Notebook menu or using the Notebook operation defaultTab or defaultTab2 keywords.
Three modes are available: points, spaces, and mixed. In points mode, you specify the default tab width for all paragraphs in units of points. In the Document Settings dialog, you can enter this setting in inches, centimeters, or points, but it is always stored as points. Prior to Igor Pro 9.00, this was the only mode available.
In spaces mode, you specify the default tab width for all paragraphs in units of spaces.
In mixed mode, you specify the default tab width for paragraphs controlled by proportional fonts in units of points and for paragraphs controlled by monospace fonts in units of spaces.
Specifying default tabs in spaces is mostly of use for indentation and alignment of comments in notebooks that show Igor code such as Igor help files.
For formatted notebooks, the space character unit used in spaces mode and in mixed mode for monospace fonts is the width of a space character in the ruler font for a given paragraph. For plain text notebooks, it is the width of a space character in the notebook font.
In a formatted notebook, the ruler displays explicit tab stops and default tab stops. You can adjust default tab stops by dragging one of them. This sets either the default tab width in points or in spaces, depending on the units used for default tabs by the current paragraph. Default tabs in points are relative to the position of zero on the ruler. Default tabs in spaces are relative to the ruler's left margin.
When you create a new notebook window, Igor applies your preferred default tab width settings. There are separate preferences for plain text notebooks and formatted text notebooks. You can set preferences for a given type of notebook by first using the Document Settings dialog to apply the desired settings to a window of that type and then choosing Notebook→Capture Notebook Prefs as explained under Notebook Preferences.
Igor stores document settings separately for each formatted text notebook file. In Igor Pro 9.00 and later, it stores the default tab width mode, width in points, and width in spaces settings. Older versions of Igor support only default tabs specified in points and ignore the other settings.
Igor does not store document settings for plain text notebook files, so your preferred default tab width settings for plain text notebooks apply to all plain text notebook files subsequently opened.
Notebook Paragraph Properties
A set of paragraph properties is called a "ruler". In some word processors, this is called a "style". The purpose of rulers is to make it easy to keep the formatting of a notebook consistent. See Working With Rulers.
Formatted Notebook Paragraph Properties
The paragraph properties for a formatted notebook are all under your control and can be different for each paragraph. A new formatted notebook has one ruler, called the Normal ruler. You can control the properties of the Normal ruler and you can define additional rulers.
The ruler font, ruler text size, ruler text style and ruler text color can be set using the pop-up menu on the left side of the ruler. They set the default text format for paragraphs governed by the ruler. You can use the Notebook menu to override these default properties. The Notebook menu permits you to hide or show the ruler in a formatted notebook.
The paragraph properties for formatted notebooks are:
| Paragraph Property | Description |
|---|---|
| First-line indent | Horizontal position of the first line of the paragraph. |
| Left margin | Horizontal position of the paragraph after the first line. |
| Right margin | Horizontal position of the right side of the paragraph. |
| Line alignment | Left, center, right or full. |
| Space before | Extra vertical space to put before the paragraph. |
| Min line space | Minimum height of each line in the paragraph. |
| Space after | Extra vertical space to put after the paragraph. |
| Tab stops | Left, center, right, decimal-aligned or comma-aligned tab stops. |
| Ruler font | The default font to use for the paragraph. |
| Ruler text size | Default text size to use for the paragraph. |
| Ruler text style | Default text style to use for the paragraph. |
| Ruler text color | Default text color to use for the paragraph. |
Plain Notebook Paragraph Properties
For each plain notebook, there is one set of paragraph properties that govern all paragraphs. Many of the items are fixed — you can't adjust them.
| Paragraph Property | Comment |
|---|---|
| First-line indent | Fixed at zero. |
| Left margin | Fixed at zero. |
| Right margin | Fixed at infinity. |
| Line alignment | Fixed as left-aligned. |
| Space before | Fixed at zero. |
| Min line space | Fixed at zero. |
| Space after | Fixed at zero. |
| Tab stops | None. |
| Font | Set using Notebook menu. |
| Text size | Set using Notebook menu. |
| Text style | Set using Notebook menu. |
| Text color | Set using Notebook menu. |
There is only one font, text size, text style and text color for the entire document which you can set using the Notebook menu.
Although you cannot set paragraph tab stops in a plain notebook, you can set and use the notebook's default tab stops, which affect the entire notebook.
Notebook Character Properties
The character properties are font, text size, text style, text color and vertical offset. The vertical offset is used mainly to implement superscript and subscript. A specific collection of character properties is called a "text format". You can set the text format using the Notebook menu. The Set Text Format dialog allows you to inspect and set all of the character properties.
Plain Notebook Text Formats
A plain notebook has one text format which applies to all of the text in the notebook. You can set it, using the Notebook menu, except for the vertical offset which is always zero.
Igor does not store settings (font, size, style, etc.) for plain text files. When you open a file as a plain text notebook, these settings are determined by preferences. You can capture preferences choosing Notebook→Capture Notebook Prefs.
Formatted Notebook Text Formats
By default, the text format for the text in a paragraph is determined by the ruler font, ruler text size, ruler text style, and ruler color of the ruler governing the paragraph. You can change these ruler properties using the ruler pop-up menu in the ruler bar.
You can override the default text format for the selected text by applying specific formatting using the Notebook menu or the font, size, style, and color icons in the ruler bar.
You can set the text format of the selected text to the ruler default by choosing Notebook→Set Text Format to Ruler Default or by clicking the Default button in the ruler bar.
You should use the ruler to set the basic text format and use overrides for highlighting or other effects. For example, you might override the ruler text format to underline a short stretch of text or to switch to italic.
If you make a selection from the font, size, style, or color submenus of the ruler pop-up menu in the ruler bar, you redefine the current ruler, and all text governed by that ruler is updated.
If you make a selection from the font, size, style, or color submenus of the Notebook menu in the main menu bar, you override the text format for the selected text, and only the selected text is updated. This is also what happens if you use the font, size, style, and color icons in the ruler bar.
Text Sizes
The Text Size submenu in the Notebook menu contains an Other item. This leads to the Set Text Size dialog in which you can specify which sizes should appear in the Text Size submenu.
The text sizes in your Text Size menu are stored in the Igor preferences file so that the menu will include your preferred sizes each time you run Igor.
Vertical Offset
The vertical offset property is available only in formatted notebooks and is used mainly to implement superscript and subscript, as described in the next section.
Vertical offset is also useful for aligning a picture with text within a paragraph. For example, you might want to align the bottom of the picture with the baseline of the text.
The easiest way to do this is to use the Alt+Up Arrow and Alt+Down Arrow key combinations, which tweak the vertical offset by one point at a time.
You can set the vertical offset by choosing Notebook→Set Text Format which displays the Set Text Format dialog.
Superscript and Subscript
The last four items in the Text Size submenu of the Notebook menu have to do with superscript and subscript. Igor implements superscript and subscript by setting the text size and the vertical offset of the selected text to achieve the desired effect. They are not character properties but rather are effects accomplished using character properties.
The following table illustrates the use and effects of each of these items.
| Action | Effect on Character Properties | Result | |
|---|---|---|---|
| Type "XYZ" | XYZ | ||
| Highlight "Y" and | Reduces text size and sets | XYZ | |
| then choose Superscript | vertical offset for "Y" | ||
| Highlight "Z" and | Sets text size and vertical offset for "Z" | XYZ | |
| then choose Superscript | to make it superscript relative to "Y" | ||
| Highlight "Z" and | Sets text size and vertical offset for "Z" | XYZ | |
| then choose In Line | to be same as for "Y" | ||
| Highlight "YZ" and | Sets text size for "YZ" same as "X" | XYZ | |
| then choose Normal | and sets vertical offset to zero | ||
Help Links in Formatted Notebooks
You can format text as a help link by selecting the text and clicking the Help button in the ruler. Usually you do this while editing a help file.
Clicking text in a notebook that is formatted as a help link goes to the specified help topic. This allows you to easily link to help topics from a documentation notebook. The help link text must reference a topic or subtopic in a help file; the target cannot be in a notebook.
Since simply clicking a help link in a notebook activates the link, to edit a help link you need to do one of the following:
-
Use the arrow keys instead of simply clicking in the help link
-
Press the Ctrl key while clicking in the help link
-
Select at least one character instead of simply clicking in the help link
Notebook Read/Write Properties
There are three properties that control whether a notebook can be modified.
Read-Only
The read-only property is set if you open the file for read-only by executing OpenNotebook/R. It is also set if you open a file for which you do not have read/write permission.
When the read-only property is set, a lock icon appears in the bottom/left corner of the notebook window and you cannot modify the notebook manually or via commands.
The read-only property cannot be changed after the notebook is opened.
Use read-only if you want no modifications to be made to the notebook.
Write-Protect
You can set the write-protect property to on or off by clicking the pencil icon in the bottom/left corner of the notebook window or using the Notebook operation with the writeProtect keyword.
The write-protect property is intended to give the user a way to prevent inadvertent manual modifications to the notebook. The user can turn the property on or off at will.
The write-protect property does not affect commands such as Notebook and NotebookAction. Even if write-protect is on, they can still modify the notebook.
Use write-protect if you want to avoid inadvertent manual modifications to the notebook but want the user to be able to take full control.
Changeable By Command Only
You can control the changeableByCommandOnly property using NewNotebook/OPTS=8 or using the Notebook operation with the changeableByCommandOnly keyword.
This property is intended to allow programmers to control whether the user can manually modify the notebook or not. Its main purpose is to allow a programmer to create a notebook subwindow in a control panel for displaying status messages and other information that is not intended to be modified by the user. There is no way to manually change this property - it can be changed by command only.
When the changeableByCommandOnly property is on, a lock icon appears in the bottom/left corner of the notebook window.
Use changeableByCommandOnly if you want no manual modifications to be made to the notebook but want it to be modifiable via commands.
The changeableByCommandOnly property is intended for programmatic use only and is not saved to disk.
For further information on notebook subwindows, see Notebooks as Subwindows in Control Panels.
Working With Rulers
A ruler is a set of paragraph properties that you can apply to paragraphs in a formatted notebook. Using rulers, you can make sure that paragraphs that you want to have the same formatting do have the same formatting. Also, you can redefine the format of a ruler and all paragraphs governed by that ruler will be automatically updated.
In a simple notebook, you might use just the one built-in ruler, called Normal. In a fancier notebook, where you are concerned with presentation, you might use several rulers.
The pop-up menu on the left side of the ruler shows which ruler governs the first currently selected paragraph. You can use this pop-up menu to
-
Apply an existing ruler to the selected paragraphs
-
Create a new ruler
-
Redefine an existing ruler
-
Rename a ruler
-
Remove a ruler from the document
Defining a New Ruler
To create a new ruler, choose Define New Ruler from the Ruler pop-up menu. This displays the Define New Ruler dialog.
Enter a name ruler for the ruler. Ruler names must follow rules for standard (not liberal) Igor names. They may be up to 31 bytes in length, must start with a letter and may contain letters, numbers and the underscore character.
Use the icons in the dialog's ruler bar to set the font, text size, text style, and color for the new ruler.
Click OK to create the new ruler.
In a sophisticated word processor, a ruler can be based on another ruler so that changing the first ruler automatically changes the second. Igor rulers do not have this capability.
Redefining a Ruler
When you redefine a ruler, all paragraphs governed by the ruler are automatically updated. There are four principal ways to redefine a ruler:
-
Use the Redefine Ruler dialog.
-
Use the font, text size, text style or text color items in the Ruler pop-up menu.
-
Use the Redefine Ruler from Selection item in the Ruler pop-up menu.
-
Press the Ctrl key while using a margin, indent, tab, alignment, or spacing control in the ruler bar.
To invoke the Redefine Ruler dialog, choose Redefine Ruler from the Ruler pop-up menu.
Another handy way to redefine an existing ruler (e.g., Normal) is to adjust it, creating a derived ruler (e.g. Normal+). Then choose Redefine Ruler from Selection from the Ruler pop-up menu. This redefines the explicitly named ruler (Normal) to match the current ruler (Normal+)
Creating a Derived Ruler
You can adjust a ruler using its icons. When you do this, you create a derived ruler. A derived ruler is usually a minor variation of an explicitly created ruler.
If you redefine the Normal ruler, the Normal+ ruler is not automatically redefined. This is a limitation in Igor's implementation of rulers compared to a word-processor program.
Finding Where a Ruler Is Used
You can find the next or previous paragraph governed by a particular ruler. To do this press Alt while selecting the name of the ruler from the Ruler pop-up menu. To search backwards, press Shift+Alt while selecting the ruler. If there is no next or previous use of the ruler, Igor will emit a beep.
Removing a Ruler
Rulers that you no longer need clutter up the Ruler pop-up menu. You can remove them from the document by choosing Remove Ruler from the Ruler pop-up menu.
You might want to know if a particular ruler is used in the document. The only way to do this is to search for the ruler. See Finding Where a Ruler Is Used.
Transferring Rulers Between Notebooks
The only way to transfer a ruler from one notebook to another is by copying text from the first notebook and pasting it in the second. Rulers needed for the text are also copied and pasted. If a ruler that exists in the source notebook also exists in the destination, the destination ruler takes precedence.
If you expect to create a lot of notebooks that share the same rulers then you should create a template document with the common rulers. See Notebook Template Files below for details.
Special Characters
Aside from regular text characters, there are some special things that you can put into a paragraph in a formatted notebook. This table lists of all of the types of special characters and where they can be used.
| Special Character Type | Where It Can Be Used |
|---|---|
| Picture | Main body text, headers and footers. |
| Igor-object pictur | Main body text, headers and footers. |
| The date | Main body text, headers and footers. |
| The time | Main body text, headers and footers. |
| The name of the experiment fil | Main body text, headers and footers. |
| Notebook window title | Headers and footers only. |
| Current page number | Headers and footers only. |
| Total number of pages | Headers and footers only. |
| Actions | Main body text only. |
The main way in which a special character differs from a normal character is that it is not simply a text character. Another significant difference is that some special characters are dynamic, meaning that Igor can update them automatically. Other special characters, while not dynamic, are linked to Igor graphs, tables or page layouts (see Using Igor-Object Pictures below).
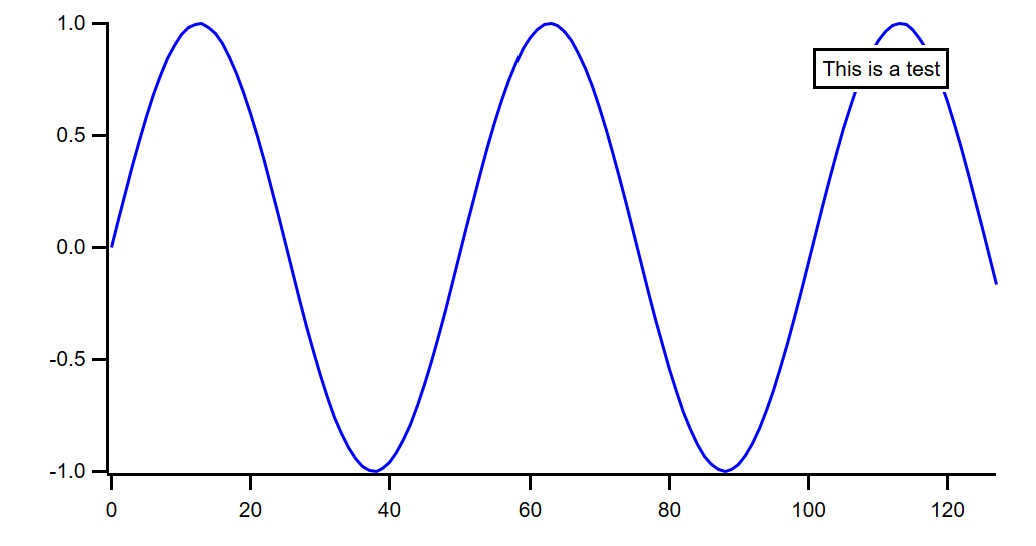
This example shows three kinds of special characters:

The time and date look like normal text but they are not. If you click any part of them, the entire time or date is selected. They act like a single character.
An action is a special character which, when clicked, runs Igor commands. See Notebook Action Special Characters for details.
Except for pictures, which are pasted, special characters are inserted using the Special submenu in the Notebook menu or using the Insert pop-up menu in the ruler area of a formatted notebook.
Inserting Pictures
You can insert pictures, including Igor-object pictures, by merely doing a paste. You can also insert pictures using Edit→Insert File or using the Notebook insertPicture operation.
When you insert a picture, the contents of the picture file are copied into the notebook. No link to the picture file is created.
If you use a platform-independent picture format, such as PNG (recommended), JPEG, TIFF, PDF, or SVG, then the picture is displayed correctly on all platforms. If you use a platform-specific format, such as Enhanced Metafile on Windows, the picture is displayed as a gray box if viewed on the other platform. On Windows, PDF is displayed correctly in Igor Pro 9.00 and later; older versions displayed PDF as a gray box.
Saving Pictures
You can save a picture in a formatted text notebook as a standalone picture file. Select one picture and one picture only. Then choose File→Save Graphics. You can also save a picture using the Notebook savePicture operation.
Special Character Names
Each special character has a name. For most types, the name is automatically assigned by Igor when the special character is created. However for action special characters you specify the name through the Special→New Action dialog. When you click a special character, you will see the name in the notebook status area. Special character names must be unique within a particular notebook.
The special character name is used only for specialized applications and usually you can ignore it. You can use the name with the Notebook findSpecialCharacter operation to select special characters. You can get a list of special character names from SpecialCharacterList and get information using SpecialCharacterInfo.
When you copy a graph, table,layout, or Gizmo plot and paste it into a notebook, an Igor-object picture is created (as described below in Using Igor-Object Pictures). The Igor-object picture, like any notebook picture, is a special character and thus has a special character name, which, whenever possible, is the same as the source window name. However, this may not always possible such as when, for example, you paste Graph0 twice into a notebook, the first special character will be named "Graph0" and the second "Graph0_1".
The Special Submenu
Using the Special submenu of the Notebook menu you can
-
Frame or scale pictures
-
Insert special characters
-
Control updating of special characters
-
Convert a picture to PNG format
-
Specify an action character that executes commands
Scaling Pictures
You can scale a picture by choosing selecting it and choosing Notebook→Special→Scale or by using the Notebook command line operation. There is currently no way to scale a picture using the mouse.
Updating Special Characters
The window title, page number and total number of pages are dynamic characters -- Igor automatically updates them when you print a notebook. These are useful for headers and footers. All other kinds of special characters are not dynamic but Igor makes it easy for you to update them if you need to, using the Update Selection Now or Update All Now items in the Special menu.
To prevent inadvertent updating, Igor disables these items until you enable updating, using the Enable Updating item in the Special menu. This enables updating for the active notebook.
If you are using a notebook as a form for generating reports, you will probably want to enable updating. However, if you are using it as a log of what you have done, you will want to leave updating in the disabled state.
Notebook Action Special Characters
An action is a special character that runs commands when clicked. Use actions to create interactive notebooks, which can be used for demonstrations or tutorials. Help files are formatted notebook files so actions can also be used in help files.
You create actions in a formatted text notebook. You can invoke actions from formatted text notebooks or from help files.
For a demonstration of notebook actions, see the Notebook Actions Demo experiment.
Open the Notebook Actions Demo experiment
To create an action use the NotebookAction operation or choose Notebook→Special→New Action to invoke the Notebook Action dialog:
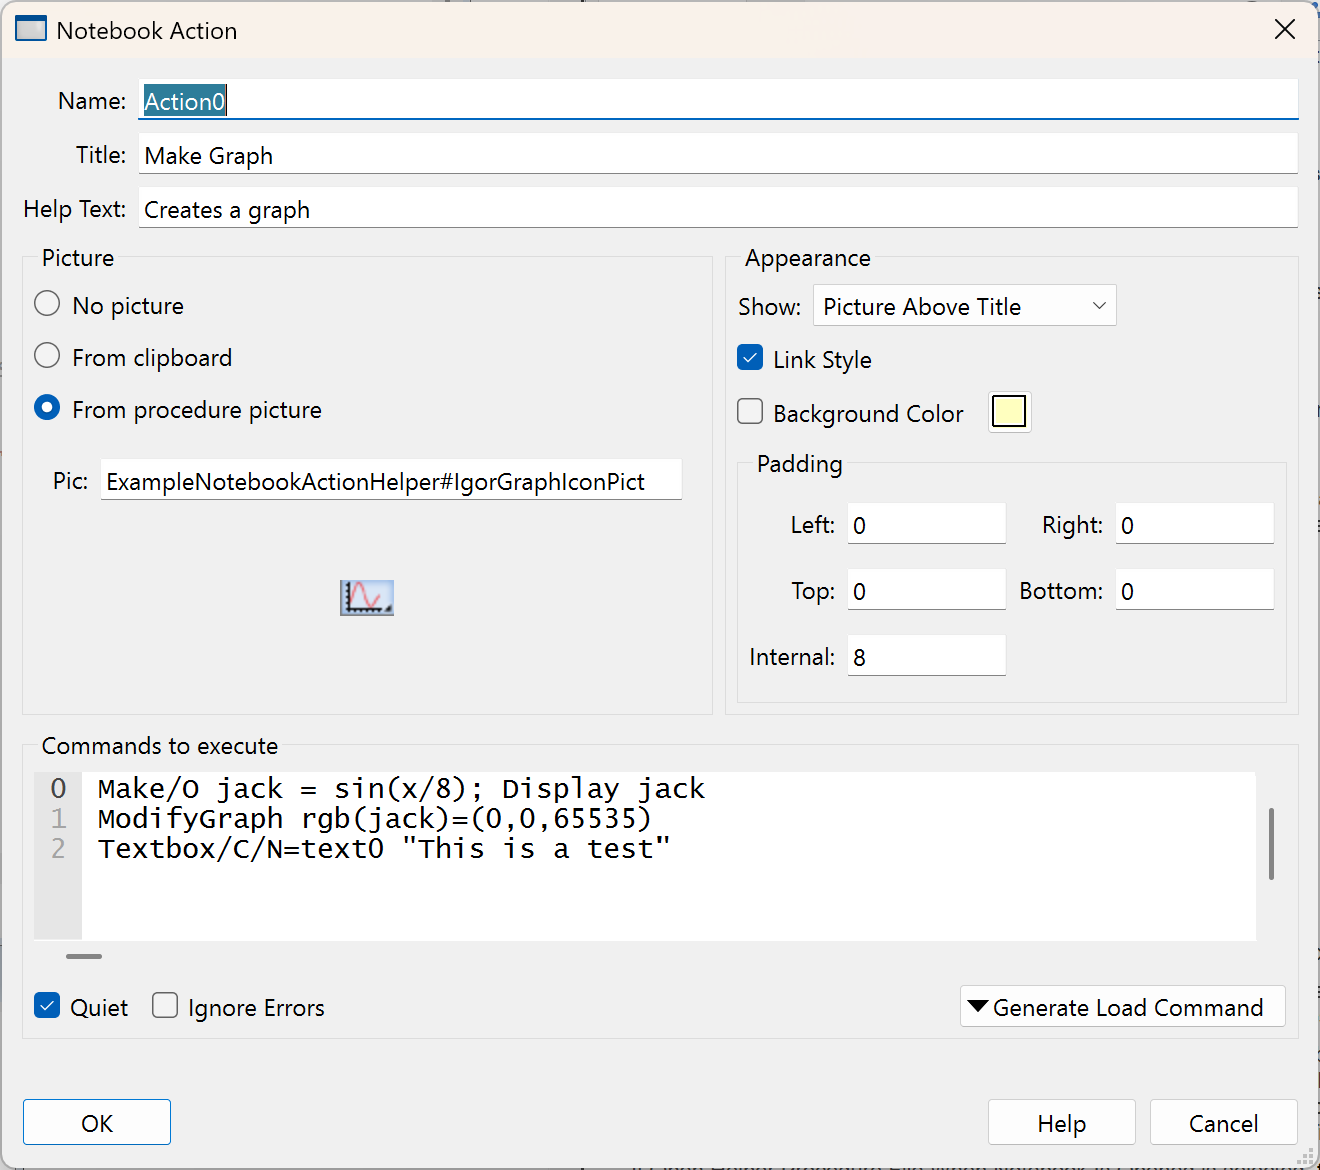
Each action has a name that is unique within the notebook.
The title is the text that appears in the notebook. The text formatting of the notebook governs the default text formatting of the title.
If the Link Style checkbox is selected, the title is displayed like an HTML link — blue and underlined. This style overrides the color and underline formatting applied to the action through the Notebook menu.
The help text is a tip that appears when the cursor is over an action, if tips are enabled in the Help section of the Miscellaneous Settings dialog.
An action can have an associated picture that is displayed instead of or in addition to the title. There are two ways to specify a picture. You can paste one into the dialog using the Paste button or you can reference a Proc Picture stored in a procedure file. The latter source may be useful for advanced programmers (see Proc Pictures for details).
For most purposes it is better to use a picture rather than a Proc Picture. One exception is if you have to use the same picture many times in the notebook, in which case you can save disk space and memory by using a Proc Picture.
If you designate a Proc Picture using a module name (e.g., MyProcPictures#MyPicture), then the Proc Picture must be declared static.
If you specify both a Proc Picture and a regular picture, the regular picture is displayed. If you specify no regular picture and your Proc Picture name is incorrect or the procedure file that supplies the Proc Picture is not open or not compiled, "???" is displayed in place of the picture.
In order for a picture to display correctly on both Windows and Macintosh, it must be in a cross-platform format such as PNG. You can convert a picture to PNG by clicking the Convert To PNG button. This affects the regular picture only.
Pictures and Proc Picture in actions are drawn transparently. The background color shows through white parts of the picture unless the picture explicitly erases the background.
The action can display one of six things as determined by the Show popup menu:
-
The title
-
The picture
-
The picture below the title
-
The picture above the title
-
The picture to the left of the title
-
The picture to the right of the title
If there is no picture and you choose one of the picture modes, just the title is displayed.
You can add padding to any external side of the action content (title or picture). The Internal Padding value sets the space between the picture and the title when both are displayed. All padding values are in points.
If you enable the background color, the rectangle enclosing the action content is painted with the specified color.
You can enter any number of commands to be executed in the Commands area. When you click the action, Igor sends each line in the Commands area to the Operation Queue, as if you called the Execute/P operation, and the commands are executed.
In addition to regular commands, you can enter special operation queue commands like INSERTINCLUDE, COMPILEPROCEDURES, and LOADFILE. These are explained under Operation Queue.
For sophisticated applications, the commands you enter can call functions that you define in a companion "helper procedure file" (see Notebook Action Helper Procedure Files).
If the Quiet checkbox is selected, commands are not sent to the history area after execution.
If the Ignore Errors checkbox is selected then command execution errors are not reported via error dialogs.
The Generate LoadFile Command button displays an Open File dialog and then generates an Execute/P command to load the file into Igor. This is useful for generating a command to load a demo experiment, for example. This button inserts the newly-generated command at the selection point in the command area so, if you want the command to replace any pre-existing commands, delete any text in the command area before clicking the button. If the selected file is inside the Igor Pro Folder or any subdirectory, the generated path will be relative to the Igor Pro Folder. Otherwise it will be absolute.
Creating a Hyperlink Action
You can use a notebook action to create a hyperlink that displays a web page by calling the BrowseURL operation from the action's command.
Modifying Action Special Characters
You can modify an existing action by right-clicking on it and choosing Modify Action from the pop-up menu, or by selecting the action special character, and nothing else, and then choosing Notebook→Special→Modify Action.
If you have opened a notebook as a help file and want to modify an action, you must close the help file (press Option or Alt and click the close button) and reopen it as a notebook (choose File→Open File→Notebook). After editing the action, save the changes, close the notebook, and reopen it as a help file (choose File→Open File→Help File).
Modifying The Action Frame
If the notebook action has a picture, you can frame the action by choosing a frame style from the Notebook→Special→Frame submenu.
Modifying The Action Picture Scaling
If the notebook action has a picture, you can scale the picture by choosing an item from the Notebook→Special→Scale submenu.
Notebook Action Helper Procedure Files
In some instances you may want an action to call procedures in an Igor procedure file. The notebook action helper procedure file feature provides a convenient way to associate a notebook or help file with a procedure file.
Each formatted notebook (and consequently each help file) can designate only one procedure file as an action helper procedure file. Before choosing the helper file you must save the notebook as a standalone file on disk. Then choose Notebook→Special→Action Helper.
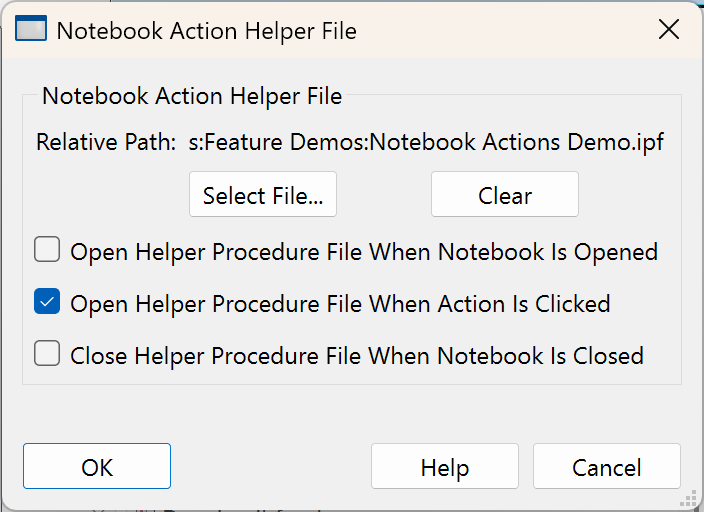
Click the File button to choose the helper procedure file for the notebook.
For most cases we recommend that you name your action helper procedure file with the same name as the notebook but with the .ipf extension. This indicates that the files are closely associated.
The helper file will usually be located in the same directory as the notebook file. Less frequently, it will be in a subdirectory or in a parent directory. It must be located on the same volume as the notebook file because Igor finds the helper using a relative path, starting from the notebook directory. If the notebook file is moved, the helper procedure file must be moved with it so that Igor will be able to find the helper using the relative path.
If Open Helper Procedure File When Notebook Is Opened is selected, the helper procedure file is opened along with the notebook. This checkbox can usually be left deselected. However, if you use Proc Pictures stored in the helper file, you should select it so that the pictures can be correctly rendered when the notebook is opened.
If Open Helper Procedure File When Action Is Clicked is selected, then, when you click an action, the procedure file loads, compiles, and executes automatically. This should normally be selected.
In both of these situations, the procedure file loads as a "global" procedure file, which means that it is not part of the current experiment and is not closed when creating a new experiment.
If Close Helper procedure File When Notebook Is Closed is selected and you kill a notebook or help file that has opened a helper file, the helper file is also killed. This should normally be selected.
To avoid unanticipated name conflicts between procedures in your helper file and elsewhere, it is a good idea to declare the procedures static (see Static Functions). In order to call such private routines you also need to assign a module name to the procedure file and use the module name when invoking the routines (see Regular Modules). For an example see the Notebook Actions Demo experiment.
Open the Notebook Actions Demo experiment
Using Igor-Object Pictures
You create a picture from an Igor graph, table, page layout or Gizmo plot by choosing Edit→Export Graphics to copy a picture to the clipboard. For graphs, layouts, and Gizmo plots, you can also choose Edit→Copy. When you do this, Igor puts information about the window from which the picture was generated on the clipboard. When you paste into a notebook, Igor stores the window information with the picture. We call this kind of picture an "Igor-object" picture.
The Igor-object information contains the name of the window from which the picture was generated, the date/time at which it was generated, the size of the picture and the export mode used to create the picture. Igor uses this information to automatically update the picture when you request it.
Because of backward compatibility issues, this feature works only if the name of the window is 31 bytes or less.
Igor cannot link Igor-object pictures to a window in a different Igor experiment.
For good picture quality that works across platforms, we recommend that you use a high-resolution PNG format.
Updating Igor-Object Pictures
Before updating Igor object pictures, you must enable updating using the Notebook→Special→Enable Updating menu item. This is a per-notebook setting.
When you click an Igor-object picture, Igor displays the name of the object from which the picture was generated and the time at which it was generated in the notebook's status area.
The first Graph0 shown in the status area is the name of the picture special character and the second Graph0 is the name of the source graph for the picture. There is no requirement that these be the same but they usually will be.
If you change the Igor graph, table, layout, or Gizmo plot, you can update the associated picture by selecting it and choosing Update Selection Now from the Notebook→Special menu or by right-clicking and choosing Update Selection from the contextual menu. You can update all Igor-object pictures as well as any other special characters in the notebook by clicking anywhere so that nothing is selected and then choosing Update All Now from the Notebook→Special menu.
An Igor object picture can be updated even if it was created on another platform using a platform-dependent format. For example, you can create an EMF Igor object picture on Windows and paste it into a notebook.
Igor never updates an Igor-object picture unless you tell it to. Thus you can keep pictures of a given object taken over time to record the history of that object.
The Size of the Picture
The size of the picture is determined when you initially paste it into the notebook. If you ask Igor to update the picture, it will keep the same size, even if you have changed the size of the graph window from which the picture is derived. Normally, this is the desired behavior. If you want to change the size of the picture in the notebook, you need to repaste a new picture over the old one.
Activating the Igor-Object Window
You can activate the window associated with an Igor-object picture by double-clicking the Igor object picture in the notebook. If the window exists it is activated. If it does not exist but the associated window recreation macro does exist, Igor runs the window recreation macro.
Breaking the Link Between the Object and the Picture
Lets say you create a picture from a graph and paste it into a notebook. Now you kill the graph. When you click the picture, Igor displays a question mark after the name of the graph in the notebook's status area to indicate that it can't find the object from which the picture was generated. Igor cannot update this picture. If you recreate the graph or create a new graph with the same name, this reestablishes the link between the graph and the picture.
If you change the name of a graph, this breaks the link between the graph and the picture. To reestablish it, you need to create a new picture from the graph and paste it into the layout.
Compatibility Issues
A Macintosh format picture, when updated on Windows, is converted to a Windows format.
Igor does not recognize Igor-object pictures created by Igor versions before 6.10.
If you save a notebook containing a Gizmo picture and open it in Igor 6 version 6.37 or before, you will get errors in Igor 6. If you open it in Igor 6 version 6.38 or later, it will display correctly.
Cross-Platform Pictures
If you want to create a notebook that contains pictures that display correctly on both Macintosh and Windows, you can use the PDF or PNG (Portable Network Graphics) format. If some pictures are already in JPEG or TIFF format, these too will display correctly on either platform.
You can convert other types of pictures to PNG using the Convert to PNG item in the Special submenu of the Notebook menu.
PDF pictures are displayed correctly on Windows in Igor Pro 9.00 or later. In earlier versions on Windows, PDF pictures are displayed as gray boxes.
Page Breaks
When you print a notebook, Igor automatically goes to the next page when it runs out of room on the current page. This is an automatic page break.
In a formatted notebook, you can insert a manual page break using the Insert Page Break item in the Edit menu. Igor displays a manual page break as a dashed line across the notebook window. You can't insert a manual page break into a plain notebook.
There is no way to see where Igor will put automatic page breaks other than by printing the document or using the Print Preview feature.
Headers and Footers
Both formatted and plain notebooks can have headers or footers.
You create headers and footers using the Document Settings dialog.
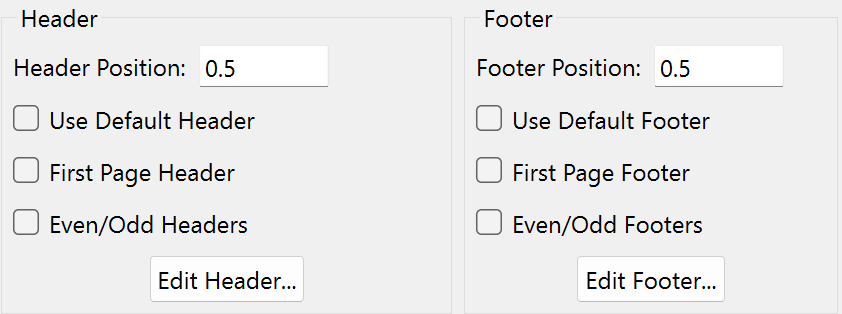
The header position is specified as a distance from the top of the paper. The footer position is specified as a distance from the bottom of the paper. The units are your preferred units as specified in the Miscellaneous section of the Miscellaneous settings dialog.
For most uses, the default header or default footer will be sufficient. The default header consists of the date, window title and page number. The other options are intended for use in fancy reports.
Clicking Edit Header or Edit Footer displays a subdialog in which you can enter text as well as special characters.
The Page Number and Number of Pages special characters are displayed on the screen as # characters but are printed using the actual page number and number of pages in the document. The Date, Time and Window Title special characters are automatically updated when the document is printed.
Header and footer settings are saved in formatted text notebook files but not in plain text notebook files. Consequently, settings for plain text notebooks revert to preferred settings, as set by the Capture Notebooks Prefs dialog, when you open a file as a plain text notebook.
Printing Notebooks
To print an entire notebook, click so that no text is selected and then choose File→Print Notebook Window.
To print part of a notebook, select the section that you want to print and then choose File→Print Notebook Selection.
Import and Export Via Rich Text Format Files
The Rich Text Format (RTF) is a file format created by Microsoft Corporation for exchanging formatted text documents between programs. Microsoft also calls it the Interchange format. Many word processors can import and export RTF.
You can save an Igor plain or formatted notebook as an RTF file and you can open an RTF file as an Igor formatted notebook. You may find it useful to collect text and pictures in a notebook and to later transfer it to your word processor for final editing.
An RTF file is a plain text file that contains RTF codes. An RTF file starts with "{\rtf". Other codes define the text, pictures, document formats, paragraph formats, and text formats and other aspects of the file.
When Igor writes an RTF file from a notebook, it must generate a complex sequence of codes. When it reads an RTF file, it must interpret a complex sequence of codes. The RTF format is very complicated, has evolved and allows some flexibility. As a result, each program writes and interprets RTF codes somewhat differently. Because of this and because of the different feature sets of different programs, RTF translation is sometimes imperfect and requires that you do manual touchup.
Saving an RTF File
To create an RTF file, choose Save Notebook As from the File menu. Select Rich Text Format from the Save File dialog's File Type pop-up menu, and complete the save.
The original notebook file, if any, is not affected by saving as RTF, and the notebook retains its connection to the original file.
Opening an RTF File
When Igor opens a plain text file as a notebook, it looks for the "\rtf" code that identifies the file as an RTF file. If it sees this code, it displays a dialog asking if you want to convert the rich text codes into an Igor formatted notebook.
If you answer Yes, Igor creates a new, formatted notebook. It then interprets the RTF codes and sets the properties and contents of the new notebook accordingly. When the conversion is finished, you sometimes need to fix up some parts of the document that were imperfectly translated.
If you answer No, Igor opens the RTF file as a plain text file. Use this to inspect the RTF codes and, if you are so inclined, to tinker with them.
Exporting a Notebook as HTML
Igor can export a notebook in HTML format. HTML is the format used for Web pages. For a demo of this feature, choose File→Example Experiments→Feature Demos→Web Page Demo.
This feature is intended for two kinds of uses. First, you can export a simple Igor notebook in a form suitable for immediate publishing on the Web. This might be useful, for example, to automatically update a Web page or to programmatically generate a series of Web pages.
Second, you can export an elaborate Igor notebook as HTML, use an HTML editor to improve its formatting or tweak it by hand, and then publish it on the Web. It is unlikely that you could use Igor alone to create an elaborately formatted Web page because there is a considerable mismatch between the feature set of HTML and the feature set of Igor notebooks. For example, the main technique for creating columns in a notebook is the use of tabs. But tabs mean nothing in HTML, which uses tables for this purpose.
Because of this mismatch between notebooks and HTML, and so your Web page works with a wide variety of Web browsers, we recommend that you keep the formatting of notebooks which you intend to write as HTML files as simple as possible. For example, tabs and indentation are not preserved when Igor exports HTML files, and you can't rely on Web browsers to display specific fonts and font sizes. If you restrict yourself to plain text and pictures, you will achieve a high degree of browser compatibility.
There are two ways to export an Igor notebook as an HTML file:
-
Choose File→Save Notebook As
-
Using the SaveNotebook/S=5 operation
The SaveNotebook operation includes a /H flag which gives you some control over the features of the HTML file:
-
The file's character encoding
-
Whether or not paragraph formatting (e.g., alignment) is exported
-
Whether or not character formatting (e.g., fonts, font sizes) is exported
-
The format used for graphics
When you choose File→Save Notebook As, Igor uses the following default parameters:
-
Character encoding: UTF-8 (explained below)
-
Paragraph formatting is not exported
-
Character formatting is not exported
-
Pictures are exported in the PNG (Portable Network Graphics) format
By default, paragraph and character formatting is not exported because this formatting is often not supported by some Web browsers, is at cross-purposes with Web browser behavior (e.g., paragraph space-before and space-after), or is customarily left in the hands of the Web viewer (e.g., fonts and font sizes).
For creating simple web pages that work with a majority of web browsers, this is all you need to know about Igor's HTML export feature. In order to use advanced formatting, to use non-Roman characters, to use different graphics formats, and to cope with diverse web-browser behavior, you need to know more. Unfortunately, this can get quite technical.
HTML Standards
Igor's HTML export routine writes HTML files that conform to the HTML 4.01 specification, which is available from:
http://www.w3.org/TR/1999/PR-html40-19990824
It writes style information that conforms to the CSS1 (Cascading Style Sheet - Level 1) specification, which is available from:
http://www.w3.org/TR/1999/REC-CSS1-19990111
HTML Horizontal Paragraph Formatting
Tabs mean nothing in HTML. A tab behaves like a single space character. Consequently, you cannot rely on tabs for notebooks that are intended to be written as HTML files. HTML has good support for tables, which make tabs unnecessary. However, Igor notebooks don't support tables. Consequently, there is no simple way to create an HTML file from an Igor notebook that relies on tabs for horizontal formatting.
HTML files are often optimized for viewing on screen in windows of varying widths. When you make the window wider or narrower, the browser automatically expands and contracts the width of the text. Consequently, the roles played by the left margin and right margin in notebooks are unnecessary in HTML files. When Igor writes an HTML file, it ignores the left and right paragraph margin properties.
HTML Vertical Paragraph Formatting
The behavior of HTML browsers with regard to the vertical spacing of paragraphs makes it difficult to control vertical formatting. For historical reasons, browsers typically add a blank line after each paragraph (
) element and they ignore empty paragraph elements. Although it is possible to partially override this behavior, this only leads to more problems.
In an Igor notebook, you would usually use the space-before and space-after paragraph properties in place of blank lines to get paragraph spacing that is less than one line. However, because of the aforementioned browser behavior, the space-before and space-after would add to the space that the browser already adds and you would get more than one line's space when you wanted less. Consequently, Igor ignores the space-before and space-after properties when writing HTML files.
The minimum line height property is written as the CSS1 line-height property, which does not serve exactly the same purpose. This will work correctly so long as the minimum line height that you specify is greater than or equal to the natural line height of the text.
HTML Character Formatting
In an Igor notebook, you might use different fonts, font sizes, and font styles to enhance your presentation. An HTML file is likely to be viewed on a wide range of computer systems and it is likely that your enhancements would be incorrectly rendered or would be a hindrance to the reader. Consequently, it is customary to leave these things to the person viewing the web page.
If you use the SaveNotebook operation and enable exporting font styles, only the bold, underline and italic styles are supported.
In notebooks, the vertical offset character property is used to create subscripts and superscripts. When writing HTML, Igor uses the CSS vertical-align property to represent the notebook's vertical offset. The HTML property and the Igor notebook property are not a good match. Also, some browsers do not support the vertical-align property. Consequently, subscripts and superscripts in notebooks may not be properly rendered in HTML. In this case, the only workaround is to use a picture instead of using the notebook subscript and superscript.
HTML Pictures
If the notebook contains one or more pictures, Igor writes PNG or JPEG picture files to a "media" folder. For example, if the notebook contains two pictures and you save it as "Test.htm", Igor writes the file Test.htm and creates a folder named TestMedia. It stores in the TestMedia folder two picture files: Picture0.png (or .jpg) and Picture1.png (or .jpg). The names of the picture files are always of the form Picture<N> where N is a sequential number starting from 0. If the folder already exists when Igor starts to store pictures in it, Igor deletes all files in the folder whose names start with "Picture", since these files are most likely left over from a previous attempt to create the HTML file.
When you choose Save Notebook As from the File menu, Igor always uses the PNG format for pictures. If you want to use the JPEG format, you must execute a SaveNotebook operation from the command line, using the /S=5 flag to specify HTML and the /H flag to specify the graphics format.
PNG is a lossless format that is excellent for storing web graphics and is supported by virtually all recent web browsers. JPEG is a lossy format commonly used for web graphics. We recommend that you use PNG.
HTML does not support Igor's double, triple, or shadow picture frames. Consequently, when writing HTML, all types of notebook frames are rendered as HTML thin frames.
HTML Text Encoding
By default, Igor uses the UTF-8 text encoding when you save a notebook as HTML. For historical reasons, the SaveNotebook operation /H flag allows you to specify other text encodings. However, there is no reason to use anything other than UTF-8.
Embedding HTML Code
If you are knowledgeable about HTML, you may want to access the power of HTML without completely giving up the convenience of having Igor generate HTML code for you. You can do this by embedding HTML code in your notebook, which you achieve by simply using a ruler named HTMLCode.
Normally, Igor translates the contents of the notebook into HTML code. However, when Igor encounters a paragraph whose ruler is named HTMLCode, it writes the contents of the paragraph directly into the HTML file. Here is a simple example:
Living things are generally classified into 5 kingdoms:
<OL>
<LI>Monera
<LI>Protista
<LI>Fungi
<LI>Plantae
<LI>Animalia
</OL>
In this example, the gray lines are governed by the HTMLCode ruler. Igor writes the text in these line directly to the HTML file. This example produces a numbered list, called an "ordered list", which is announced using the HTML "OL" tag.
By convention, we make the ruler font color for the HTMLCode ruler gray. This allows us to distinguish at a glance the HTML code from the normal notebook text. The use of the color gray is merely a convention. It is the fact that the ruler is named HTMLCode that makes Igor write the contents of these paragraphs directly to the HTML file.
Here is an example that shows how to create a simple table:
<TABLE border="1" summary="Example of creating a table in HTML.">
<CAPTION><EM>A Simple Table</EM></CAPTION>
<TR><TH><TH>Col 1<TH>Col 2<TH>Col 3
<TR><TH>Row 1<TD>10<TD>20<TD>30
<TR><TH>Row 2<TD>40<TD>50<TD>60
</TABLE>
Here is an example that includes a link:
<P>Visit the <A HREF="http://www.wavemetrics.com">WaveMetrics</A> web site</P>
Finding Notebook Text
You can find text in a notebook using the find bar . Choose Edit→Find or press Ctrl+F to display it. The find bar allows you to set search parameters and to search forward and backward.
You can search for other occurrences of a string with minimal use of the mouse as follows:
-
Place your cursor on or in the first occurrence of the string you want to find.
-
Press Ctrl+F (Edit→Find) to find the next occurrence. The string will be automatically inserted into the Find bar.
-
Press Ctrl+G (Edit→Find Same) to find subsequent occurrences.
-
Press Shift-Ctrl+G to find the previous occurrences.
You can also perform a Find on multiple help, procedure and notebook windows at one time. See Finding Text In Multiple Windows.
Replacing Notebook Text
You can replace text in a notebook using the find bar . Choose Edit→Replace or press Ctrl+R to display the bar in replace mode.
Another method for finding and replacing text consists of these steps:
-
Copy the replacement text to the clipboard.
-
Place your cursor on or in the first occurrence of the string you want to find.
-
Press Ctrl+F (Edit→Find) to find the next occurrence. The string will be automatically inserted into the Find bar.
-
Press Ctrl+R to display the replace bar.
-
Press Ctrl+V to paste.
-
Press Ctrl+G to find the next occurrence.
-
Repeast steps 5 and 6 until done.
Notebook Names, Titles and File Names
The following explains the distinction between a notebook's name, its title, and the name of the file in which it is saved:
Notebook name
- Used to identify a notebook
- Igor automatically gives new notebooks names of the form Notebook0. You can change it using the
Window Controldialog or using the DoWindow/C operation
Notebook title
- For visually identifying the window. The title appears in the title bar at the top of the window and in the
Other Windowssubmenu of theWindowsmenu. - Initially, Igor sets the title to the concatenation of the notebook name and the file name. You can change it using the
Window Controldialog or using the DoWindow/T operation.
File name
- This is the name of the file in which the notebook is stored.
- You enter this in the
New Notebookdialog. Change it on the desktop.
Igor automatically opens notebooks that are part of an Igor experiment when you open the experiment. If you change a notebook's file name outside of the experiment, Igor will be unable to automatically open it and will ask for your help when you open the experiment.
A notebook file stored inside a packed experiment file does not exist separately from the experiment file, so there is no way or reason to change the notebook's file name.
Notebook Info Dialog
You can get general information on a notebook by selecting the Info item in the Notebook menu or by clicking the icon in the bottom/left corner of the notebook. This displays the File Information dialog.
The File Information dialog tells you whether the notebook has been saved and if so whether it is stored in a packed experiment file, in an unpacked experiment folder or in a stand-alone file.
Programming Notebooks
Advanced users may want to write Igor procedures to automatically log results or generate reports using a notebook. The operations that you would use are briefly described here.
| Operation | What It Does |
|---|---|
| NewNotebook | Creates a new notebook window. |
| OpenNotebook | Opens an existing file as a notebook. |
| SaveNotebook | Saves an existing notebook to disk as a stand-alone file or packed into the experiment file. |
| PrintNotebook | Prints all of a notebook or just the selected text. |
| Notebook | Provides control of the contents and all of the properties of a notebook except for headers and footers. Also sets the selection and to search for text or graphics. |
| NotebookAction | Creates or modifies notebook action special characters. |
| GetSelection | Retrieves the selected text. |
| SpecialCharacterList | Returns a list of the names of special characters in the notebook. |
| SpecialCharacterInfo | Returns information about a specific special character. |
| KillWindow | Kills a notebook. |
There is currently no way to set headers and footers from Igor procedures. A workaround is to create a template notebook file with the headers and footers that you want and to open this instead of creating a new notebook.
The Notebook Demo #1 experiment, in the Examples:Feature Demos folder, provides a simple illustration of generating a report notebook using Igor procedures.
Open the Notebook Demo #1 experiment
See Notebooks as Subwindows in Control Panels for information on using a notebook as a user-interface element.
Some example procedures follow.
Logging Text
This example shows how to add an entry to a log. Since the notebook is being used as a log, new material is always added at the end.
//	Function AppendToLog(nb, str, stampDateTime)
//	Appends the string to the named notebook.
//	If stampDateTime is nonzero, appends date/time before the string.
Function AppendToLog(nb, str, stampDateTime)
	String nb							// name of the notebook to log to
	String str							// the string to log
	Variable stampDateTime			// nonzero if we want to include stamp
	Variable now
	String stamp
	Notebook $nb selection={endOfFile, endOfFile}
	if (stampDateTime)
		now = datetime
		stamp = Secs2Date(now,0) + ", " + Secs2Time(now,0) + "\r"
		Notebook $nb text=stamp
	endif
	Notebook $nb text= str+"\r"
End
You can test this function with the following commands:
NewNotebook/F=1/N=Log1 as "A Test"
AppendToLog("Log1", "Test #1\r", 1)
AppendToLog("Log1", "Test #2\r", 1)
You will find the sprintf operation useful for generating the string to be logged.
Inserting Graphics
There are two kinds of graphics that you can insert into a notebook under control of a procedure:
-
A picture generated from a graph, table, layout or Gizmo plot (an "Igor-object" picture)
-
A copy of a named picture stored in the current experiment's picture gallery
The command
Notebook Notebook0 picture={Graph0(0,0,360,144), -1, 0}
creates a new picture of the named graph and inserts it into the notebook. The numeric parameters allow you to control the size of the picture, the type of picture and whether the picture is black and white or color. This creates an anonymous (unnamed) picture. It has no name and does not appear in the Pictures dialog. However, it is an Igor-object picture with embedded information that allows Igor to recognize that it was generated from Graph0.
The command
Notebook Notebook0 picture={PICT_0, 1, 0}
makes a copy of the named picture, PICT_0, stored in the experiment's picture gallery, and inserts the copy into the notebook as an anonymous picture. The inserted anonymous picture is no longer associated with the named picture from which it sprang.
See Pictures for more information on pictures.
Updating a Report Form
In this example, we assume that we have a notebook that contains a form with specific values to be filled in. These could be the results of a curve fit, for example. This procedure opens the notebook, fills in the values, prints the notebook and then kills it.
// DoReport(value1, value2, value3)
// Opens a notebook file with the name "Test Report Form",
// searches for and replaces "<value 1>", "<value 2>" and "<value3>".
// Then prints the notebook and kills it.
// "<value 1>", "<value 2>" and "<value 3>" must appear in the form
// notebook, in that order.
// This procedure assumes that the file is in the Igor folder.
Function DoReport(value1, value2, value3)
	String value1, value2, value3

	OpenNotebook/P=IgorUserFiles/N=trf "Test Report Form.ifn"
	Notebook trf, findText={"<value 1>", 1}, text=value1
	Notebook trf, findText={"<value 2>", 1}, text=value2
	Notebook trf, findText={"<value 3>", 1}, text=value3

	PrintNotebook/S=0 trf
	KillWindow trf
End
To try this function, enter it in the Procedure window. Then create a notebook that contains "<value 1>", "<value 2>" and "<value 3>" and save it in the Igor User Files folder using the file name "Test Report Form.ifn". The notebook should look like this:
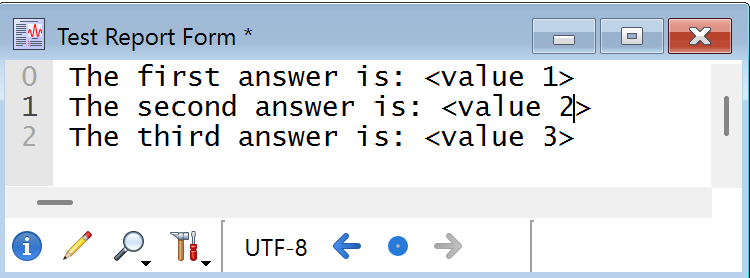
Now kill the notebook and execute the following command:
DoReport("123", "456", "789")
This will print the form using the specified values.
Updating Igor-Object Pictures
The following command updates all pictures in the notebook made from Igor graphs, tables, layouts or Gizmo plots from the current experiment.
Notebook Notebook0 specialUpdate=0
More precisely, it will update all dynamic special characters, including date and time characters as well as Igor-object pictures.
This next fragment shows how to update just one particular Igor-object picture.
String nb = "Notebook0"
Notebook $nb selection={startOfFile, startOfFile}
Notebook $nb findPicture={"Graph0", 1}
if (V_Flag)
	Notebook $nb specialUpdate=1
else
	Beep							// can't find Graph0
endif
Igor will normally refuse to update special characters unless updating is enabled, via the Enable Updating dialog (Notebook menu). You can override this and force Igor to do the update by using 3 instead of 1 for the specialUpdate parameter.
Retrieving Notebook Text
Since you can retrieve text from a notebook, it is possible to use a notebook as an input mechanism for a procedure. To illustrate this, here is a procedure that tags each point of a wave in the top graph with a string read from the specified notebook. The do-loop in this example shows how to pick out each paragraph from the start to the end of the notebook.
#pragma rtGlobals=1           // Make V_Flag and S_Selection be local variables.

// TagPointsFromNotebook(nb, wave)
// nb is the name of an open notebook.
// wave is the name of a wave in the top graph.
// TagPointsFromNotebook reads each line of the notebook and uses it
// to tag the corresponding point of the wave.
Function TagPointsFromNotebook(nb, wave)
	String nb                  // name of notebook
	String wave                // name of the wave to tag

	String name                // name of current tag
	String text                // text for current tag
	Variable p

	p = 0
	do
		// move to current paragraph
		Notebook $nb selection={(p, 0), (p, 0)}
		if (V_Flag)             // no more lines in file?
			break
		endif

		// select all characters in paragraph up to trailing CR
		Notebook $nb selection={startOfParagraph, endOfChars}

		GetSelection notebook, $nb, 2    // Get the selected text
		text = S_Selection               // S_Selection is set by GetSelection
		if (strlen(text) > 0)            // skip if this line is empty
			name = "tag" + num2istr(p)
			Tag/C/N=$name/F=0/L=0/X=0/Y=8 $wave, pnt2x($wave, p), text
		endif

		p += 1
	while (p < numpnts($wave))          // break if we hit the end of the wave
End
More Notebook Programming Examples
These example experiments illustrate notebook programming:
Open the Notebook Actions Demo experiment
Open the Notebook Operations Test experiment
Open the Notebook Picture Test experiment
Open Notebook Subwindow Demo Experiment
Generate Notebook Commands Dialog
The Generate Notebook Commands dialog automatically generates the commands required to reproduce a notebook or a section of a notebook. This is intended to make programming a notebook easier. To use it, start by manually creating the notebook that you want to later create automatically from an Igor procedure. Then choose Generate Commands from the Notebook menu to display the corresponding dialog:
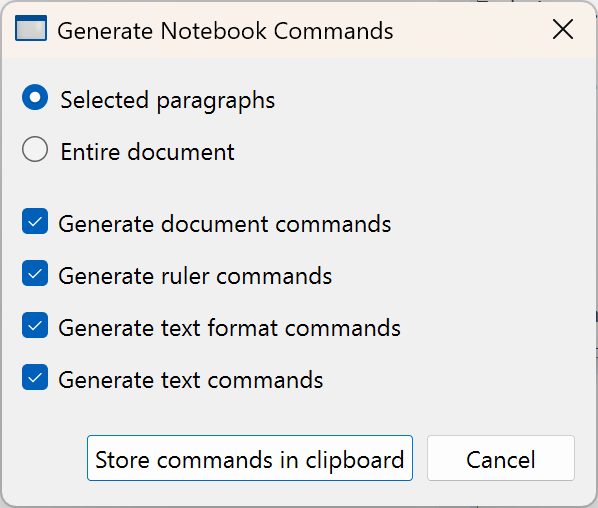
After clicking Store Commands in Clipboard, open the procedure window and paste the commands into a procedure.
For a very simple formatted notebook, the commands generated look like this:
String nb = "Notebook2"
NewNotebook/N=$nb/F=1/V=1/W=(5,40,563,359)
Notebook $nb defaultTab=36,pageMargins={54,54,54,54}
Notebook $nb showRuler=0,rulerUnits=1,updating={1,60}
Notebook $nb newRuler=Normal,justification=0,margins={0,0,504}
Notebook $nb spacing={0,0,0},tabs={}
Notebook $nb rulerDefaults={"Helvetica",10,0,(0,0,0)}
Notebook $nb ruler=Normal,text="This is a test."
To make it easier for you to modify the commands, Igor uses the string variable nb instead of repeating the literal name of the notebook in each command.
If the notebook contains an Igor-object picture, you will see a command that looks like
Notebook $nb picture={Graph0(0,0,360,144), 0, 1}
However, if the notebook contains a picture that is not associated with an Igor object, you will see a command that looks like
Notebook $nb picture={putGraphicNameHere, 1, 0}
You will need to replace "putGraphicNameHere" with the name of a picture. Use the Pictures dialog, via the Misc menu, to see what named pictures are stored in the current experiment or to add a named picture. See Pictures for more information.
There is a shortcut that generates commands without going through the dialog. Select some text in the notebook, press Alt and choose Copy from the Edit menu. This generates commands for the selected text and text formats. Press the Alt to also generate document and ruler commands.
Notebook Preferences
The notebook preferences affect the creation of new notebooks. There is one set of preferences for plain notebooks and another set of preferences for formatted notebooks.
To set notebook preferences, set the attributes of any notebook of the desired type (plain or formatted) and then use the Capture Notebook Prefs item in the Notebook menu.
To determine what the preference settings are you must create a new notebook and examine its settings.
Notebook windows each have their own Page Setup values. New notebook windows will have their own copy of the captured Page Setup values.
Preferences are stored in the Igor Preferences file. See Preferences for further information on preferences.
Notebook Template Files
A template notebook provides a way to customize the initial contents of a new notebook. When you open a template notebook, Igor opens it normally but leaves it untitled and disassociates it from the template notebook file. This leaves you with a new notebook based on your prototype. When you save the untitled notebook, Igor creates a new notebook file.
Template notebooks have ".ift" as the file name extension instead of ".ifn".
To make a template notebook, start by creating a prototype formatted text notebook with whatever contents you would like in a new notebook.
Choose File→Save Notebook As, choose IGOR Formatted Notebook Template from the file type pop-up menu, and save the template notebook.
You can convert an existing formatted text notebook file into a template file by changing the extension from ".ifn" to ".ift".