Python Overview
Users can call Python code directly from Igor Pro. The igorpro Python module is shipped with Igor Pro, and provides an API that allows Igor Pro and Python to communicate (see Python Module Reference). Users can pass Igor data types —such as waves, data folders, variables, and strings — to Python to take advantage of the large number of third-party libraries available to Python programmers. Similarly, Python can pass data back to Igor, which are automatically converted into native Igor types (See Python to Igor Type Conversions).
There are three ways to interact with Python from Igor Pro: the Python Console, the Python operation, and the PythonFile operation. For first-time users, we recommend getting familiar with running Python commands using the Python Console. See Setting up Python for the first time to get started.
Importantly, the igorpro module can only be used from within Igor Pro itself. At the present moment, you cannot start a Python session using an external application and have it communicate with Igor. This may be a feature we implement in the future. You can execute Python scripts in any .py file, but they must be launched from Igor itself (see PythonFile).
When executing Python code from a .py file, import the igorpro module using:
import igorpro
Setting up Python for the first time
Igor does not supply its own version of Python, meaning that you can use any supported CPython environment that is on your system (see Supported Python Versions). If you don't have Python installed on your computer yet, we recommend downloading the Windows 64-bit installer for one of the supported versions (https://www.python.org/downloads).
Igor Pro does not support CPython versions installed using the Microsoft® Store.
Selecting a Python installation
Once Python is installed, users must configure Igor to use a specific installation of Python, which is done in the Miscellaneous Settings dialog. In the Python menu, select Settings.... Python installations that are already on your system path should be automatically detected and available for you to select.

Installations that are not automatically detected can still be used by clicking Add..., and browsing to the Python3XX.dll file, or the .cfg file for virtual environments. If you've installed Python into the default location using one of their installers, it was likely installed in:
C:\Users\<username>\AppData\Local\Programs\PythonXXX
AppData is usually a hidden folder, in order to browse inside it you must check View→Show→Hidden Items in the Windows file explorer.
If your selected installation of Python has any incompatabilities with what Igor expects (e.g. using an unsupported version of Python), it will be detected here. When you select a Python environment, information about that installation should be displayed at the bottom of the dialog. Click Save Settings to complete your selection. Any manually configured environments will show up the next time you open the dialog.
After selecting a valid Python environment to use, you can start a Python session by selecting 'Open Console' in the 'Python' menu. If you execute the Python or PythonFile operations prior to opening the Python Console, the console will be opened for you when executing the operation for the first time.
Supported Python versions
Igor currently supports Python 3.11 through 3.14.
Our support for Python 3.14 is currently limited to the 'standard' installation of Python 3.14, not the free-threaded installation.
Creating a virtual environment
A common practice is to create a virtual Python environment for new projects, so that you can isolate the packages used by that project from the rest of your system, while still using the same Python base installation. Virtual environments can either be created using Igor or with external tools like venv.
After creating a virtual environment, you must activate it before you can use it. See Activating a virtual environment.
Using Igor to create a virtual environment
Igor Pro 10 comes with the PythonEnv operation, which provides some environment management utilities.
-
In the Python Settings, select the Python installation you want to use as the base Python version for your new environment. Alternatively, activate that environment programatically (see Activating a virtual environment).
-
To create a new virtual environment at a specific location on disk:
NewPath/O envPath, "path/to/environment/parent/folder"

// Creates the virtual environment in envPath
PythonEnv/P=envPath venv = "nameOfEnvironment" -
Activate the environment to use it for running subsequent Python code.
PythonEnv/P=envPath activate = "nameOfEnvironment"
Using external tools to create a virtual environment
-
Navigate to a suitable location on disk using the system command prompt, powershell, or similar. You may want to create a new folder in which to hold both the virtual Python environment as well as any Python code that you plan to write that is associated with that project.
-
We recommend using venv, or a similar tool (https://docs.python.org/3/library/venv.html) to create the virtual environment. For example, using venv from the command prompt:
python -m venv /path/to/new/virtual/environmentIn the above example, the virtual environment will be based on the version of Python that is default on your system, or whichever environment is currently activated.
-
If you wish to use a different Python version, you can specify the full path to the Python executable that you want to use. For example, if your default system Python is Python 3.13, but you need a virtual environment that uses Python 3.11, you can do this:
path/to/Python311/python -m venv /path/to/new/virtual/environment -
Once created, you must configure the virtual environment in Igor in order to use it. In the Python category of the Miscellaneous Settings dialog, click Add... and navigate to the .cfg file that is inside your virtual environment folder. Once selected, click Save Settings. When you open the Python Console or execute any of the Python operations, it will use the virtual environment.
Activating a virtual environment
In order to use a specific Python environment, whether it is a virtual environment or not, you need to activate it. This can be done manually, as described in Selecting a Python installation. To activate an environment programmatically, use the PythonEnv operation.
// Activates the environment so it will be used to execute subsequent Python code
PythonEnv/P=envPath activate = "nameOfEnvironment"
Now when you open the Python Console or execute any of the Python operations, it will use this environment.
If you have already started a Python session by running Python code through the Python Console or one of Igor's operations, you will have to restart Igor in order to use the new virtual environment.
Installing Python packages
Igor does not have a direct way to install Python packages into a specific Python environment. That should be done externally in the command prompt, powershell, etc. using a package manager like pip(https://pip.pypa.io/en/stable/cli/pip/) or uv(https://docs.astral.sh/uv/). However, if you insist, you can install packages from Igor using a script like this, assuming that you installed pip alongside your Python installation:
Function installPackage(String arguments)
	// Get the path to the Python executable
	PythonEnv
	String pathToPip = StringByKey("HOME", S_PythonEnvInfo, "=", ";") + "\\Scripts\\pip.exe"

	// Build the pip install command string
	String cmd
	sprintf cmd, "\"%s\" install %s", pathToPip, arguments

	ExecuteScriptText/B/Z cmd
	print S_Value
End

// To install numpy, for instance:
PythonEnv/P=envPath activate = "nameOfTargetEnvironment"
installPackage("numpy")
Recommended Python packages
NumPy
NumPy is a popular Python package that provides an extensive library for math and scientific computing. Because it is so widely used, the Python Module Reference provides methods for directly converting between Igor waves and NumPy arrays. The Python and PythonFile operations are also capable of retrieving NumPy arrays and assigning their data to Igor waves. In order to use the full functionality of the module and the built-in Igor operations, we recommend installing NumPy (https://numpy.org/) into your Python environment. From the system command prompt or terminal, execute:
pip install numpy
Python script locations
In order for Python to be able to import your code, it needs to be on Python's search path, which can be queried in the Python Console using:
sys.path
You can add folders containing your Python scripts to this search path by using
sys.path.append('path/to/my/python/scripts/')
Alternatively, there are a few locations that Igor automatically adds to sys.path for your convenience:
- /Documents/WaveMetrics/Igor Pro 10 User Files/Python Scripts
- /Documents/WaveMetrics/Igor Pro 10 User Files/User Procedures
- /Program Files/WaveMetrics/Igor Pro 10 Folder/Python Scripts
- /Program Files/WaveMetrics/Igor Pro 10 Folder/User Procedures
Any subfolders within these folders are not added to sys.path. For instance, if you have the file analysis.py inside the folder 'Python Scripts/MyProject', you can import it as a module using the Python Console:
from MyProject import analysis
or, alternatively:
import MyProject.analysis
or execute the file using the PythonFile operation:
PythonFile file = "MyProject/analysis.py"
Python Console
The Python Console runs the Python Interpreter, which allows users to execute Python code one statement at a time. The Python Console is analogous to running a Python session from the system command prompt or terminal.
Before opening the Python Console, make sure you have the correct Python environment selected in Miscellaneous Settings. Once a Python session has been started, you have to restart Igor to change Python environments. You can open the Python Console from the 'Python' menu, and selecting Open Console.
The Python Console is meant to act as a quick way to try out new code, test an idea, or even do incremental analysis on your data. It is designed so that users can freely copy and paste code (comments, empty lines, and all) directly into the console and have it just...work.
Multi-line statements
The Python Console supports multi-line statements, such as function or class definitions, conditional statements, multi-line strings, loops, and explicit line continuation ( \ ). A dot in the left margin indicates that a multi-line statement is in progress. For example, this for-loop will create 10 waves in Igor (wave_0, wave_1, ...):
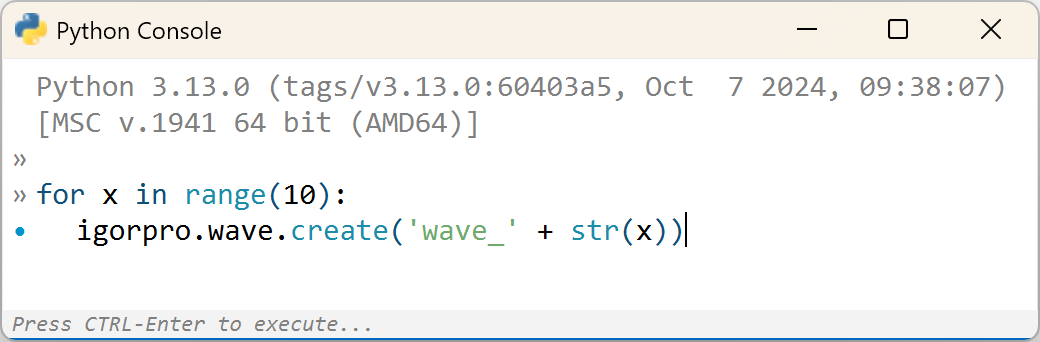
Note that to exit the multi-line statement and execute the code, you must press CTRL-Enter, or Esc to clear the entry line.
Undocking the Python Console
The Python Console is a dockable window, meaning it can be part the main Igor window when it is 'docked', or exist as an independent window when it is 'undocked'. Right click on the console and select the menu item to toggle between the 'docked' and 'undocked' state.
Interrupting Python
In order to break Python out of its current execution, press CTRL-C while the Python Console is the active window. This will perform a keyboard interrupt.
Object life-time
Any Python objects that are created using the console are global objects that will persist until Igor is closed or they are otherwise deleted. These objects can be used by subsequent calls to the Python or PythonFile operations. Similarly, global Python objects that are created with these operations can then be used in the console.
If a new experiment is opened without restarting Igor, global Python objects from the igorpro module (igorpro.wave, igorpro.variable, igorpro.string, etc.) will be stale, since the underlying Igor objects no longer exist. Attempting to use those stale objects from Python will result in an error saying that the object no longer exists.
Once a module has been imported into Python, any changes to the module source code will not take effect until the Python Interpreter restarts. However, see Python's importlib documentation for more information and caveats on re-importing a module (https://docs.python.org/3/library/importlib.html#importlib.reload).
Changing Python environments
Once the Python Console is opened, you cannot change environments without restarting Igor, or opening a new instance of Igor. If multiple instances of Igor are running, each can run its own Python Console session independently. Opening a new experiment does not alter the current Python session, existing Python objects, or imported modules. However, all of the existing Python objects that reference Igor objects will no longer be valid, because their associated Igor objects no longer exist. Attempting to use an invalid Python object will raise an exception.
Programming with an External Editor
Igor Pro does not have a built-in editor for Python code. We recommend using a third-party editor, such as Visual Studio Code, PyCharm, etc. for editing your Python code. Most editors are capable of providing users with productivity features like syntax highlighting and statement completion for the various Python modules that are installed. In order to enable these features for the igorpro Python module, you must configure the external editor so that it knows the location of the module.
Visual Studio Code
-
In the search bar, type:
>Preferences: Open User Settings (JSON)This will open the
settings.jsonfile. -
In this file, there will be a list of properties. Add the property
python.analysis.extraPathsto the list, using the full path to theIgor Pro 10 Folder/IgorBinaries_x64/Pythonfolder. For example:"python.analysis.extraPaths": [
"C:/Program Files/WaveMetrics/Igor Pro 10 Folder/IgorBinaries_x64/Python"
],The full file should look something like this:
{
"security.workspace.trust.untrustedFiles": "open",
"window.menuBarVisibility": "compact",
"workbench.colorCustomizations": {},
"launch": {
"configurations": [
]
},
"editor.unicodeHighlight.nonBasicASCII": false,
"workbench.preferredDarkColorTheme": "Visual Studio 2017 Dark - C++",
"editor.largeFileOptimizations": false,
"redhat.telemetry.enabled": true,
"git.openRepositoryInParentFolders": "never",
"python.analysis.extraPaths": [
	"C:/Program Files/WaveMetrics/Igor Pro 10 Folder/IgorBinaries_x64/Python"
],
"editor.indentSize": "tabSize",
} -
Restart Visual Studio Code, and you should now have statement completion for the
igorpromodule.
PyCharm
- Navigate to
Settings > Project > Python Interpreter. Alternatively, click on the button in the status bar that indicates which Python interpreter your project is configured with, and selectInterpreter Settings... - Click on the Python Interpreter drop down list, and click
Show All.... This should open a new window showing the path to your current Python Interpreter. - In the left panel, click on the button for
Show Interpreter Paths, which will display the current Python search paths. - Click the
+button to add a new folder, and navigate toC:/Program Files/WaveMetrics/Igor Pro 10 Folder/IgorBinaries_x64/Python - Once you've added this folder to the path list, the IDE will recognize the
igorpromodule and you should get statement completion.
Built-in console commands
| #clear | Clears the console | |
| Ctrl-Enter | Executes a multi-line statement | |
| Esc | Clears the entry line | |
| Up/Down arrow keys | Navigates through the command history | |
Python to Igor type conversions
The following Python types are able to be converted back into native Igor types when using the Python and PythonFile operations:
| Python Type | Igor Type |
|---|---|
| Boolean | Variable |
| Integer | Variable |
| Float | Variable |
| Complex | Complex Variable |
| String | String |
| List | Wave |
| Tuple | Wave |
| Array | Wave |
When creating an Igor wave from a NumPy array using igorpro.wave.createfrom, the Igor wave will have the following type, depending on the type of the NumPy array:
| NumPy Array Data Type | Igor Wave Type |
|---|---|
| numpy.bool | Unsigned 8 bit |
| numpy.int8 | Signed 8 bit |
| numpy.uint8 | Unsigned 8 bit |
| numpy.int16 | Signed 16 bit |
| numpy.uint16 | Unsigned 16 bit |
| numpy.int32 | Signed 32 bit |
| numpy.uint32 | Unsigned 32 bit |
| numpy.int64 | Signed 64 bit |
| numpy.uint64 | Unsigned 64 bit |
| numpy.float32 | 32 bit Float |
| numpy.float64 | 64 bit Float |
| numpy.complex64 | 32 bit Complex Float |
| numpy.complex128 | 64 bit Complex Float |
| numpy.str | Text |
Igor does not support the numpy.float16 type, since Igor does not have a corresponding 16 bit float type. We recommend converting to numpy.float32 before passing the array to Igor.
Caveats
Note, Python code is executed within Igor's process. If Python crashes for any reason, Igor will likely crash as well. We recommend using Igor's auto-save feature to periodically save the experiment file to limit potential data loss that could result from a Python crash. Some scenarios that may be more likely to cause problems:
-
Since Igor is a Qt-based application, attempting to import Qt for Python may fail. If you do try to do this, we recommend using a version of Qt that is < 6, but this still may fail due to library conflicts.
-
Running Python code that initiates non-blocking event loops may cause a crash.