Advanced Topics
This file contains material on topics of interest to advanced Igor users.
- Procedure Modules
- Regular Modules
- Independent Modules
- Sound
- Movies
- Timing
- Packages
- Saving Package Preferences
- Creating Your Own Help File
- Creating Formatted Text
- Client/Server Overview
- ActiveX Automation
- Calling Igor from Scripts
- File Transfer Protocol (FTP)
- Operation Queue
- User-Defined Hook Functions
- Window User Data
- Window Hook Functions
- Data Acquisition
- FIFOs and Charts
- Charts
- Background Tasks
- Automatic Parallel Processing With TBB
- Automatic Parallel Processing With Multithread
- ThreadSafe Functions and Multitasking
- Cursors - Moving Cursor Calls Function
- Crashes
Procedure Modules
Igor supports grouping procedure files into modules to prevent name conflicts and to isolate procedure packages from other packages. This feature is for intermediate to advance Igor programmers.
There are three types of modules:
- ProcGlobal
- Regular Modules
- Independent Modules
You set a procedure file's module using the ModuleName or IndependentModule pragmas. A procedure file that does not contain one of these pragmas is in the ProcGlobal module by default.
Igor compiles independent modules separately from other procedures. This allows independent modules to continue to work even if there are errors in other procedure files. Independent module programming is demanding and is intended for use by advance Igor programmers. See Independent Modules for details.
Regular modules provide protection against name conflicts and are easier to work with than independent modules. Regular modules are intended for use by intermediate to advanced Igor programmers who are creating procedure packages. See Regular Modules for details.
Regular Modules
Regular modules provide a way to avoid name conflicts between procedure files. Regular modules are distinct from "independent modules" which are discussed in the next section.
Igor's module concept provides a way to group related procedure files and to prevent name conflicts between procedure packages. You specify that a procedure file is part of a regular module using the #pragma ModuleName statement. The statement is allowed in any procedure file but not in the built-in main procedure window.
A procedure file that does not contain a #pragma ModuleName statement (or a #pragma IndependentModule statement) defines public procedure names in the default ProcGlobal module. All functions in the procedure file can be called from any other procedure file in ProcGlobal or in any regular module by simply specifying the name without any name qualifications (explained below).
When you execute a function from the command line or use the Execute operation, you are operating in the ProcGlobal context.
Functions are public by default and private if declared using the static keyword. For example:
// In a procedure file with no #pragma ModuleName or #pragma IndependentModule

static Function Test()           // "static" means this function is private to its procedure file
	Print "Test in ProcGlobal"
End

Function TestInProcGlobal()      // Public
	Print "TestInProcGlobal in ProcGlobal"
End
Because it is declared static, the Test function is private to its procedure file. Each procedure file can have its own static Test function without causing a name conflict.
The TestInProcGlobal function is public so there can be only one public function with this name in ProcGlobal.
In this example the static Test function is accessible only from the procedure file in which it is defined.
Sometimes you have a need to avoid name conflicts but still want to be able to call functions from other procedure files, from control action procedures or from the command line. This is where a regular module is useful.
You specify that a procedure file is in a regular module using the ModuleName pragma so that even static functions can be called from other procedure files. For example:
#pragma ModuleName = ModuleA     // The following procedures are in ModuleA

static Function Test()           // Semi-private
	Print "Test in ModuleA"
End

Function TestModuleA()           // Public
	Print "Test in ModuleA"
End
Because it is declared static, this Test function does not conflict with Test functions in other procedure files. But because it is in a regular module (ModuleA), it can be called from other procedure files using a qualified name:
ModuleA#Test() // Call Test in ModuleA
This qualified name syntax overrides the static nature of Test and tells Igor that you want to execute the Test function defined in ModuleA. The only way to access a static function from another procedure file is to put it in a regular module and use a qualified name.
If you are writing a non-trivial set of procedures, it is a good idea to use a module and to declare your functions static, especially if other people will be using your code. This prevents name conflicts with other procedures that you or other programmers write.
Make sure to choose a distinctive module name. Module names must be unique.
Regular Modules in Action Procedures and Hook Functions
Control action procedures and hook functions are called by Igor at certain times. They are executed in the ProcGlobal context, as if they were called from the command line. This means that you must use a qualified name to call a static function as an action procedure or a hook function. For example:
#pragma ModuleName = RegularModuleA

static Function ButtonProc(ba) : ButtonControl
	STRUCT WMButtonAction &ba

	switch (ba.eventCode)
		case 2: // mouse up
			Print "Running RegularModuleA#ButtonProc"
			break
	endswitch

	return 0
End

static Function CreatePanel()
	NewPanel /W=(375,148,677,228)
	Button button0,pos={106,23},size={98,20},proc=RegularModuleA#ButtonProc,title="Click Me"
End
RegularModuleA is the name we have chosen for the regular module for demonstration purposes. You should choose a more descriptive module name.
The use of a qualified name, RegularModuleA#ButtonProc, allows Igor to find and execute the static ButtonProc function in the RegularModuleA module even though ButtonProc is running in the ProcGlobal context.
To protect the CreatePanel function from name conflicts we also made it static. To create the panel, execute:
RegularModuleA#CreatePanel()
Regular Modules and User-Defined Menus
Menu item execution text also runs in the ProcGlobal context. If you want to call a routine in a regular module you must use a qualified name.
Continuing the example from the preceding section, here is how you would write a menu definition:
#pragma ModuleName = RegularModuleA

Menu "Macros"
	"Create Panel", RegularModuleA#CreatePanel()
End
See Also
Procedure Modules, Independent Modules, Controls and Control Panels, User-Defined Hook Functions, User-Defined Menus
Independent Modules
An independent module is a set of procedure files that are compiled separately from all other procedures. Because it is compiled separately, an independent module can run when other procedures are in an uncompiled state because the user is editing them or because an error occurred in the last compile. This allows the independent module's control panels and menus to continue to work regardless of user programming errors.
Creating an independent module adds complexity and requires a solid understanding of Igor programming. You should use an independent module if it is important that your procedures be runnable at all times. For example, if you have created a data acquisition package that must run regardless of what the user is doing, that would be a good candidate for an independent module.
A file is designated as being part of an independent module using the IndependentModule pragma:
#pragma IndependentModule = imName
Make sure to use a distinctive name for your independent module.
The IndependentModule pragma is not allowed in the built-in procedure window which is always in the ProcGlobal module.
It is normal for multiple procedure files that are part of the same package to be in the same independent module.
An independent module creates an independent namespace. Function names in an independent module do not conflict with the same names used in other modules. To call an independent module function from the ProcGlobal module or from a regular module the function must be public (non-static) and you must use a qualified name as illustrated in the next section.
An independent module can call only procedures in that independent module.
Independent Modules - A Simple Example
Here is a simple example using an independent module. This code must be in its own procedure file and not in the built-in procedure file:
#pragma IndependentModule = IndependentModuleA

static Function Test()				// static means private to file
	Print "Test in IndependentModuleA"
End

// This must be non-static to call from command line (ProcGlobal context)
Function CallTestInIndependentModuleA()
	Test()
End
From the command line (the ProcGlobal context):
CallTestInIndependentModuleA()                        // Error
IndependentModuleA#CallTestInIndependentModuleA()     // OK
IndependentModuleA#Test()                             // Error
The first command does not work because the functions in the independent module are accessible only using a qualified name. The second command does work because it uses a qualified name and because the function is public (non-static). The third command does not work because the function is private (static) and therefore is accessible only from the file in which it is defined. A static function in an independent module is not accessible from outside the procedure file in which it is defined unless it is in an enclosed regular module as described below under Regular Modules Within Independent Modules.
SetIgorOption IndependentModuleDev=1
By default, the debugger is disabled for independent modules. It can be enabled using:
SetIgorOption IndependentModuleDev=1
Also by default, independent module procedure windows are not listed in the Windows→Procedure Windows submenu unless you use SetIgorOption IndependentModuleDev=1.
When SetIgorOption IndependentModuleDev=1 is in effect, the Windows→Procedure Windows submenu shows all procedure windows, and those that belong to an independent module are listed with the independent module name in brackets. For example:
DemoLoader.ipf [WMDemoLoader]
This bracket syntax is used in the WinList, FunctionList, DisplayProcedure, and ProcedureText functions and operations.
To get the user experience, as opposed to the programmer experience, return to normal operation by executing:
SetIgorOption IndependentModuleDev=0
Independent Module Development Tips
Development of an independent module may be easier if it is first done as for normal code. Add the module declaration
#pragma IndependentModule = moduleName
only after the code has been fully debugged and is working properly.
A procedure file that is designed to be #included should ideally work inside or outside of an independent module. Read the sections on independent modules below to learn what the issues are.
When developing an independent module, you will usually want to execute:
SetIgorOption IndependentModuleDev=1
Independent Modules and #include
If you #include a procedure file from an independent module, Igor copies the #included file into memory and makes it part of the independent module by inserting a #pragma IndependentModule statement at the start of the copy. If the same file is included several times, there will be several copies, each with a different independent module name.
Do not edit procedure windows created by #including into an independent module because they are temporary and your changes will not be saved. You would not want to save them anyway because Igor has modified them.
Do not #include files that already contain a #pragma IndependentModule statement unless the independent module name is the same.
Limitations of Independent Modules
Independent modules are not for every-day programming and are more difficult to create than normal modules because of the following limitations:
-
Macros and Procs are not supported.
-
Button and control dialogs do not list functions in an independent module.
-
Functions in an independent module cannot call functions in other modules except through the Execute operation.
Independent Modules in Action Procedures and Hook Functions
Normally you must use a qualified name to invoke a function defined in an independent module from the ProcGlobal context. Control action procedures and hook functions execute in the ProcGlobal context. But, as a convenience and to make #include files more useful, Igor eliminates this requirement when you create controls and specify hook functions from a user-defined function in an independent module.
When you execute an operation that creates a control or specifies a hook function while running in an independent module, Igor examines the specified control action function name or hook function name. If the named function is defined in the same independent module, Igor automatically inserts the independent module name. This means you can write something like:
#pragma IndependentModule = IndependentModuleA
Function SetProcAndHook()
	Button b0, proc=ButtonProc
	SetWindow hook(Hook1)=HookFunc
End
You don't have to write:
#pragma IndependentModule = IndependentModuleA
Function SetProcAndHook()
	Button b0, proc=IndependentModuleA#ButtonProc
	SetWindow hook(Hook1)=IndependentModuleA#HookFunc
End
Such independent module name insertion is only done when an operation is called from a function defined in an independent module. It is not done if the operation is executed from the command line or via Execute.
The control action function or hook function must be public (non-static) except as described below under Regular Modules Within Independent Modules.
Here is a working example:
#pragma IndependentModule = IndependentModuleA

Function ButtonProc(ba) : ButtonControl	// Must not be static
	STRUCT WMButtonAction &ba

	switch (ba.eventCode)
		case 2: // mouse up
			Print "Running IndependentModuleA#ButtonProc"
			break
	endswitch

	return 0
End

Function CreatePanel()
	NewPanel /W=(375,148,677,228)
	Button button0,pos={106,23},size={98,20},proc=ButtonProc,title="Click Me"
End
Independent Modules and User-Defined Menus
Independent modules can contain User-Defined Menus. When you choose a user-defined menu item, Igor determines if the menu item was defined in an independent module. If so, and if the menu item's execution text starts with a call to a function defined in the independent module, then Igor prepends the independent module name before executing the text. This means that the second and third menu items in the following example both call IndependentModuleA#DoAnalysis:
#pragma IndependentModule = IndependentModuleA

Menu "Macros"
	"Load Data File/1", Beep; LoadWave/G
	"Do Analysis/2", DoAnalysis()		// Igor automatically prepends IndependentModuleA#
	"Do Analysis/3", IndependentModuleA#DoAnalysis()
End

Function DoAnalysis()
	Print "DoAnalysis in IndependentModuleA"
End
This behavior on Igor's part makes it possible to #include a procedure file that creates menu items into an independent module and have the menu items work. However, in many cases you will not want a #included file's menu items to appear. You can suppress them using menus=0 option in the #Include statement. See Turning the Included File's Menus Off.
If a procedure file with menu definitions is included into multiple independent modules, the menus are repeatedly defined (see Independent Modules and #include). Judicious use of the menus=0 option in the #Include statements helps prevent this. See Turning the Included File's Menus Off.
When the execution text doesn't start with a user-defined function name, as for the first menu item in this example, Igor executes the text without altering it.
Independent Modules and Popup Menus
In an independent module, implementing a popup menu whose items are determined by a function call at click time requires special care. For example, outside of an independent module, this works:
Function/S MyPopMenuList()
	return "Item 1;Item2;"
End
...
PopupMenu pop0 value=#"MyPopMenuList()"	// Note the quotation marks
But inside an independent module you need this:
#pragma IndependentModule=MyIM
Function/S MyPopMenuList()
	return "Item 1;Item2;"
End
...
String cmd= GetIndependentModuleName()+"MyPopMenuList()"
PopupMenu pop0 value=#cmd			// No enclosing quotation marks
GetIndependentModuleName returns the name of the independent module to which the currently-running function belongs or "ProcGlobal" if the currently-running function is not part of an independent module.
You could change the command string to:
PopupMenu pop0 value=#"MyIM#MyPopMenuList()"
but using GetIndependentModuleName allows you to disable the IndependentModule pragma by commenting it out and have the code still work, which can be useful during development. With the pragma commented out you are running in ProcGlobal context and GetIndependentModuleName returns "ProcGlobal".
When the user clicks the popup menu, Igor generates the menu items by evaluating the text specified by the PopupMenu value keyword as an Igor expression. The expression ("MyIM#MyPopMenuList()" in this case) is evaluated in the ProcGlobal context. In order for Igor to find the function in the independent module, it must be public (non-static), except as describe below under Regular Modules Within Independent Modules, and you must use a qualified name.
Note that #cmd is not the same as #"cmd". The #cmd form was introduced with Igor Pro 6. The string variable cmd is evaluated when PopupMenu runs which occurs in the context of the independent module. The contents of cmd ("MyIM#MyPopMenuList()" in this case) are stored in the popup menu's internal data structure. When the popup menu is clicked, Igor evaluates the stored text as an Igor expression in the ProcGlobal context. This causes the function MyIM#MyPopMenuList to run.
With the older #"cmd" syntax, the stored text is evaluated only when the popup menu is clicked, not when the PopupMenu operation runs, and this evaluation occurs in the ProcGlobal context. It is too late to capture the independent module in which the text should be evaluated.
Regular Modules Within Independent Modules
It is usually not necessary but you can create a regular module within an independent module. For example:
#pragma IndependentModule = IndependentModuleA
#pragma ModuleName = RegularModuleA
Function Test()
	Print "Test in RegularModuleA within IndependentModuleA"
End
Here RegularModuleA is a regular module within IndependentModuleA.
To call the function Test from outside of the independent module you must qualify the call like this:
IndependentModuleA#RegularModuleA#Test()
This illustrates that the independent module establishes its own namespace (IndependentModuleA) which can host one level of sub-namespace (RegularModuleA). By contrast, a regular module creates a namespace within the global namespace (called ProcGlobal) and cannot host additional sub-namespaces.
This nesting of modules is useful to prevent name conflicts in a large independent module project comprising multiple procedure files. Otherwise it is not necessary.
Because all procedure files in a given independent module are compiled separately from all other files, function names never conflict with those outside the group and there is little or no need to use the static designation on functions in an independent module. However, if need be, you can call static functions in a regular module inside an independent module from outside the independent module using a triple-qualified name:
IndependentModuleName#RegularModuleName#FunctionName()
Calling Routines From Other Modules
Code in an independent module cannot directly call routines in other modules and usually should not need to. If you must call a routine from another module, you can do it using the Execute operation. You must use a qualified name. For example:
Execute "ProcGlobal#foo()"
To call a function in a regular module, you must prepend ProcGlobal and the regular module name to the function name:
Execute "ProcGlobal#MyRegularModule#foo()"
Calling a nonstatic function in a different independent modules requires prepending just the other independent module name:
Execute "OtherIndependentModule#bar()"
Calling static functions in other independent modules requires prepending the independent module name and a regular module name:
Execute "OtherIndependentModule#RegularModuleName#staticbar()"
Using Execute Within an Independent Module
If you need to call a function in the current independent module using Execute, you can compose the name using the GetIndependentModuleName function. For example, outside of an independent module the commands would be:
String cmd = "WS_UpdateWaveSelectorWidget(\"Panel0\", \"selectorWidgetName\")"
Execute cmd
But inside an independent module the commands are:
#pragma IndependentModule=MyIM
String cmd="WS_UpdateWaveSelectorWidget(\"Panel0\", \"selectorWidgetName\")"
cmd = GetIndependentModuleName() + "#" + cmd	// Make qualified name
Execute cmd
You could change the command string to:
cmd = "MyIM#" + cmd
but using GetIndependentModuleName allows you to disable the IndependentModule pragma by commenting it out and have the code still work, which can be useful during development. With the pragma commented out you are running in ProcGlobal context and GetIndependentModuleName returns "ProcGlobal".
Independent Modules and Dependencies
GetIndependentModuleName is also useful for defining dependencies using functions in the current independent module. Dependencies are evaluated in the global procedure context (ProcGlobal). In order for dependencies to evaluate correctly, the dependency must use GetIndependentModuleName to create a formula to pass to the SetFormula operation. For example, outside of an independent module, this works:
String formula = "foo(root:wave0)"
SetFormula root:aVariable $formula
But inside an independent module you need this:
#pragma IndependentModule=MyIM
String formula = GetIndependentModuleName() + "#foo(root:wave0)"
SetFormula root:aVariable $formula
Independent Modules and Pictures
To allow DrawPICT to use a picture in the picture gallery, you must prepend GalleryGlobal# to the picture name:
DrawPICT 0,0,1,1,GalleryGlobal#PICT_0
Without GalleryGlobal, only proc pictures can be used in an independent module.
Making Regular Procedures Independent-Module-Compatible
You may want to make an existing set of procedures into an independent module. Alternatively, you may want to make an existing procedure independent-module-compatible so that it can be #included into an independent module. This section outlines the necessary steps.
-
If you are creating an independent module, add the IndependentModule pragma:
#pragma IndependentModule=<NameOfIndependentModule> -
Change any Macro or Proc procedures to functions.
-
Make Execute commands suitable for running in the ProcGlobal context or in an independent module using GetIndependentModuleName. See Using Execute Within an Independent Module.
-
Make PopupMenu controls that call a string function to populate the menu work in the ProcGlobal context or in an independent module using GetIndependentModuleName. See Independent Modules and Popup Menus.
-
Make any dependencies work in the ProcGlobal context or in an independent module using GetIndependentModuleName. See Independent Modules and Dependencies.
See Also
Procedure Modules, Regular Modules, Controls and Control Panels, User-Defined Hook Functions, User-Defined Menus, GetIndependentModuleName
Public and Static Functions
The static keyword marks a user-defined function as private to the file in which it is defined. It can be called within that file only, with an exception explained below for "regular modules".
If you are a beginning Igor programmer and you are not familiar with the advanced concepts of Regular Modules and Independent Modules, it is sufficient to think of this like this:
-
A static function can be called only from the procedure file in which it is defined.
-
A public function can be called from any procedure file.
The rest of this section is for advanced programmers with an understanding of Regular Modules and Independent Modules.
-
A public function defined in the default ProcGlobal module can be called from another file in the ProcGlobal module or from a regular module without using a qualified name.
-
A public function defined in a regular module can be called from a procedure file in ProcGlobal or from a regular module without using a qualified name.
-
A public function defined in an independent module can be called from a procedure file in ProcGlobal or from a regular module using a qualified name such as IndependentModuleA#Test.
-
A public function defined in an independent module cannot be called from another independent module.
-
A static function defined in ProcGlobal can be called only from the file in which it is defined.
-
A static function defined in a regular module can be called from a procedure file in ProcGlobal or from another regular module using a qualified name such as RegularModuleA#Test.
-
A static function defined in a regular module cannot be called from an independent module.
-
A static function defined in an independent module can be called only from the procedure file in which it is defined.
-
An independent module can call only functions defined in that independent module.
Sound
The PlaySound operation is provided for playing of sound through the computer speakers.
The PlaySound operation takes the sound data from a wave.
A number of sound input operations are provided: SoundInStatus , SoundInSet, SoundInRecord, SoundInStartChart, and SoundInStopChart. Several example experiments that use these routines can be found in your Igor Pro Folder in the Examples folder.
The SoundLoadWave operation loads various sound file formats into waves and SoundSaveWave saves wave data to sound files. These operations replace SndLoadWave, SoundSaveAIFF and SoundSaveWAV from the obsolete SndLoadSaveWave XOP.
Sound Demos
Movies
You can create movies, optionally with a soundtrack, and extract frames from movies for analysis.
Playing Movies
Use the PlayMovie operation to play a movie in your default movie viewing program.
Creating Movies
You can create a movie from a graph, page layout or Gizmo window. To do this, you write a procedure that modifies the window and adds a frame to the movie in a loop. You can also include audio.
Here are the operations used to create and play a movie:
The NewMovie operation creates a movie file and also defines the movie frame rate and optional audio track specifications.
Before calling NewMovie, you need to prepare the first frame of your movie as the target graph, page layout or Gizmo window.
If you will be using audio you also need to prepare a sound wave. The sound wave can be of any time duration but usually will either be the entire length of the movie or will be the length of one video frame.
After creating the file and the first video frame and optional audio, you use AddMovieFrame to add as many video frames as you wish. You may also add more audio using the AddMovieAudio operation. Finally you use the CloseMovie and PlayMovie operations.
When you write a procedure to generate a movie, you need to call the DoUpdate operation after all modifications to the graph, page layout or Gizmo window and before calling AddMovieFrame. This allows Igor to process any changes you have made to the window.
In addition to creating a movie from a window, you can also create movies from pictures in the picture gallery (see Pictures) using the /PICT flag with NewMovie and AddMovieFrame. You can put pictures of Igor graphs, tables, page layouts, and Gizmo plots in the gallery using SavePICT.
Extracting Movie Frames
You can extract individual frames from a movie and can control movie playback using PlayMovieAction.
Movie Programming Examples
For examples of programming with movies, choose File→Example Experiments→Movies & Audio.
Timing
There are two methods you can use when you want to measure elapsed time:
-
The ticks counter using the ticks function
-
The microsecond timer using StartMSTimer and StopMSTimer
Ticks Counter
You can easily measure elapsed time with a precision of 1/60th of a second using the ticks function. It returns the tick count which starts at zero when you first start your computer and is incremented at a rate of approximately 60 Hz from then on.
Here is an example of typical use:
...
Variable t0
...
t0= ticks
<operations you wish to time>
printf "Elapsed time was %g seconds\r",(ticks-t0)/60
...
Microsecond Timer
You can measure elapsed time to microsecond accuracy for durations up to 35 minutes using the microsecond timer. See the StartMSTimer function for details and an example.
Packages
A package is a set of files that adds significant functionality to Igor. Packages consist of procedure files and may also include XOPs, help files and other supporting files.
A package usually adds one or more items to Igor's menus that allow the user to interactively load the package, access its functionality, and unload the package.
A package typically provides some level of user-interface, such as a menu item and a control panel, for accessing the added functionality. It may store settings in experiments or in global preferences.
A package is typically loaded into memory and unloaded at the user's request.
Igor comes pre-configured with numerous WaveMetrics packages accessed through the Data→Packages, Analysis→Packages, Misc→Packages, Windows→New→Packages and Graph→Packages submenus as well as others. Take a peek at these submenus to see what packages are supplied with Igor.
Menu items for WaveMetrics packages are added to Igor's menus by the WMMenus.ipf procedure file which is shipped in the Igor Procedures folder. WMMenus.ipf is hidden unless you enable independent module development. See Independent Modules.
Creating a Package
This section shows how to create a package through a simple example. The package is called "Sample Package". It adds a Load Sample Package item to the Macros menu. When the user chooses Load Sample Package, the package's procedure file is loaded. This adds two additional items to the Macros menu: Hello From Sample Package and Unload Sample Package.
The package consists of two procedure files stored in a folder in the Igor Pro User Files folder. If you are not familiar with Igor Pro User Files, take a short detour and read Special Folders and Igor Pro User Files.
The sample package is installed as follows:
Igor Pro User Files
	Sample Package
		Sample Package Loader.ipf
		Sample Package.ipf
	Igor Procedures
		Shortcut pointing to the "Sample Package Loader.ipf" file
	User Procedures
		Shortcut pointing to the "Sample Package" folder
Putting the shortcut for the "Sample Package Loader.ipf" in Igor Procedures causes Igor to load that file at launch time. The file adds the "Load Sample Package" item to the Macros menu. See Global Procedure Files for details.
Putting the shortcut for the "Sample Package" folder in User Procedures causes Igor to search that folder when a #include is invoked. See Shared Procedure Files for details.
A real package might include other procedure files and a help file in the "Sample Package" folder.
To try this out yourself, follow these steps:
-
Create the "Sample Package" folder in your Igor Pro User Files folder.
You can locate your Igor Pro User Files folder using the Help menu.
-
Create a new procedure file named "Sample Package Loader.ipf" in the "Sample Package" folder and enter the following contents in the file:
Menu "Macros"
	"Load Sample Package", /Q, LoadSamplePackage()
End

Function LoadSamplePackage()
	Execute/P/Q/Z "INSERTINCLUDE \"Sample Package\""
	Execute/P/Q/Z "COMPILEPROCEDURES "		// Note the space before final quote
End
Save the procedure file.
-
Create a new procedure file named "Sample Package.ipf" in the "Sample Package" folder and enter the following contents in the file:
Menu "Macros"
	"Hello From Sample Package", HelloFromSamplePackage()
	"Unload Sample Package", UnloadSamplePackage()
End

Function HelloFromSamplePackage()
	DoAlert /T="Sample Package Wants to Say" 0, "Hello!"
End

Function UnloadSamplePackage()
	Execute /P /Q /Z "DELETEINCLUDE \"Sample Package\""
	Execute /P /Q /Z "COMPILEPROCEDURES "		// Note the space before final quote
End
Save the procedure file.
-
In the desktop, make a shortcut for "Sample Package Loader.ipf" file and put it in the Igor Procedures folder in the Igor Pro User Files folder.
This causes Igor to load the "Sample Package Loader.ipf" file at launch time. This is how the Load Sample Package menu item gets into the Macros menu.
-
In the desktop, make a shortcut for the "Sample Package" folder and put it in the User Procedures folder in the Igor Pro User Files folder.
This causes Igor to search the "Sample Package" folder when a #include is invoked. This allows Igor to find the "Sample Package.ipf" file when it is #included.
-
Quit and restart Igor so that Igor will load the "Sample Package Loader.ipf" file.
If you prefer you can just manually make sure that "Sample Package Loader.ipf" is open and "Sample Package.ipf" is closed. This simulates the state of affairs after restarting Igor.
-
Choose Windows→Procedure Windows and verify that Igor has loaded the "Sample Package Loader.ipf" file.
-
Click the Macros menu and verify that the "Load Sample Package" item is present.
-
Choose Macros→Load Sample Package.
The LoadSamplePackage function runs, adds a #include statement to the built-in procedure window, and forces procedures to be recompiled. This cause Igor to load the "Sample Package.ipf" procedure file which contains the bulk of the package's procedures and adds items to the Macros menu.
-
Click the Macros menu and notice that the "Hello From Sample Package" and "Unload Sample Package" items have been added.
-
Choose Macros→Hello From Sample Package.
The package displays an alert. A real package would do something more exciting.
-
Choose Macros→Unload Sample Package.
The UnloadSamplePackage function runs, removes the #include statement from the built-in procedure window, and forces procedures to be recompiled. This cause Igor to unload the "Sample Package.ipf" procedure.
-
Click the Macros menu and notice that the "Hello From Sample Package" and "Unload Sample Package" items have been removed.
Most real packages do not create Unload menu items. Instead they provide an Unload Package button in a control panel or automatically unload when a control panel is closed. Or they might not support unloading.
A real package typically does not include "Package" in its name or in its menu items.
Lightweight Packages
A lightweight package is one that consists of at most a few procedure files and does not create clutter in the current experiment unless it is actually used.
If your package is lightweight you might prefer to dispense with loading and unload it and just keep it loaded all the time. To do this you would organize your files like this:
Igor Pro User Files
	Your Package
		Your Package Part 1.ipf
		Your Package Part 2.ipf
	Igor Procedures
		Shortcut pointing to the "Your Package" folder
Here both of your package procedure files are global, meaning that Igor loads them at launch time and never unloads them. You do not need procedures for loading and unloading your package.
If you have an ultra-light package, consisting of just a single procedure file, you can dispense with the "Your Package" folder and put the procedure file directly in the Igor Procedures folder.
Managing Package Data
When you create a package of procedures, you need some place to store private data used by the package to keep track of its state. It's important to keep this data separate from the user's data to avoid clutter and to protect your data from inadvertent changes.
Private data should be stored in a data folder named after the package inside a generic data folder named Packages. For example, if your package is named My Package you would store your private data in root:Packages:'My Package'.
There are two general types of private data that you might need to store: overall package data and per-instance data. For example, for a data acquisition package, you may need to store data describing the state of the acquisition as a whole and other data on a per-channel basis.
Creating and Accessing the Package Data Folder
This section demonstrates the recommended way to create and access a package data folder. We use a bottleneck function that returns a DFREF for the package data folder. If the package data folder does not yet exist, the bottleneck function creates and initializes it. This way calling functions don't need to worry about whether the package data folder has been created.
First we write a function to create and initialize the package data folder:
Function/DF CreatePackageData()     // Called only from GetPackageDFREF
	// Create the package data folder
	NewDataFolder/O root:Packages
	NewDataFolder/O root:Packages:'My Package'

	// Create a data folder reference variable
	DFREF dfr = root:Packages:'My Package'

	// Create and initialize package data
	Variable/G dfr:gVar1 = 1.0
	String/G dfr:gStr1 = "hello"
	Make/O dfr:wave1
	WAVE wave1 = dfr:wave1
	wave1= x^2

	return dfr
End
Now we can write the bottleneck function:
Function/DF GetPackageDFREF()
	DFREF dfr = root:Packages:'My Package'
	if (DataFolderRefStatus(dfr) != 1)  // Data folder does not exist?
		DFREF dfr = CreatePackageData()  // Create package data folder
	endif
	return dfr
End
GetPackageDFREF would be used like this:
Function/DF DemoPackageDFREF()
	DFREF dfr = GetPackageDFREF()

	// Read a package variable
	NVAR gVar1 = dfr:gVar1
	Printf "On entry gVar1=%g\r", gVar1

	// Write to a package variable
	gVar1 += 1
	Printf "Now gVar1=%g\r", gVar1
End
All functions that access the package data folder should do so through GetPackageDFREF. The calling functions do not need to worry about whether the data folder has been created and initialized because GetPackageDFREF does this for them.
Creating and Accessing the Package Per-Instance Data Folders
Here we extend the technique of the preceding section to handle per-instance data. This example shows how you might handle per-channel data in a data acquisition package. If your package does not use per-instance data then you can skip this section.
First we write a function to create and initialize the per-instance package data folder:
Function/DF CreatePackageChannelData(channel)      // Called only from GetPackageChannelDFREF
	Variable channel     // 0 to 3

	DFREF dfr = GetPackageDFREF()	// Access main package data folder

	String dfName = "Channel" + num2istr(channel)   // Channel0, Channel1, ...

	// Create the package channel data folder
	NewDataFolder/O dfr:$dfName

	// Create a data folder reference variable
	DFREF channelDFR = dfr:$dfName

	// Initialize per-instance data
	Variable/G channelDFR:gGain = 5.0
	Variable/G channelDFR:gOffset = 0.0

	return channelDFR
End
Now we can write the bottleneck function:
Function/DF GetPackageChannelDFREF(channel)
	Variable channel     // 0 to 3

	DFREF dfr = GetPackageDFREF()	// Access main package data folder

	String dfName = "Channel" + num2istr(channel)            // Channel0, Channel1, ...
	DFREF channelDFR = dfr:$dfName
	if (DataFolderRefStatus(channelDFR) != 1)                // Data folder does not exist?
		DFREF channelDFR = CreatePackageChannelData(channel)  // Create it
	endif
	return channelDFR
End
GetPackageChannelDFREF would be used like this:
Function/DF DemoPackageChannelDFREF(channel)
	Variable channel     // 0 to 3

	DFREF channelDFR = GetPackageChannelDFREF(channel)

	// Read a package variables
	NVAR gGain = channelDFR:gGain
	NVAR gOffset = channelDFR:gOffset
	Printf "Channel %d: Gain=%g, offset=%g\r", channel, gGain, gOffset
End
All functions that access a package channel data folder should do so through GetPackageChannelDFREF. The calling functions do not need to worry about whether the data folder has been created and initialized because GetPackageChannelDFREF does this for them.
Saving Package Preferences
If you are writing a sophisticated package of Igor procedures you may want to save preferences for your package. For example, if your package creates a control panel that can be opened in any experiment, you may want it to remember its position on screen between invocations. Or you may want to remember various settings in the panel from one invocation to the next.
Such "state" information can be stored either separately in each experiment or it can be stored just once for all experiments in preferences. These two approaches both have their place, depending on circumstances. But, if your package creates a control panel that is intended to be present at all times and used in any experiment, then the preferences approach is usually the best fit.
If you choose the preferences approach, you will store your package preference file in a directory created for your package. Your package directory will be in the Packages directory, inside Igor's own preferences directory.
The location of Igor's Packages directory depends on the operating system and the particular user's configuration. You can find where it is on a particular system by executing:
Print SpecialDirPath("Packages", 0, 0, 0)
You must choose a very distinctive name for your package because that is the only thing that prevents some other package from overwriting yours. All package names starting with "WM" are reserved for WaveMetrics.
A package name is limited to 255 bytes and must be a legal name for a directory on disk.
If you use a name longer than 31 bytes, your package will require Igor Pro 8.00 or later.
There are two ways to store package preference data:
-
In a special-format binary file stored in your package directory
-
As Igor waves and variables in an Igor experiment file stored in your package directory
The special-format binary file approach is relatively simple to implement but is not suitable for storing very large amounts of data. In most cases it is not necessary to store very large amounts of data so this is the way to go.
The use of the Igor experiment file supports storing a large amount of preference data but creates a problem of synchronizing your preference data stored in memory and your preference data stored on disk. It also leads to a proliferation of preference data stored in various experiments. You should avoid using this technique if possible.
Saving Package Preferences in a Special-Format Binary File
This approach supports preference data consisting of a collection of numeric and string data. You define a structure encapsulating your package preference data. You use the LoadPackagePreferences operation to load your data from disk and the SavePackagePreferences data to save it to disk.
SavePackagePreferences stores data from your package's preferences data structure in memory. LoadPackagePreferences returns that data to you via the same structure.
SavePackagePreferences also creates a directory for your package preferences and stores your data in a file in that directory. Your package directory is located in the Packages directory in Igor's preferences directory. The job of storing the preferences data in the file is handled transparently by Igor which, by default, automatically flushes your data to the file when the current experiment is saved or closed and when Igor quits.
You would call LoadPackagePreferences every time you need to access your package preference data and SavePackagePreferences every time you want to change your package preference data. You pass to these operations an instance of a structure that you define.
Here are example functions from the Package Preferences Demo experiment that use the LoadPackagePreferences and SavePackagePreferences operations to implement preferences for a particular package:
// NOTE: The name you choose must be distinctive!
static Constant kPrefsVersion = 100
static StrConstant kPackageName = "Acme Data Acquisition"
static StrConstant kPrefsFileName = "PanelPreferences.bin"
static Constant kPrefsRecordID = 0

Structure AcmeDataAcqPrefs
	uint32 version          // Preferences structure version number. 100 means 1.00.
	double panelCoords[4]   // left, top, right, bottom
	uchar phaseLock
	uchar triggerMode
	double ampGain
	uint32 reserved[100]    // Reserved for future use
EndStructure

//	DefaultPackagePrefsStruct(prefs)
//	Sets prefs structure to default values.
static Function DefaultPackagePrefsStruct(prefs)
	STRUCT AcmeDataAcqPrefs &prefs

	prefs.version = kPrefsVersion

	prefs.panelCoords[0] = 5         // Left
	prefs.panelCoords[1] = 40        // Top
	prefs.panelCoords[2] = 5+190     // Right
	prefs.panelCoords[3] = 40+125    // Bottom
	prefs.phaseLock = 1
	prefs.triggerMode = 1
	prefs.ampGain = 1.0

	Variable i
	for(i=0; i<100; i+=1)
		prefs.reserved[i] = 0
	endfor
End

// SyncPackagePrefsStruct(prefs)
// Syncs package prefs structures to match state of panel. Call this only if the panel exists.
static Function SyncPackagePrefsStruct(prefs)
	STRUCT AcmeDataAcqPrefs &prefs

	// Panel does exists. Set prefs to match panel settings.
	prefs.version = kPrefsVersion

	GetWindow AcmeDataAcqPanel wsize
	// NewPanel uses device coordinates. We therefore need to scale from
	// points (returned by GetWindow) to device units for windows created
	// by NewPanel.
	Variable scale = ScreenResolution / 72
	prefs.panelCoords[0] = V_left * scale
	prefs.panelCoords[1] = V_top * scale
	prefs.panelCoords[2] = V_right * scale
	prefs.panelCoords[3] = V_bottom * scale

	ControlInfo /W=AcmeDataAcqPanel PhaseLock
	prefs.phaseLock = V_Value        // 0=unchecked; 1=checked

	ControlInfo /W=AcmeDataAcqPanel TriggerMode
	prefs.triggerMode = V_Value      // Menu item number starting from on

	ControlInfo /W=AcmeDataAcqPanel AmpGain
	prefs.ampGain = str2num(S_value) // 1, 2, 5 or 10
End

// InitPackagePrefsStruct(prefs)
// Sets prefs structures to match state of panel or to default values if panel does not exist.
static Function InitPackagePrefsStruct(prefs)
	STRUCT AcmeDataAcqPrefs &prefs

	DoWindow AcmeDataAcqPanel
	if (V_flag == 0)
		// Panel does not exist. Set prefs struct to default.
		DefaultPackagePrefsStruct(prefs)
	else
		// Panel does exists. Sync prefs struct to match panel state.
		SyncPackagePrefsStruct(prefs)
	endif
End

static Function LoadPackagePrefs(prefs)
	STRUCT AcmeDataAcqPrefs &prefs

	// This loads preferences from disk if they exist on disk.
	LoadPackagePreferences kPackageName, kPrefsFileName, kPrefsRecordID, prefs

	// If error or prefs not found or not valid, initialize them.
	if (V_flag!=0 || V_bytesRead==0 || prefs.version!=kPrefsVersion)
		InitPackagePrefsStruct(prefs)	// Set based on panel if it exists or set to default values.
		SavePackagePrefs(prefs)	// Create initial prefs record.
	endif
End

static Function SavePackagePrefs(prefs)
	STRUCT AcmeDataAcqPrefs &prefs

	SavePackagePreferences kPackageName, kPrefsFileName, kPrefsRecordID, prefs
End
The package preferences structure, AcmeDataAcqPrefs in this case, must not use fields of type Variable, String, WAVE, NVAR, SVAR or FUNCREF because these fields refer to data that may not exist when LoadPackagePreferences is called.
The structure can use fields of type char, uchar, int16, uint16, int32, uint32, int64, uint64, float and double as well as fixed-size arrays of these types and substructures with fields of these types.
Use the reserved field to add fields to the structure in a backward-compatible fashion. For example, a subsequent version of the structure might look like this:
Structure AcmeDataAcqPrefs
	uint32                  // Preferences structure version number. 100 means 1.00.
	double panelCoords[4]   // left, top, right, bottom
	uchar phaseLock
	uchar triggerMode
	double ampGain
	uint32 triggerDelay
	uint32 reserved[99]      // Reserved for future use
EndStructure
Here the triggerDelay field was added and size of the reserved field was reduced to keep the overall size of the structure the same. The AcmeDataAcqLoadPackagePrefs function would also need to be changed to set the default value of the triggerDelay field.
If you need to change the structure such that its size changes or its fields are changed in an incompatible manner then you must change your structure version which will cause old preferences to be overwritten with new preferences.
For a functional example, see the Package Preferences Demo.
In the example above we store just one structure in the preference file. However LoadPackagePreferences and SavePackagePreferences allow storing any number of structures of the same or different types in the preference file. You can store either multiple instances of the same structure or multiple different structures. You must assign a unique nonnegative integer as a record ID for each structure stored and pass this record ID to LoadPackagePreferences and SavePackagePreferences. You could use this feature, for example, to store a different structure for each type of control panel that your package presents. Since all data is cached in memory you should not attempt to store hundreds or thousands of structures.
In almost all cases a particular package will need just one preference file. For the rare cases where this is inconvenient, LoadPackagePreferences and SavePackagePreferences allow each package to create any number of preference files, each with a distinct file name. All of the preference files for a particular package are stored in the same directory, the package's preferences directory. Each file can store a different set of structure. However, the code that implements this feature is not tuned to handle large numbers of files so you should not use this feature indiscriminately.
Saving Package Preferences in an Experiment File
This approach supports package preference data consisting of waves, numeric variables and string variables. It is more difficult to implement than the special-format binary file approach and is not recommended except for expert programmers and then only if the previously described approach is not suitable.
You use the SaveData operation to store your waves and variables in a packed experiment file in your package directory on disk. You can later use the LoadData operation to load the waves and variables into a new experiment.
You must create your package directory as illustrated by the SavePackagePrefs function below.
The following example functions save and load package preferences. These functions assume that the package preferences consist of all waves and variables at the top level of the package's data folder. You may need to customize these functions for your situation.
// SavePackagePrefs(packageName)
// Saves the top-level waves, numeric variables and string variables
// from the data folder for the named package into a file in the Igor
// preferences hierarchy on disk.
Function SavePackagePrefs(packageName)
	String packageName            // NOTE: Use a distinctive package name.

	// Get path to Packages preferences directory on disk.
	String fullPath = SpecialDirPath("Packages", 0, 0, 0)
	fullPath += packageName

	// Create a directory in the Packages directory for this package
	NewPath/O/C/Q tempPackagePrefsPath, fullPath

	fullPath += ":Preferences.pxp"

	DFREF saveDF = GetDataFolderDFR()
	SetDataFolder root:Packages:$packageName
	SaveData/O/Q fullPath         // Save the preference file
	SetDataFolder saveDF

	// Kill symbolic path but leave directory on disk.
	KillPath/Z tempPackagePrefsPath
End

// LoadPackagePrefs(packageName)
// Loads the data from the previously-saved package preference file,
// if it exist, into the package's data folder.
// Returns 0 if the preference file existed, -1 if it did not exist.
// In either case, this function creates the package's data folder if it
// does not already exist.
// LoadPackagePrefs does not affect any other data already in the
// package's data folder.
Function LoadPackagePrefs(packageName)
	String packageName               // NOTE: Use a distinctive package name.

	Variable result = -1
	DFREF saveDF = GetDataFolderDFR()

	NewDataFolder/O/S root:Packages  // Ensure root:Packages exists
	NewDataFolder/O/S $packageName   // Ensure package data folder exists

	// Find the disk directory in the Packages directory for this package
	String fullPath = SpecialDirPath("Packages", 0, 0, 0)
	fullPath += packageName
	GetFileFolderInfo/Q/Z fullPath
	if (V_Flag == 0)                 // Disk directory exists?
		fullPath += ":Preferences.pxp"
		GetFileFolderInfo/Q/Z fullPath
		if (V_Flag == 0)              // Preference file exist?
			LoadData/O/R/Q fullPath    // Load the preference file.
			result = 0
		endif
	endif

	SetDataFolder saveDF
	return result
End
The hard part of using the experiment file for saving package preferences is not in saving or loading the package preference data but in choosing when to save and load it so that the latest preferences are always used. There is no ideal solution to this problem but here is one strategy:
-
When package preference data is needed (e.g., you are about to create your control panel and need to know the preferred coordinates), check if it exists in memory. If not load it from disk.
-
When the user does a New Experiment or quits Igor, if package preference data exists in memory, save it to disk. This requires that you create an IgorNewExperimentHook function and an IgorQuitHook function.
-
When the user opens an experiment file, if it contains package preference data, delete it and reload from disk. This requires that you create an AfterFileOpenHook function. This is necessary because the package preference data in the just opened experiment is likely to be older than the data in the package preference file.
Package Preference Demo
Creating Your Own Help File
You can create an Igor help file that extends the Igor help system. This is something you might want to do if you write a set of Igor procedures or extensions for use by your colleagues. If your procedures or extensions are generally useful, you might want to make them available to all Igor users. In either case, you can provide documentation in the form of an Igor help file.
Here are the steps for creating an Igor help file.
-
Create a formatted-text notebook.
A good way to do this is to is to open the Igor Help File Template provided by WaveMetrics in the More Help Files folder. Alternatively, you can start by duplicating another WaveMetrics-supplied help file and then opening it as a notebook using File→Open File→Notebook. Either way, you are starting with a notebook that contains the rulers used to format an Igor help file.
-
Choose Save Notebook As from the File menu to create a new file. Use a ".ihf" extension so that Igor will recognize it as a help file.
-
Enter your help text in the new file.
-
Save and kill the notebook.
-
Open the file as a help file using File→Open File→Help File.
When you open the file as a help file, it needs to be compiled. When Igor compiles a help file, it scans through it to find out where the topics start and end and makes a note of subtopics. When the compilation is finished, it saves the help file which now includes the help compiler information.
Once Igor has successfully compiled the help file, it acts like any other Igor help file. That is, when opened it appears in the Help Windows submenu, its topics will appear in the Help Browser, and you can click links to jump around.
Here are the steps for modifying a help file.
-
If the help file is open, kill it by pressing Alt and clicking the close button.
-
Open it as a notebook, using File→Open File→Notebook.
Alternatively, you can press Shift while choosing the file from Files→Recent Files. Then, in the resulting dialog, specify that you want to open the file as a formatted notebook.
-
Modify it using normal editing techniques.
-
Choose Save Notebook from the File menu.
-
Click the close button and kill the notebook.
-
Reopen it as a help file using File→Open File→Help File.
Alternatively, you can press Shift while choosing the file from Files→Recent Files. Then, in the resulting dialog, specify that you want to open the file as a help file.
The Syntax of a Help File
Igor needs to be able to identify topics, subtopics, related-topics declarations, and links in Igor help files. To do this it looks for certain rulers, text patterns and text formats described in Creating Links. You can get most of the required text formats by using the appropriate ruler from the Igor Help File Template file.
Igor considers a paragraph to be a help topic declaration if it starts with a bullet character followed by a tab and if the paragraph's ruler is named Topic. By convention, the Topic ruler's font is Arial, its text size is 12 and its text style is bold-underlined. The bullet and tab characters should be plain, not bold or underlined.
The easiest way to create a new topic with the right formatting is to copy an existing topic and then modify it.
Once Igor finds a topic declaration, it scans the body of the topic. The body is all of the text until the next topic declaration, a related-topics declaration, or the end of the file. While scanning, it notes any subtopics.
Igor considers a paragraph to be a subtopic declaration if the name of the ruler governing the paragraph starts with "Subtopic". Thus if the ruler is named Subtopic or Subtopic+ or Subtopic2, the paragraph is a subtopic declaration. By convention, the Subtopic ruler's font is Arial, its text size is 10 and its text style is bold and underlined. Text following the subtopic name that is not bold and underlined is not part of the subtopic name.
The easiest way to create a new subtopic with the right formatting is to copy an existing subtopic and then modify it.
Igor considers a paragraph to be a related-topics declaration if the ruler governing the paragraph is named RelatedTopics and if the paragraph starts with the text pattern "Related Topics:". When Igor sees this pattern it knows that this is the end of the current topic. The related-topics declaration is optional. Prior to Igor Pro 4, Igor displayed a list of related topics in the Igor Help Browser. Igor Pro no longer displays this list. The user can still click the links in the related topics paragraph to jump to the referenced topics.
Igor knows that it has hit the end of the current topic when it finds the related-topics declaration or when it finds a new topic declaration. In either case, it proceeds to compile the next topic. It continues compiling until it hits the end of the file.
When compiling the help file, Igor may encounter syntax that it can't understand. For example, if you have a related-topics declaration paragraph, Igor will expect the next paragraph to be a topic declaration. If it is not, Igor will stop the compilation and display an error dialog. You need to open the file as a notebook, fix the error, save and kill it and then reopen it as a help file.
Another error that is easy to make is to fail to use the plain text format for syntactic elements like bullet-tab, "Related Topics:" or the comma and space between related topics. If you run into a non-obvious compile error in a topic, subtopic or related topics declaration, recreate the declaration by copying from a working help file.
The help files supplied by WaveMetrics contain a large number of rulers to define various types of paragraphs such as topic paragraphs, subtopic paragraphs, related topic paragraphs, topic body paragraphs and so on. The Igor Help File Template contains many but not all of these rulers. If you find that you need to use a ruler that exists in a WaveMetrics help file but not in your help file then copy a paragraph governed by that ruler from the WaveMetrics help file and paste it into your file. This transfers the ruler to your file.
Creating Links
A link is text in an Igor help file that, when clicked, takes the user to some other place in the help. Igor considers any pure blue, underlined text to be a link. Pure blue means that the RGB value is (0, 0, 65535). By convention links use the Arial font.
To create a link, select the text in the notebook that you are preparing to be a help file. Then choose Make Help Link from the Notebook menu. This sets the text format for the selected text to pure blue and underlined.
The link text refers to another place in the help using one of these forms:
-
The name of a help topic (e.g., Command Window)
-
The name of a help subtopic (e.g., History Area)
-
A combined topic and subtopic (e.g., Command Window[History Area])
Use the combined form if there is a chance that the help topic or subtopic name by itself may be ambiguous. For example, to refer to the Preferences operation, use PreferencesPreferences] rather than Preferences by itself.
When the user double-clicks a link, Igor performs the following search:
-
If the link is a topic name, Igor goes to that topic.
-
If the link is in topic[subtopic] form, Igor goes to that subtopic.
-
If steps 1 and 2 fail, Igor searches for a subtopic with the same name as the link. First, it searches for a subtopic in the current topic. If that fails, it searches for a subtopic in the current help file. If that fails, it searches for a subtopic in all help files.
-
If step 3 fails, Igor searches all help files in the Igor Pro folder. If it finds the topic in a closed help file, it opens and displays it.
-
If step 4 fails, Igor searches all help files in the Igor Pro User Files folder. If it finds the topic in a closed help file, it opens and displays it.
-
If all of the above fail, Igor displays a dialog saying that the required help file is not available.
You can create a link in a help file that will open a Web page or FTP site in the user's Web or FTP browser. You do this by entering the Web or FTP URL in the help file while you are editing it as a notebook. The URL must appear in this format:
The WaveMetrics FTP server is no longer in service. Use your own FTP URL.
The URL must include the angle brackets and the "http://", "https://" or "ftp://" protocol specifier. Support for https was added in Igor Pro 7.02.
After entering the URL, select the entire URL, including the angle brackets, and choose Make Help Link from the notebook menu. Once the file is compiled and opened as a help file, clicking the link will open the user's Web or FTP browser and display the specified URL.
For any other kind of URL, such as sftp or mailto, use a notebook action that calls BrowseURL instead of a help link.
It is currently not possible make ordinary text into a Web or FTP link. The text must be an actual URL in the format shown above or you can insert a notebook action which brings up a web page using the BrowseURL operation. See Notebook Action Special Characters for details.
Checking Help Links
You can tell Igor to check your help links as follows:
-
Open your Igor help file and compile it as a help file if necessary.
-
Activate your help window.
-
Right-click in the body of the help file and choose Check Help Links. Igor will check your links from where you clicked to the end of the file and note any problems by writing diagnostics to the history area of the command window.
-
When Igor finishes checking, if it found bad links, kill the help file and open it as a notebook.
-
Use the diagnostics that Igor wrote in the history to find and fix any link errors.
-
Save the notebook and kill it.
-
Open the notebook as a help file. Igor will compile it.
-
Repeat the check by going back to step 1 until you have no bad links.
During this process, Igor searches for linked topics and subtopics in open and closed help files and opens any closed help file to which a link refers. If a link is not satisfied by an already open help file, Igor searches closed help files in:
-
The Igor Pro Folder and subfolders
-
The Igor Pro User Files folder and subfolders
-
Files and folders referenced by shortcuts in one of those folders
You can abort the check by pressing the User Abort Key Combinations.
The diagnostic that Igor writes to the history in case of a bad link is in the form:
Notebook $nb selection={(33,292), (33,334)} ...
This is set up so that you can execute it to find the bad link. At this point, you have opened the help file as a notebook. Assuming that it is named Notebook0, execute
String/G nb = "Notebook0"
Now, you can execute the diagnostic commands to find the bad link and activate the notebook. Fix the bad link and then proceed to the next diagnostic. It is best to do this in reverse order, starting with the last diagnostic and cutting it from the history when you have fixed the problem.
If you press the Shift key while right-clicking a help window, you can choose Check Help Links in All Open Help Files. Then Igor checks all help links in all help files open at that time. While checking a help file, Igor may open a previously unopened help file. Such newly opened help files are not checked. Only those help files open when you chose Check Help Links in All Open Help Files are checked. However, if you repeat the process, help files opened during the previous iteration are checked.
When fixing a bad link, check the following:
-
A link is the name of a topic or subtopic in a currently open help file. Check spelling.
-
There are no extraneous blue/underlined characters, such as tabs or spaces, before or after the link. (You cannot identify the text format of spaces and tabs by looking at them. Check them by selecting them and then using the Set Text Format dialog.)
-
There are no duplicate topics. If you specify a link in topic[subtopic] form and there are two topics with the same topic name, Igor may not find the subtopic.
Help for User-Defined Functions
You can provide help for user-defined functions in your package by including a topic similar to the built-in Functions topic in your help file. In Igor Pro 9.00 or later, the user can go to the help for your user-defined function by selecting it in a procedure or notebook window, right-clicking, and choosing Help For <topic name>.
Here is how add help for your user-defined functions:
-
Display the built-in Functions topic.
-
Copy that topic paragraph and the first subtopic to the clipboard.
-
Paste into your help file.
-
Change the topic name to a distinctive name such as My Package Functions.
-
Edit the subtopic to provide help for one of your user-defined function.
-
Add additional subtopics by copying and pasting the original and editing as needed.
Make sure that your package name and user-defined function names are distinctive to avoid collisions with other packages.
The Insert Template For item in the contextual menu gets information from the procedure file and does not depend on help.
Creating Formatted Text
The printf, sprintf, and fprintf operations print formatted text to Igor's history area, to a string variable or to a file respectively. The wfprintf operation prints formatted text based on data in waves to a file.
All of these operations are based on the C printf function which prints the contents of a variable number of string and numeric variables based on the contents of a format string. The format string can contain literal text and conversion specifications. Conversion specifications define how a variable is to be printed.
Here is a simple example:
printf "The minimum is %g and the maximum is %g\r", V_min, V_max
In this example, the format string is "The minimum is %g and the maximum is %g\r" which contains some literal text along with two conversion specifications -- both of which are "%g" -- and an escape code ("\r") indicating "carriage-return". If we assume that the Igor variable V_min = .123 and V_max = .567, this would print the following to Igor's history area:
The minimum is .123 and the maximum is .567
We could print this output to an Igor string variable or to a file instead of to the history using the sprintf or fprintf operations. These are described below.
Printf Operation
The syntax of the printf operation is:
printf format [, parameter [, parameter ]. . .]
where format is the format string containing literal text or format specifications. The number and type of parameters depends on the number and type of format specifications in the format string. The parameters, if any, can be literal numbers, numeric variables, numeric expressions, literal strings, string variables or string expressions.
The conversion specifications are very flexible and make printf a powerful tool. They can also be quite involved. The simplest specifications are:
| Specification | What It Does |
|---|---|
| %g | Converts a number to text using integer, floating point or exponential notation depending on the number's magnitude. |
| %e | Converts a number to text using exponential notation. |
| %f | Converts a number to text using floating point notation. |
| %d | Converts a number to text using integer notation. |
| %s | Converts a string to text. |
Here are some examples:
printf "%g, %g, %g\r", PI, 6.022e23, 1.602e-19
prints:
3.14159, 6.022e+23, 1.602e-19
printf "%e, %e, %e\r", PI, 6.022e23, 1.602e-19
prints:
3.141593e+00, 6.022000e+23, 1.602000e-19
printf "%f, %f, %f\r", PI, 6.022e23, 1.602e-19
prints:
3.141593, 602200000000000027200000.000000, 0.000000
printf "%d, %d, %d\r", PI, 6.022e23, 1.602e-19
prints:
3, 9223372036854775807, 0
printf "%s, %s\r", "Hello, world", "The time is " + Time()
prints:
Hello, world, The time is 11:43:40 AM
Note that the output for 6.022e23 when printed using the %d conversion specification is wrong. This is because 6.022e23 is too big a number to represent as an 64-bit integer.
If you want better control of the output format, you need to know more about conversion specifications. It gets quite involved. See the printf operation for details.
sprintf Operation
The sprintf operation is very similar to printf except that it prints to a string variable instead of to Igor's history. The syntax of the sprintf operation is:
sprintf stringVariable, format [, parameter [, parameter ]. . .]
where stringVariable is the name of the string variable to print to and the remaining parameters are as for printf. sprintf is useful for generating text to use as prompts in macros, in axis labels and in annotations.
fprintf Operation
The fprintf operation is very similar to printf except that it prints to a file instead of to Igor's history. The syntax of the fprintf operation is:
fprintf variable, format [, parameter [, parameter ]. . .]
where variable is the name of a numeric variable containing the file reference number for the file to print to and the remaining parameters are as for printf. You get the file reference number using the Open operation.
For debugging purposes, if you specify 1 for the file reference number, Igor prints to the history area instead of to a file, as if you used printf instead of fprintf.
wfprintf Operation
The wfprintf operation is similar to printf except that it prints the contents of one to 100 waves to a file. The syntax of the wfprintf operation is:
wfprintf variable, format [/R=(start,end)] wavelist
variable is the name of a numeric variable containing the file reference number for the file to print to.
Unlike printf, which rounds, wfprintf converts floating point values to integers by truncating, if you use an integer conversion specification like "%d".
Example Using fprintf and wfprintf
Here is an example of a command sequence that creates some waves and put values into them and then writes them to an output file with column headers.
Make/N=25 wave1, wave2, wave3
wave1 = 100+x; wave2 = 200+x; wave3 = 300+x
Variable f1
Open f1
fprintf f1, "wave1, wave2, wave3\r"
wfprintf f1, "%g, %g, %g\r" wave1, wave2, wave3
Close f1
This generates a comma delimited file. To generate a tab delimited file, use:
fprintf f1, "wave1\twave2\twave3\r"
wfprintf f1, "%g\t%g\t%g\r" wave1, wave2, wave3
Since tab-delimited is the default format for wfprintf, this last command is equivalent to:
wfprintf f1, "" wave1, wave2, wave3
Client/Server Overview
An application can interact with other software as a server or as a client.
A server accepts commands and data from a client program and returns results to the client.
A client sends commands and data to a server program and receives results from the server.
See ActiveX Automation. Igor can play the role of an Automation server but not an Automation client. However it is possible to generate script files that allow Igor to indirectly play the role of client.
ActiveX Automation
ActiveX Automation, often called just Automation, is Microsoft's technology for allowing one program to control another. The program that does the controlling is called the Automation client. The program that is controlled is called the Automation Server. The client initiates things by making calls to the server which carries out the requested actions and returns results.
Automation client programs are most often written in Visual Basic or C#. They can also be written in C++ and other programming languages, and in various scripting languages such as VBScript, JavaScript, Perl, Python and so on.
Igor can play the role of Automation Server. If you want to write an client program to drive Igor, see Automation Server Overview.
Igor Pro does not directly support playing the role of Automation client. However, it is possible to write an Igor program which generates a script file which can act like an Automation client. For an example, choose File→Example Experiments→Programming→CallMicrosoftWord.
Calling Igor from Scripts
You can call Igor from shell scripts and batch files using an operation-like syntax. You can also use this feature to register an Igor license.
The syntax for calling Igor is:
<IGOR> [/I /Q /X /N /Automation /LANG=code ] [pathToFileOrCommands ] [pathToFile ] ...
<IGOR> [/I /N /Automation /LANG=code ] [pathToFileOrCommands ] [pathToFile ] ...
<IGOR> [/I /Q /X /Automation /LANG=code ] "commands "
<IGOR> /SN=num /KEY="key " /NAME="name " [/ORG="org " /QUIT]
where <IGOR> is the full path to the Igor executable file.
The Igor executable file resides in a folder within the Igor Pro folder. The full path will be something like:
"C:\Program Files\WaveMetrics\Igor Pro 10 Folder\IgorBinaries_x64\Igor64.exe"
In the following discussions, <IGOR> means "the full path to the Igor executable file".
Parameters
All parameters are optional. If you omit all parameters, including just the full path to the Igor executable, a new instance of Igor is launched.
The usual parameter is a file for Igor to open. It is recommended that both the path and the path to the file parameter be enclosed in quotes.
You can open multiple files by using a space between one quoted file path and the next.
With the /X flag, only one parameter is allowed and it is interpreted as an Igor command.
Flags
When you specify a flag, you can use a - instead of /. For example, you can write /Q or -Q.
| /Automation | The Windows OS uses it when launching Igor Pro as an ActiveX Automation server. It is not intended for use in batch files. | ||||||||
| /I | Launches a new instance of Igor if one would otherwise not be launched. See Details for a discussion of instances. | ||||||||
| /KEY = "key " | Specifies the license activation key when registering a license. For example: | ||||||||
/KEY="ABCD-EFGH-IJKL-MNOP-QRST-UVWX-Y" | |||||||||
| /LANG = code | code is an unquoted ISO locale of the form language_territory where language is a lowercase two-letter ISO 639 language code, and territory is an uppercase, two- or three-letter ISO 3166 territory code. Currently supported values for code are en_US, ja_JP, and de_DE. If Igor attempts to load the corresponding translation and is unsuccessful, Igor ignores the /LANG flag. | ||||||||
| /N | Forces the current experiment to be closed without saving if any of the file parameters are an experiment file. | ||||||||
| To save a currently open experiment, use: | |||||||||
| |||||||||
| /NAME = "name " | Specifies the name of the licensed user when registering a license. A name is required when registering. | ||||||||
| /ORG = "org " | Specifies the optional name of the licensed organization when registering a license. /ORG is optional and defaults to "". | ||||||||
| /Q | Prevents the command from being displayed in Igor's command line as it is executing. | ||||||||
| /QUIT | Quits Igor after entering license information when used with /SN, /KEY, and /NAME. Otherwise /QUIT is ignored. | ||||||||
| To quit Igor Pro in other circumstances, use: | |||||||||
| |||||||||
| /SN = num | Specifies the license serial number when registering a license. | ||||||||
| /START = x | Controls logging of diagnostic information for use in troubleshooting slow startup or crashes during startup. Allowed values for x are: | ||||||||
| |||||||||
| /START was added in Igor Pro 9.00. | |||||||||
| /UNATTENDED | Suppresses certain interactions that are inconvenient for unattended operations. An example is the About Autosave dialog that appears when Igor is launched until the user clicks "Do not show this message again". | ||||||||
| /UNATTENDED was added in Igor Pro 9.00. | |||||||||
| /X | Executes the commands in the parameter. Only one parameter is allowed with /X. Use semicolons to separate Igor commands within the parameter. | ||||||||
Details
If an existing instance of Igor is running, the command is sent to the existing instance if you omit the /I flag and you include /X, /SN, or a path to a file. Otherwise, a new instance of Igor is launched.
Registering an Igor License
You can register an Igor license using the /SN, /KEY, and /NAME flags. All of these flags must be present to successfully register a license. The optional /ORG parameter defaults to "".
These batch file commands register Igor Pro with the given serial number and license activation key:
<IGOR> /SN=1234567 /KEY="ABCD-EFGH-IJKL-MNOP-QRST-UVWX-Y" /NAME="Jack" /ORG="Acme Scientific" /QUIT
Network Communication
The following sections contain material related to the network communication and Internet-related capabilities of Igor Pro.
- URLs
- Safe Handling of Passwords
- Network Timeouts and Aborts
- Network Connections from Multiple Threads
- File Transfer Protocol (FTP)
- Hypertext Transfer Protocol (HTTP)
URLs
URLs, or Uniform Resource Locators, are compact strings that represent a resource available via the Internet. The description of the URL standard is described in RFC1738 (http://www.rfc-editor.org/rfc/rfc1738.txt) and updated in RFC3986 (http://www.rfc-editor.org/rfc/rfc3986.txt).
Each URL is composed of several different parts, most of which are optional:
<scheme>://<username>:<password>@<host>:<port>/<path>?<query>
Some examples of valid URLs are:
http://www.example.com
http://www.example.com/afolder?key1=45&key2=66
http://myusername:Passw0rD@www.example.com:8010/index.html
file:///C:\\Data\\Trial1\\control.ibw
ftp://ftp.wavemetrics.com
The WaveMetrics FTP server is no longer in service. Use your own FTP URL.)
For most operations and functions that take a urlStr parameter, only the scheme and host parts of the URL are required. See the Supported Network Schemes section for information on which schemes are supported by which operations and functions, and which port is used by default if it is not provided as part of the URL.
Usernames and Passwords
You can provide a username and password as part of the URL. However authentication credentials may not be supported by all schemes (such as file://). Some operations allow you to provide a username and password by using a flag, such as the /U and /W flags with FTPDownload, or the /AUTH flag with URLRequest.
If a URL contains a username and password in the URL and the authentication flags are also used, the values specified in the flags override values provided in the URL.
If you do not provide a username and password as part of the URL, and you do not use the authentication flags, then no authentication is attempted. An exception to this rule is that the FTP operations will login to the FTP server using "anonymous" as the username and a generic email address as the password.
If either the username or password contains special or reserved characters, those characters must be percent-encoded.
Supported Network Schemes
Different operations and functions support different schemes:
| Operation | Supported Schemes | Default Port | ||
|---|---|---|---|---|
| FetchURL and URLRequest | http | 80 | ||
| https | 443 | |||
| ftp | 21 | |||
| file | Not applicable | |||
| FTP operations* | ftp | 21 | ||
| * Includes FTPUpload, FTPDownload, FTPDelete, and FTPCreateDirectory. | ||||
Percent Encoding
Percent encoding is a way to encode characters in URLs that would otherwise have a special meaning or could be misinterpreted by servers. For example, a space character in a URL is encoded as "%20" using a percent character followed by the hex code for a space in the ASCII character set.
Most URLs contain only the letters A-Z and a-z, the digits 0-9, and a few other characters such as the underscore (_), hyphen (-), period (.), and tilde (~).
A URL may also contain "reserved characters" that may have special meaning depending on the way that they are used. Every URL contains the reserved characters ":" and "/" and may also contain one or more of the following reserved characters: !*'();@&=+$,?#[].
All operations and functions provided by Igor Pro that accept a URL string parameter expect that the URL has already been percent-encoded as necessary.
In most cases you don't need to worry about percent encoding because most URLs don't use reserved characters except for their special meaning. If you need to use a reserved character in a way that differs from the character's special meaning, you must percent-encode the character. You can use the URLEncode function for this purpose.
It is important that you not pass your entire URL to URLEncode to be encoded because that URL will not be understood by a server. URLEncode percent-encodes all reserved characters in the string you pass to it, because it cannot distinguish between reserved characters used for their special meaning and reserved characters used outside of their special meaning. Instead, you must pass each piece of the URL through URLEncode so that the final URL uses the correct syntax.
As an example, we'll use URLEncode to properly encode a URL that contains the following parts:
| Part Name | Example |
|---|---|
| Scheme | http |
| Username | A. MacGyver |
| Password | yj@!2M |
| Host | www.example.com |
| Path | /tape/duct |
| Query | discount=10%&color=red |
Without any percent-encoding, the URL is:
http://A. MacGyver:yj@!2M@www.example.com/tape/duct?discount=10%&color=red
If this URL were passed to FetchURL, the result would be an error because the URL contains several reserved characters that are not intended to be used in their standard way. For example, the "@" character indicates the separation between the username:password information and the start of the host name, but in this case the password itself also contains the "@" character. In addition, the "%" character is typically used to indicate that the next two characters represent a percent-encoded character, but in this example it is also part of the query. Finally, the username contains a space character. The space character is not technically a reserved character, but should be percent-encoded to ensure that it is handled correctly.
The following table shows the values of the parts of the URL that need to be percent-encoded by passing them through the URLEncode function:
| Part Name | Encoded Value |
|---|---|
| Username | A%2E%20MacGyver |
| Password | yj%40%212M |
| Query | discount=10%25&color=red |
The properly percent-encoded URL is:
http://A%2E%20MacGyver:yj%40%212M@www.example.com/tape/duct?discount=10%25&color=red
For keyword-value pairs that make up the query part, each keyword and value must be percent-encoded separately because the "=" character that separates the key from the value and the "&" character that separates the pairs in the list must not be percent-encoded.
For more information on percent-encoding and reserved characters, see http://en.wikipedia.org/wiki/Percent-encoding.
Safe Handling of Passwords
Some operations and functions support the use of a username and password when making a network connection. If you use sensitive passwords you must take certain precautions to prevent them from being accidentally revealed.
-
Always use the /V=0 flag when using a username or password with the /U (username) and /W (password) flags or the /AUTH flag. Otherwise, the debugging information that is printed to the history area will contain those values and anyone who sees the experiment could see them.
-
Do not hard code username or password values into procedures, since anyone with access to the procedure file could read them.
-
Do not store username or password values in global variables. Since global variables are saved with an experiment, if someone else had access to your experiment they could see this information.
Here is an example of how a username and sensitive password can be used in a secure manner:
Function SafeLogin()
	String username = ""
	String password = ""
	Prompt username, "Username"
	Prompt password, "Password"
	DoPrompt "Enter username and password", username, password
	if (V_flag == 1)
		// User hit cancel button, so do nothing.
		return 0
	endif

	// Percent-encode in case username and password contain reserved characters.
	String encodedUser = URLEncode(username)
	String encodedPass = URLEncode(password)

	String theURL
	sprintf theURL, "http://%s:%s@www.example.com", encodedUser, encodedPass
	String response = FetchURL(theURL)
	// NOTE: For FTP operations and URLRequest, make sure to use /V=0 so that
	// the username and password are not printed to the history.

	return 0
End
Note that the user is prompted to provide the username and password when the function is called and that only local string variables are used to store the username and password. The values in those string variables are not stored once the function is done executing.
Note also that the password is not hidden during entry in the dialog. Igor currently does not provide a way to do this.
Network Timeouts and Aborts
Some network calls may return an error code to Igor if they timeout. Depending on the specific operation or function, there can be a number of causes for a timeout.
If a network connection cannot be made after a period of time it will timeout. The amount of time allowed for a connection to be established is dependent on several factors.
You can always abort a network operation or function by pressing the User Abort Key Combinations.
Network Connections From Multiple Threads
All network-related operations and functions are thread-safe, which means that they can be called from multiple preemptive threads at the same time. This capability can be useful when:
-
You want to retrieve information from several different URLs as quickly as possible.
-
You want to do a long download or other operation in the background to avoid tieing Igor up.
The following example illustrates the first of these cases. It uses FetchURL to retrieve a list of the most frequently downloaded books from the Project Gutenberg web site. It then uses FetchURL to download the entire text of the top four books and prints the number of bytes in each.
ThreadSafe Function GetThePage(url)
	String url

	String response = FetchURL(url)
	return strlen(response)
End

Function ListGutenbergTopBooks()
	String topBooksURL = "http://www.gutenberg.org/browse/scores/top"
	String baseURL = "http://www.gutenberg.org/files/"

	// Get the contents of the page.
	String response = FetchURL(topBooksURL)
	Variable error = GetRTError(1)
	if (error || numtype(strlen(response)) != 0)
		Print "Error getting the list of most popular books."
		return 0
	endif

	String topBooksHTML = response

	// Remove all line endings.
	topBooksHTML = ReplaceString("\n", topBooksHTML, "")
	topBooksHTML = ReplaceString("\r", topBooksHTML, "")

	// Parse the page to get the section of the page
	// with the list of the most popular books from yesterday.
	// This could break if the format of the web page changes.
	String regExp = "(?i)<h2 id=\"books-last1\">.*?<ol>(.*?)</ol>"
	String topYesterdayHTML = ""
	SplitString/E=regExp topBooksHTML, topYesterdayHTML
	if (V_flag != 1)
		Print "Error parsing the top 100 books section."
		return 0
	endif

	// Replace the line endings.
	topYesterdayHTML = ReplaceString("</li><li>", topYesterdayHTML, "\r")

	// Create a wave to store text info about the top four books.
	Variable numBooksToUse = 4
	Make/O/T/N=(numBooksToUse, 2) topBooksInfo

	Make/O/N=(numBooksToUse) byteCounts

	Variable n
	String bookNumStr
	Variable bookNum
	String titleAuthor
	String thisLine
	Variable pos
	String bookURL = ""
	regExp = "(?i)a href=\".*?(\d+)\">(.+?)</a>"
	for (n=0; n<numBooksToUse; n+=1)
		// For each book we're going to look at, get the
		// partial URL and the title/author text.
		thisLine = StringFromList(n, topYesterdayHTML, "\r")
		SplitString/E=regExp thisLine, bookNumStr, titleAuthor
		if (V_flag != 2)
			Print "Error parsing the URL and title/author information."
			return 0
		endif

		// Remove the (###) stuff at the end of titleAuthor if it's there.
		pos = strsearch(titleAuthor, "(", 0)
		if (pos > 0)
			titleAuthor = titleAuthor[0, pos - 1]
		endif

		bookNum = str2num(bookNumStr)

		// Store the information about the book in the text wave.
		sprintf bookURL, "%s%d/%d.txt", baseURL, bookNum, bookNum
		topBooksInfo[n][0] = bookURL
		topBooksInfo[n][1] = titleAuthor
	endfor

	// Download each book (using multiple threads if possible)
	// and count the number of bytes in each.
	MultiThread byteCounts = GetThePage(topBooksInfo[p][0])

	// Print the results.
	Print "The top four books by download from yesterday are:"
	for (n=0; n<numBooksToUse; n+=1)
		Printf "%s (%d bytes)\r", topBooksInfo[n][1], byteCounts[n]
	endfor
End
Here is an example of what the output was when this help file was written:
The top four books by download from yesterday are:
Ulysses by James Joyce (1573044 bytes)
Alice's Adventures in Wonderland by Lewis Carroll (167529 bytes)
Piper in the Woods by Philip K. Dick (62214 bytes)
Pride and Prejudice by Jane Austen (704160 bytes)
File Transfer Protocol (FTP)
The FTPDownload, FTPUpload, FTPDelete, and FTPCreateDirectory command line operations support simple transfers of files and directories over the Internet.
Since Igor's SaveNotebook operation can generate HTML files from notebooks, it is possible to write an Igor procedure that downloads data, analyzes it, graphs it, and uploads an HTML file to a directory used by a web server. You can then use the BrowseURL operation to verify that everything worked as expected. For a demo of some of these features, choose File→Example Experiments→Feature Demos→Web Page Demo.
FTP Limitations
All FTP operations run "synchronously". This means that while the operation is being carried out, Igor cannot do anything else. However, it is possible to perform these operations using an Igor preemptive thread so that they execute in the background and you can continue to use Igor for other purposes. For more information, see Network Connections From Multiple Threads.
Igor does not currently provide any way for the user to browse the remote server from within Igor itself.
Igor does not provide any secure way to store passwords. Consequently, you should not use Igor for FTP in situations where tight security is required. See Safe Handling of Passwords for an example of how to securely prompt the user for a password.
Igor does not provide any support for using proxy servers. Proxy servers are security devices that stand between the user and the Internet and permit some traffic while prohibiting other traffic. If your site uses a proxy server, FTP operations may fail. Your network administrator may be able to provide a solution.
Igor does not include operations for listing a server directory or changing its current directory.
Downloading a File
The following function transfers a file from an FTP server to the local hard disk:
Function DemoFTPDownloadFile()
	// NOTE: The WaveMetrics FTP server is no longer in service. Use your own FTP URL.
	String url = "ftp://ftp.wavemetrics.net/welcome.msg"
	String localFolder = SpecialDirPath("Desktop", 0, 0, 0)
	String localPath = localFolder + "DemoFTPDownloadFile.txt"
	FTPDownload/U="anonymous"/W="password" url, localPath
End
The output directory must already exist on the local hard disk. The target file may or may not exist on the local hard disk. If it does not exist, the FTPDownload command creates it. If it does exist, FTPDownload asks if you want to overwrite it. To overwrite it without being asked, use the /O flag.
If you elect to overwrite it, all previous contents of the target file are obliterated.
FTPDownload presents a dialog asking you to specify the local file name and location in the following cases:
-
You use the /I (interactive) flag.
-
The parent directory specified by the local path does not exist.
-
The specified local file exists and you do not use the /O (overwrite) flag.
Downloading a Directory
The following function transfers a directory from an FTP server to the local hard disk:
Function DemoFTPDownloadDirectory()
	// NOTE: The WaveMetrics FTP server is no longer in service. Use your own FTP URL.
	String url = "ftp://ftp.wavemetrics.net/Utilities"
	String localFolder = SpecialDirPath("Desktop", 0, 0, 0)
	String localPath = localFolder + "DemoFTPDownloadDirectory"
	FTPDownload/D/U="anonymous"/W="password-goes-here"/O url, localPath
End
The /D flag specifies that you are transferring a directory.
The output directory may or may not already exist on the local hard disk. If it does not exist, the FTPDownload command creates it. If it does exist, FTPDownload asks if you want to overwrite it. To overwrite it without being asked, use the /O flag.
If you elect to overwrite it, all previous contents of the local directory are obliterated.
If the local path that you specify should not end with a colon or backslash, FTPDownload presents a dialog asking you to specify the local directory because it is looking for the name of the directory to be created on the local hard disk.
FTPDownload presents a dialog asking you to specify the local directory in the following cases:
-
You use the /I (interactive) flag.
-
The parent directory specified by the local path does not exist.
-
The specified directory (DemoFTPDownloadFolder in the example above) exists and you have not used the /O (overwrite) flag.
-
FTPDownload gets an error when it tries to create the specified directory. This could happen, for example, if you don't have write privileges for the parent directory.
Uploading a File
The following function uploads a file to an FTP server:
Function DemoFTPUploadFile()
	// NOTE: The WaveMetrics FTP server is no longer in service. Use your own FTP URL.
	String url = "ftp://ftp.wavemetrics.com/pub"
	String localFolder = SpecialDirPath("Desktop", 0, 0, 0)
	String localPath = localFolder + "DemoFTPUploadFile.txt"
	FTPUpload/U="username"/W="password" url, localPath
End
To successfully execute this, you need a real user name and a real password.
The /O flag has no effect on the FTPUpload operation when uploading a file. FTPUpload always overwrites an existing server file, whether /O is used or not.
If you overwrite a server file, all previous contents of the file are obliterated.
In order to overwrite an existing file on the server, you must have permission to delete files on that server. The server administrator determines what permission a particular user has.
FTPUpload presents a dialog asking you to specify the local file in the following cases:
-
You use the /I (interactive) flag.
-
The local parent directory or the local file does not exist.
Uploading a Directory
The following function uploads a directory to an FTP server:
Function DemoFTPUploadDirectory()
	// NOTE: The WaveMetrics FTP server is no longer in service. Use your own FTP URL.
	String url = "ftp://ftp.wavemetrics.com/pub"
	String localFolder = SpecialDirPath("Desktop", 0, 0, 0)
	String localPath = localFolder + "DemoFTPUploadDirectory"
	FTPUpload/D/U="username"/W="password" url, localPath
End
To successfully execute this, you need a real user name and a real password. Also, the server would have to allow uploading directories.
FTPUpload always overwrites an existing server directory, whether /O is used or not.
If you omit /O or specify /O or /O=1, all previous contents of the directory are obliterated.
If you specify /O=2, FTPUpload performs a merge of the directory contents. This means that files and directories in the source overwrite files and directories on the server that have the same name, but files and directories on the server whose names do not conflict with those in the source directory are not modified.
In order to overwrite an existing directory on the server, you must have permission to delete directories on that server. The server administrator determines what permission a particular user has.
If the local path that you specify should not end with a colon or backslash, FTPDownload presents a dialog asking you to specify the local directory because it is looking for the name of the directory to be uploaded.
FTPUpload presents a dialog asking you to specify the local directory in the following cases:
-
You use the /I (interactive) flag.
-
The specified directory or any of its parents do not exist.
If you don't have permission to remove and to create directories on the server, FTPUpload fails and returns an error.
Creating a Directory
The FTPCreateDirectory operation creates a new directory on an FTP server.
If the directory already exists on the server, the operation does nothing. This is not treated as an error, though the V_Flag output variable is set to -1 to indicate that the directory already existed.
If you don't have permission to create directories on the server, FTPCreateDirectory fails and returns an error.
Deleting a Directory
The FTPDelete operation with the /D flag deletes a directory on an FTP server.
If you don't have permission to delete directories on the server, or if the specified directory does not exist on the server, FTPDelete fails and returns an error.
FTP Transfer Types
The FTP protocol supports two types of transfers: image and ASCII. Image transfer is appropriate for binary files. ASCII transfer is appropriate for text files.
In an image transfer, also called a binary transfer, the data on the receiving end will be a replica of the data on the sending end. In an ASCII transfer, the receiving FTP agent changes line terminators to match the local convention. On Macintosh and Unix, the conventional line terminator is linefeed (LF, ASCII code 0x0A). On Windows, it is carriage-return plus linefeed (CR+LF, ASCII code 0x0D + ASCII code 0x0A).
If you transfer a text file using an image transfer, the file may not use the local conventional line terminator, but the data remains intact. Igor Pro can display text files that use any of the three conventional line terminators, but some other programs, especially older programs, may display the text incorrectly.
On the other hand, if you transfer a binary file, such as an Igor experiment file, using an ASCII transfer, the file will almost certainly be corrupted. The receiving FTP agent will convert any byte that happens to have the value 0x0D to 0x0A or vice versa. If the local convention calls for CRLF, then a single byte 0x0D will be changed to two bytes, 0x0D0A. In either case, the file will become unusable.
FTP Troubleshooting
FTP involves a lot of hardware and software on both ends and a network in between. This provides ample opportunity for errors.
Here are some tips if you experience errors in using FTP operations.
-
Use an FTP client or web browser to connect to the FTP site. This confirms that your network is operating, the FTP server is operating, and that you are using the correct URL.
-
Use an FTP client or web browser to verify that the user name and password that you are using is correct or that the server allows anonymous FTP access.
Many web browser accept URLs of the form:
ftp://username:password@ftp.example.com
However the password is not transferred securely.
3. Use an FTP browser or web browser to verify that the directory structure of the FTP server is what you think it is.
-
Using an FTP client or web browser, do the operation that you are attempting to do with Igor. This verifies that you have sufficient permissions on the server.
-
Use the /V=7 flag to tell the Igor operation to display status information in Igor's history area.
-
Try the simplest transfer you can. For example, try to download a single file that you know exists on the server.
-
If you have access to the FTP server, examine the FTP server log for clues.
Hypertext Transfer Protocol (HTTP)
The FetchURL function supports simple URL requests over the Internet from web or FTP servers and to local files. For example, you can use FetchURL to get the source code of a web page in text form, and then process the text to extract specific information from the response.
The URLRequest operation supports both simple URL requests and more complicated requests such as using the http POST, PUT, and DELETE methods. It also provides experimental support for using a proxy server.
Downloading a Web Page Via HTTP
This example uses FetchURL to download the contents of the WaveMetrics home page into a string, and then counts the number of times that the string "Igor" occurs in the text of the page.
Function DownloadWebPageExample()
	String webPageText = FetchURL("https://www.wavemetrics.com")
	if (numtype(strlen(webPageText)) == 2)
		Print "There was an error while downloading the web page."
	endif
	Variable count, pos
	do
		pos = strsearch(webPageText, "Igor", pos, 2)
		if (pos == -1)
			break			// No more occurrences of "Igor"
		else
			pos += 1
			count += 1
		endif
	while (1)
	Printf "The text \"Igor\" was found %d times on the web page.\r", count
End
Downloading a File Via HTTP
This example uses FetchURL to download a file from a web server. Because FetchURL does not support storing the downloaded data into a file directly, we store the data in memory and then use Igor to write that data to a file on disk.
Though the example uses a URL that begins with http://, FetchURL also supports https://, ftp:// and file://. You could use the code below with a different URL to download a file from an FTP server or even to access a local on-disk file.
Function DownloadWebFileExample()
	String url = "https://www.wavemetrics.net/IgorManual.zip"

	// This sample URL is for the Igor Pro Version 9 manual.
	// Based on the URL, determine what the destination
	// file name should be. This will be the default in the
	// Save As... dialog.
	String urlStrParam = RemoveEnding(url, "/")
	Variable parts = ItemsInList(urlStrParam, "/")
	String destFileNameStr = StringFromList(parts - 1, urlStrParam, "/")
	if (strlen(destFileNameStr) < 1)
		Print "Error: Could not determine the name of the destination file."
		return 0
	endif

	Variable refNum
	Open/D/M="Save File As..."/T="????" refNum as destFileNameStr
	String fullFilePath = S_fileName

	if (strlen(fullFilePath) > 0)		// No error and user didn't cancel in dialog.
		// Open the selected file so that it can later be written to.
		Open/Z/T="????" refNum as fullFilePath
		if (V_flag != 0)
			Print "There was an error opening the local destination file."
		else
			String response = FetchURL(url)
			Variable error = GetRTError(1)
			if (error == 0 && numtype(strlen(response)) == 0)
				FBinWrite refNum, response
				Close refNum
				Print "The file was successfully downloaded as " + fullFilePath
			else
				Close refNum
				DeleteFile/Z fullFilePath	// Clean up the empty file.
				Print "There was an error downloading the file."
			endif
		endif
	endif
End
Making a Query Via HTTP
Another use for HTTP requests is to get the server's response to a query. Many simple web forms use the HTTP GET method, which both FetchURL and URLRequest support. For example, you can simulate the submission of the basic Google search form using the following code.
Function WebQueryExample()
	String keywords
	String baseURL = "http://www.gutenberg.org/ebooks/search/"

	// Prompt the user to enter search keywords.
	Prompt keywords, "Enter search term"
	DoPrompt "Search Gutenberg.org", keywords
	if (V_flag == 1)
		return -1				// User clicked cancel button
	endif

	// Pass the search terms through URLEncode to
	// properly percent-encode them.
	keywords = URLEncode(keywords)

	// Build the full URL.
	String url = ""
	sprintf url, "%s?query=%s", baseURL, keywords

	// Fetch the results.
	String response
	response = FetchURL(url)
	Variable error = GetRTError(1)
	if (error != 0 || numtype(strlen(response)) != 0)
		Print "Error fetching search results."
		return -1
	endif

	// Try to extract the thumbnail image of the first result.
	String regExp = "(?s)<img class=\"cover-thumb\" src=\"(.+?)\".*"
	String firstURL
	SplitString/E=regExp response, firstURL
	firstURL = TrimString(firstURL)
	firstURL = "http:" + firstURL
	if (V_flag == 1)
		BrowseURL firstURL
	else
		Print "Could not extract the first result from the"
		Print "results page. Your search terms might not"
		Print "have given any results, or the format of"
		Print "the results may have changed so that the"
		Print "first result cannot be extracted."
		return -1
	endif

	return 0
End
Examples using the POST method with HTTP can be found in the section The HTTP POST Method of the documentation for the URLRequest operation.
HTTP Troubleshooting
Here are some tips if you experience errors using FetchURL or URLRequest:
-
Use a web browser to connect to the site. This confirms that your network is operating, the server is operating, and that you are using the correct URL.
-
FetchURL and URLRequest generate an error if it cannot connect to the destination server, which could happen if your computer is not connected to the network or if the target URL contains an invalid host name or port number.
However if the URL contains an invalid path or if the destination URL requires you to provide a username and password, these operations will likely not generate an error. The reason is these errors typically result in a web page being returned, though not the one you expected. If you need to check that a call to FetchURL returned a valid web page and not an error web page, you must do that in your own code. One possibility would be to try searching the page for key phrases, such as "File Not Found" or "Page Not Found".
With URLRequest, you can inspect the value of the V_responseCode output variable. For successful HTTP requests, this value will usually be 200. A different value may indicate that there was an error making the request.
Operation Queue
Igor implements an operation queue that supports deferred execution of commands and some special commands for dealing with files, procedures, and experiments.
Igor services the operation queue when no procedures are running and the command line is empty. If the operation queue is not empty, Igor then executes the oldest command in the queue.
You can append a command to the operation queue using:
Execute/P <command string >
The /P flag tells Igor to post the command to operation queue instead of executing it immediately.
You can also specify the /Q (quiet) or /Z (ignore error) flags. See Execute for details about /Q and /Z.
The command string can contain either a special command that is unique to the operation queue or ordinary Igor commands. The special commands are:
INSERTINCLUDE procedureSpec
DELETEINCLUDE procedureSpec
AUTOCOMPILE ON
AUTOCOMPILE OFF
COMPILEPROCEDURES
NEWEXPERIMENT
OPENEXPERIMENT
LOADFILE filePath
LOADFILEINNEWINSTANCE filePath
LOADHELPEXAMPLE filePath
MERGEEXPERIMENT filePath
RELOAD CHANGED PROCS (added in Igor Pro 9.00)
The special operation queue keywords must be all caps and must have exactly one space after the keyword.
INSERTINCLUDE and DELETEINCLUDE insert or delete #include lines in the main procedure window. procedureSpec is whatever you would use in a #include statement except for "#include " itself.
AUTOCOMPILE ON and AUTOCOMPILE OFF require Igor Pro 8.03 or later. See Auto-Compiling for details.
COMPILEPROCEDURES does just what it says, compiles procedures. You must call it after operations such as INSERTINCLUDE that modify, add, or remove procedure files.
NEWEXPERIMENT closes the current experiment without saving.
OPENEXPERIMENT presents a dialog to select an experiment file and opens it. If the user cancels the dialog the current experiment remains unchanged. If an experiment file is chosen and the current experiment needs saving, the usual "Do you want to save changes to experiment?" dialog is presented. OPENEXPERIMENT was added for Igor 10.
LOADFILE opens the file specified by filePath. filePath is either a full path or a path relative to the Igor Pro Folder. The file can be any file that Igor can open. If the file is an experiment file, execute NEWEXPERIMENT first to avoid displaying a "Do you want to save" dialog. If you want to save the changes in an experiment before loading another, you can use the standard SaveExperiment operation.
LOADFILEINNEWINSTANCE opens the file specified by filePath in a new instance of Igor Pro. filePath is either a full path or a path relative to the Igor Pro Folder. The file can be any file that Igor can open. LOADFILEINNEWINSTANCE was added in Igor Pro 7.01.
LOADHELPEXAMPLE opens the file specified by filePath in a new instance of Igor Pro. It works the same as LOADFILEINNEWINSTANCE and is recommended for Notebook Action Special Characters that load example experiments, such as those used throughout Igor's help files. LOADHELPEXAMPLE was added in Igor Pro 8.00.
MERGEEXPERIMENT merges the experiment file specified by filePath into the current experiment. Before using this, make sure you understand the caveats regarding merging experiments. See Merging Experiments for details.
RELOAD CHANGED PROCS, added in Igor Pro 9.00, causes Igor to reload procedure windows from their disk files if they have been modified outside of Igor. This is useful if you run a system that modifies procedure files using external software which is part of a system running from Igor. The sequence of events is:
-
Most likely, you use ExecuteScriptText to trigger the external modifications.
-
You use Execute/P "RELOAD CHANGED PROCS " to reload the modified procedures.
-
You use Execute/P "COMPILEPROCEDURES " to compile the modified procedures.
Operation Queue Example
Function DemoQueue()
	Execute/P "INSERTINCLUDE <Multipeak Fitting>"
	Execute/P "COMPILEPROCEDURES "
	Execute/P "fStartMultipeakFit2()"
	Execute/P "Sleep 00:00:04"
	Execute/P "NEWEXPERIMENT "
	Execute/P "LOADFILE :Examples:Feature Demos:Live mode.pxp"
	Execute/P "DoWindow/F Graph0"
	Execute/P "StartButton(\"StartButton\")"
End
Operation Queue For Loading Packages
One important use of the operation queue is providing easy access to useful procedure packages. The "Igor Pro Folder/Igor Procedures" folder contains a procedure file named "DemoLoader.ipf" that creates the Packages submenus found in various menus. To try it out, choose one of the items from the Analysis→Packages menu.
DemoLoader.ipf is an independent module. To examine it, execute:
SetIgorOption IndependentModuleDev=1
and then use the Windows→Procedure Windows submenu.
User-Defined Hook Functions
Igor calls specific user-defined functions, called "hook" functions, if they exist, when it performs certain actions. This allows savvy programmers to customize Igor's behavior.
In some cases the hook function may inform Igor that the action has been completely handled, and that Igor shouldn't perform the action. For example, you could write a hook function to load data from a certain kind of text file that Igor cannot handle directly.
This section discusses general hook functions that do not apply to a particular window. For information on window-specific events, see Window Hook Functions.
There are two ways to get Igor to call your general hook function. The first is by using a predefined function name. For example, if you create a function named AfterFileOpenHook, Igor will automatically call it after opening a file. The second way is to explicitly tell Igor that you want it to call your hook using the SetIgorHook operation.
If you use a predefined hook function name, you should make the function static (private to the file containing it) so that other procedure files can use the same predefined name.
Here are the predefined hook functions.
| Action | Hook Function Called | |
|---|---|---|
| Procedures were successfully compiled | AfterCompiledHook | |
| A file or experiment was opened | AfterFileOpenHook | |
| The "MDI frame" (main application | ||
| window) was resized | AfterMDIFrameSizedHook | |
| A target window was created | AfterWindowCreatedHook | |
| The debugger window is about to open | BeforeDebuggerOpensHook | |
| An experiment is about to be saved | BeforeExperimentSaveHook | |
| A file or XOP is about to be opened | BeforeFileOpenHook | |
| A modification to a procedure window is about | ||
| to cause procedures to be uncompiled | BeforeUncompiledHook (Igor Pro 8.03 or later) | |
| HDF5 dataset for wave is about to be written | HDF5SaveDataHook | |
| Igor is about to open a new experiment | IgorBeforeNewHook | |
| Igor is about to quit | IgorBeforeQuitHook | |
| Igor is building and enabling menus or about | ||
| to handle a menu selection | IgorMenuHook | |
| Igor is about to quit | IgorQuitHook | |
| Igor is launching or creating a new experiment | IgorStartOrNewHook | |
To create hook functions, you must write functions with the specified names and store them in any procedure file. If you store the procedure file in "Igor Pro User Files/Igor Procedures" (see Igor Pro User Files for details), Igor will automatically open the file and compile the functions when it starts up and will execute the IgorStartOrNewHook function if it exists.
To allow for multiple procedure files to define the same predefined hook function, you should declare your hook function static. For example:
static Function IgorStartOrNewHook(igorApplicationNameStr)
String igorApplicationNameStr
The use of the static keyword makes the function private to the procedure file containing it and allows other procedure files to have their own static function with the same name.
Igor calls static hook functions after the SetIgorHook functions are called. The static hook functions themselves are called in the order in which their procedure file was opened. You should not rely on any execution order among the static hook functions. However, any hook function which returns a nonzero result prevents remaining hook functions from being called and prevents Igor from performing its usual processing of the hook event. In most cases hook functions should exercise caution in returning any value other than 0. For hook functions only, returning a NaN or failing to return a value (which causes a NaN to be returned) is considered the same as returning 0.
The following sections describe the individual hook functions in detail.
AfterCompiledHook ( )
AfterCompiledHook is a user-defined function that Igor calls after the procedure windows have all been compiled successfully.
You can use AfterCompiledHook to initialize global variables or data folders, among other things.
The function result from AfterCompiledHook must be 0. All other values are reserved for future use.
See Also
SetIgorHook, BeforeUncompiledHook, User-Defined Hook Functions
AfterFileOpenHook (refNum, fileNameStr, pathNameStr, fileTypeStr, fileCreatorStr, fileKind )
AfterFileOpenHook is a user-defined function that Igor calls after it has opened a file because the user dragged it onto the Igor icon or into Igor or double-clicked it.
AfterFileOpenHook is not called when a file is opened via a menu.
Windows system files with .bin, .com, .dll, .exe, and .sys extensions aren't passed to the hook functions.
AfterFileOpenHook's return value is ignored unless fileKind is 9.
Parameters
refNum is the file reference number. You can use this number with file I/O operations to read from the file. Igor closes the file when the user-defined function returns, and refNum becomes invalid. The file is opened for read-only; if you want to write to the file, you must close and reopen it with write access. refNum will be -1 for experiment files and XOPs. In this case, Igor has not opened the file for you.
fileNameStr contains the name of the file.
pathNameStr contains the name of the symbolic path. pathNameStr is not the value of the path. Use the PathInfo operation to determine the path's value.
fileTypeStr contains the Macintosh file type code, if applicable. File type codes are obsolete. Use the file name extension to determine if you want to handle the file. You can use ParseFilePath to obtain the extension from fileNameStr .
fileCreatorStr contains the Macintosh creator code, if applicable. Creator codes are obsolete so ignore this parameter.
fileKind is a number that identifies what kind of file Igor thinks it is. Values for fileKind are listed in the next section.
AfterFileOpenHook fileKind Parameter
This table describes the hook AfterFileOpenHook function fileKind parameter.
If the AfterFileOpenHook function returns 0, Igor performs the default action listed in the table.
| Kind of File | fileKind | Default Action, if Any | ||
|---|---|---|---|---|
| Unknown | 0 | |||
| Igor Experiment, packed | ||||
| (stationery, too) | 1 | |||
| Igor Experiment, unpacked | ||||
| (stationery, too) | 2 | |||
| Igor XOP | 3 | |||
| Igor Binary Wave File | 4 | |||
| Igor Text (data and commands) | 5 | |||
| Text, no numbers detected in first two lines | 6 | |||
| General Numeric text (no tabs) | 7 | |||
| Numeric text | ||||
| Tab-Separated-Values | 8 | |||
| Numeric text | ||||
| Tab-Separated-Values, MIME | 9 | Display loaded data in a new table and a new graph. | ||
| Text, with tabs | 10 | |||
| Igor Notebook | ||||
| (unformatted or formatted) | 11 | |||
| Igor Procedure | 12 | |||
| Igor Help | 13 | |||
Details
AfterFileOpenHook's return value is ignored, except when fileKind is 9 (Numeric text, Tab-Separated-Values, MIME). If you return a value of 0, Igor executes the default action, which displays the loaded data in a table and a graph. If you return a value of 1, Igor does nothing.
Another way to disable the MIME-TSV default action is define a global variable, in the root data folder, named V_no_MIME_TSV_Load and set its value to 1. In this case any file of fileKind = 9 is reassigned a fileKind of 8.
The default action for fileKind = 9 makes Igor a MIME-TSV document Helper Application for Web browsers such as Netscape or Internet Explorer.
The exact criteria for Igor to consider a file to be of kind 9 are:
-
fileTypeStr must be "TEXT" or "WMT0" (that's a zero, not an oh).
-
Either the first line of the file must begin with a # character, or the name of the file must end with ".tsv" in either lower or upper case.
-
The first line must contain one or more column titles. If the line starts with a # character, the first column title must not start with "include", "pragma" or the ! character. Spaces are allowed in the titles, but if two or more title columns are present, they must be separated by one tab character.
-
The second line must contain one or more numbers. If two or more numbers, they must be separated by one tab character, and the first line's words must also be separated by tabs.
When the MIME-TSV file contains one column of data, it is graphed as a series of Y values.
Short columns (less than 50 values) are graphed with lines and markers, longer columns with lines only. Preferences are turned on when the graph is made.
Two columns are assumed to be X followed by Y, and are graphed as Y versus X. More columns do not affect the graph, though they are shown in the table.
Example
// This hook function prints the first line of opened TEXT files
// into the history area
Function AfterFileOpenHook(refNum,file,pathName,type,creator,kind)
	Variable refNum,kind
	String file,pathName,type,creator
	// Check that the file is open (read only), and of correct type
	if( (refNum >= 0) && (CmpStr(type,"TEXT")==0) ) // also "text", etc.
		String line1
		FReadLine refNum, line1       // Read the line (and carriage return)
		Print line1                   // Print line in the history area.
	endif
	return 0                         // don't prevent MIME-TSV from displaying
End
See Also
BeforeFileOpenHook, SetIgorHook, User-Defined Hook Functions
AfterMDIFrameSizedHook (param )
AfterMDIFrameSizedHook is a user-defined function that Igor calls when the "MDI frame" (main application window) has been resized.
AfterMDIFrameSizedHook can be used to resize windows to fit the new frame size. See GetWindow kwFrame and MoveWindow.
Parameters
param is one of the following values:
| Size Event | param |
|---|---|
| Normal resize | 0 |
| Minimized | 1 |
| Maximized | 2 |
| Moved | 3 |
Details
Resizing the MDI frame by the top left corner calls AfterMDIFrameSizedHook twice: first for the move (param = 3) and then for the normal resize (param = 0).
Igor currently ignores the value returned by AfterMDIFrameSizedHook. Return 0 in case Igor uses this value in the future.
See Also
SetWindow, GetWindow, SetIgorHook, and User-Defined Hook Functions
AfterWindowCreatedHook (windowNameStr, winType )
AfterWindowCreatedHook is a user-defined function that Igor calls when a target window is first created.
AfterWindowCreatedHook can be used to set a window hook on target windows created by the user or by other procedures.
Parameters
windowNameStr contains the name of the created window.
winType is the type of the window, the same value as returned by WinType.
Details
"Target windows" are graphs, tables, layout, panels, and notebook windows.
This function is not called when an Igor experiment is being opened.
Igor ignores the value returned by AfterWindowCreatedHook.
See Also
SetWindow, SetIgorHook, and User-Defined Hook Functions
BeforeDebuggerOpensHook (errorInRoutineStr, stoppedByBreakpoint )
BeforeDebuggerOpensHook is a user-defined function that Igor calls when the debugger window is about to be opened, whether by hitting a breakpoint or when Debug on Error is enabled.
BeforeDebuggerOpensHook can be used to prevent the debugger window opening for certain error codes or in selected user-defined functions when Debug on Error is enabled. This is a feature for advanced programmers only. Most programmers will not need it.
This hook does not work well for macros or procs, because their runtime errors don't automatically open the debugger, but instead present an error dialog from which the user manually enters the debugger by clicking the Debug button.
Parameters
errorInRoutineStr contains the name of the routine (function or macro) the debugger will be stopping in as a fully-qualified name, comprised of at least "ModuleName#RoutineName", suitable for use with FunctionInfo.
If the routine is in a regular module procedure window (see Regular Modules for details), errorInRoutineStr will be a triple name such as "MyIM#MyModule#MyFunction".
stoppedByBreakpoint is 0 if the debugger is about to be shown because of Debug on Error, or non-zero if the debugger encountered a user-set breakpoint (see Setting Breakpoints).
If a breakpoint exists at the line where an error caused the debugger to appear, stoppedByBreakpoint will be non-zero, even though the cause was Debug on Error.
Details
If BeforeDebuggerOpensHook returns 0 or NaN (or doesn't return a value), the debugger window is opened normally.
If it returns 1, the debugger window is not shown and program execution continues.
All other return values are reserved for future use.
Example
The following hypothetical example:
-
Prevents breakpoints from bringing up the debugger, unless DEBUGGING is defined.
-
Prints the name of the routine with the error, and the error message.
-
Beeps before the debugger appears.
Function ProvokeDebuggerInFunction()
	DebuggerOptions enable=1, debugOnError=1	// Enable debug on error

	ProvokeDebugger()
End

Function ProvokeDebugger()
	Variable var=0 // Put a breakpoint here.
	               // Without a #define DEBUGGING, the breakpoint is skipped.
	Make/O $""     // Cause an error
	Print "Back from bad Make command in function"
End

static Function BeforeDebuggerOpensHook(pathToErrorFunction,isUserBreakpoint)
	String pathToErrorFunction
	Variable isUserBreakpoint

	#ifndef DEBUGGING
		if( isUserBreakpoint )
			return 1	// Ignore user breakpoints we forgot to clear. Don't use this during development!
		endif
	#endif

	Print "stackCrawl = ", GetRTStackInfo(0)
	Print "FunctionInfo = ", FunctionInfo(pathToErrorFunction)

	// Don't clear unless you're preventing the debugger from appearing
	Variable clearErrors= 0
	Variable rtErr= GetRTError(clearErrors)	// Get the error #

	Variable substitutionOption= exists(pathToErrorFunction)== 3 ? 3 : 2
	String errorMessage= GetErrMessage(rtErr,substitutionOption)

	Beep	// Audible cue that the debugger is showing up!

	Print "Error \""+errorMessage+"\" in "+pathToErrorFunction+"

	return 0	// Return 0 to show the debugger; an unexpected error occurred.
End
•ProvokeDebuggerInFunction()		// Execute this in the command line
  stackCrawl = ProvokeDebuggerInFunction;ProvokeDebugger;BeforeDebuggerOpensHook;
  FunctionInfo = NAME:ProvokeDebugger;PROCWIN:Procedure;MODULE:;INDEPENDENTMODULE:;...
  Error "Expected name" in ProcGlobal#ProvokeDebugger
  Back from bad Make command in function
See Also
SetWindow, SetIgorHook, User-Defined Hook Functions
Static Functions, Regular Modules, Independent Modules
FunctionInfo, GetRTStackInfo, GetRTError, GetErrMessage
BeforeExperimentSaveHook (refNum, fileNameStr, pathNameStr, fileTypeStr, fileCreatorStr, fileKind )
BeforeExperimentSaveHook is a user-defined function that Igor calls when an experiment is about to be saved by Igor.
Igor ignores the value returned by BeforeExperimentSaveHook.
Parameters
refNum identifies what is causing the experiment to be saved:
| Cause | refNum |
|---|---|
| Save Experiment (File menu or SaveExperiment) | 1 |
| Save Experiment As (File menu or SaveExperiment) | 2 |
| Save Experiment Copy (File menu or SaveExperiment/C) | 3 |
| Autosave Experiment (direct mode) | 17 (0x10 + 1) |
| Autosave Experiment Copy (indirect mode) | 19 (0x10 + 3) |
Before Igor Pro 9.00, refNum was always -1.
fileNameStr contains the name of the file.
pathNameStr contains the name of the symbolic path. pathNameStr is not the value of the path. Use the PathInfo operation to determine the path's value.
fileTypeStr contains the Macintosh file type code, if applicable. File type codes are obsolete. Use the file name extension to determine if you want to handle the file. You can use ParseFilePath to obtain the extension from fileNameStr .
fileCreatorStr contains the Macintosh creator code, if applicable. Creator codes are obsolete so ignore this parameter.
fileKind is a number that identifies what kind of file Igor will be saving:
| Kind of File | fileKind |
|---|---|
| Igor experiment, packed (stationery, too) | 1 |
| Igor experiment, unpacked (stationery, too) | 2 |
Details
You can determine the full directory and file path of the experiment by calling the PathInfo operation with $pathNameStr.
Example
This example prints the full file path of the about-to-be-saved experiment to the history area, and deletes all unused symbolic paths.
#pragma rtGlobals=1           // treat S_path as local string variable

Function BeforeExperimentSaveHook(rN,fileName,path,type,creator,kind)
	Variable rN,kind
	String fileName,path,type,creator

	PathInfo $path             // puts path value into (local) S_path
	Printf "Saved \"%s\" experiment\r",S_path+fileName

	KillPath/A/Z               // Delete all unneeded symbolic paths
End
See Also
SetIgorHook, User-Defined Hook Functions
BeforeFileOpenHook (refNum, fileNameStr, pathNameStr, fileTypeStr, fileCreatorStr, fileKind )
BeforeFileOpenHook is a user-defined function that Igor calls when a file is about to be opened because the user dragged it onto the Igor icon or into Igor or double-clicked it.
BeforeFileOpenHook is not called when a file is opened via a menu.
Windows system files with .bin, .com, .dll, .exe, and .sys extensions aren't passed to the hook functions.
The value returned by BeforeFileOpenHook informs Igor whether the hook function handled the open event and therefore Igor should not perform its default action. In some cases, this return value is ignored, and Igor performs the default action anyway.
Parameters
refNum is the file reference number. You can use this number with file I/O operations to read from the file. Igor closes the file when the user-defined function returns, and refNum becomes invalid. The file is opened for read-only; if you want to write to the file, you must close and reopen it with write access. refNum will be -1 for experiment files and XOPs. In this case, Igor has not opened the file for you.
fileNameStr contains the name of the file.
pathNameStr contains the name of the symbolic path. pathNameStr is not the value of the path. Use the PathInfo operation to determine the path's value.
fileTypeStr contains the Macintosh file type code, if applicable. File type codes are obsolete. Use the file name extension to determine if you want to handle the file. You can use ParseFilePath to obtain the extension from fileNameStr .
fileCreatorStr contains the Macintosh creator code, if applicable. Creator codes are obsolete so ignore this parameter.
fileKind is a number that identifies what kind of file Igor thinks it is. Values for fileKind are listed in the next section.
BeforeFileOpenHook fileKind Parameter
This table describes the BeforeFileOpenHook function fileKind parameter.
| Kind of File | fileKind | Default Action | |
|---|---|---|---|
| Unknown | 0 | ||
| Igor experiment, packed (stationery, too) | 1 | (Hook not called) | |
| Igor experiment, unpacked (stationery, too) | 2 | (Hook not called) | |
| Igor XOP | 3 | Always loaded as XOP | |
| Igor binary wave file | 4 | Data loaded as Igor binary | |
| Igor text | 5 | Loaded and executed | |
| Text, no numbers detected in first two lines | 6 | Opened as notebook | |
| General numeric text (no tabs) | 7 | Data loaded as general text | |
| Numeric text, tab-separated-values | 8 | Data loaded as delimited text | |
| Numeric text, tab-separated-values, MIME | 9 | Data loaded as delimited text | |
| Text with tabs | 10 | Opened as notebook | |
| Igor notebook (unformatted or formatted) | 11 | Opened as notebook | |
| Igor procedure | 12 | Always opened as procedure | |
| Igor help | 13 | Always opened as help | |
Details
BeforeFileOpenHook must return 1 if Igor is not to take action on the file (it won't be opened), or 0 if Igor is permitted to take action on the file. Igor ignores the return value for fileKind values of 3, 12, and 13. The hook function is not called for Igor experiments (fileKind values of 1 and 2).
Igor always closes the file when the user-defined function returns, and refNum becomes invalid. Don't store the value of refNum in a global for use by other routines, since the file it refers to will be closed.
Example
This example checks the first line of the file about to be opened to determine whether it has a special, presumably user-specific, format. If it does, then LoadMyFile (another user-defined function) is called to load it. LoadMyFile presumably loads this custom data file, and returns 1 if it succeeded. If it returns 0 then Igor will open it using the Default Action from the above table.
Function BeforeFileOpenHook(refNum,fileName,path,type,creator,kind)
	Variable refNum,kind
	String fileName,path,type,creator

   Variable handledOpen=0
   if( CmpStr(type,"TEXT")==0 )              // text files only
      String line1
      FReadLine refNum, line1                // First line (and carriage return)
      if( CmpStr(line1[0,4],"XYZZY") == 0 )  // My special file
         FSetPos refNum, 0                   // rewind to start of file
         handledOpen= LoadMyFile(refNum)     // returns 1 if loaded OK
      endif
   endif
   return handledOpen                        // 1 tells Igor not to open the file
End
See Also
AfterFileOpenHook, SetIgorHook, User-Defined Hook Functions
BeforeUncompiledHook (changeCode, procedureWindowTitleStr, textChangeStr )
BeforeUncompiledHook is a user-defined function that Igor calls before procedures enter the uncompiled state after a change to the procedures.
You can use BeforeUncompiledHook to shut down background tasks or threads before the user functions they depend on go away. You can use AfterCompiledHook to restart them.
BeforeUncompiledHook was added in Igor Pro 8.03.
Parameters
changeCode is one of the following values:
| Pending Change | changeCode | Scenarios |
|---|---|---|
| Text deletion | 1 | Delete/backspace key, cut, saved recreation macro, merge experiment |
| Text insertion | 2 | User typing, paste insert, Execute/P "INSERTINCLUDE " |
| Text replacement | 3 | User typing, paste over selected text |
| Open procedure file | 4 | File→Open Procedure, OpenProc |
| Close procedure file | 5 | Procedure close icon click, CloseProc |
| SetIgorOption poundDefine | 6 | SetIgorOption poundDefine causes a recompile |
| SetIgorOption poundUndefine | 7 | SetIgorOption poundUndefine causes a recompile |
procedureWindowTitleStr contains the title of the procedure window whose text is about to change. If the procedure window is in an independent module, the title is followed by
[<nameOfIndependentModule>]"
as described in documentation for the WinList function.
The content of textChangeStr depends on changeCode:
| changeCode | textChangeStr |
|---|---|
| 1 | "" |
| 2 | Inserted text |
| 3 | Replacement text |
| 4 | "" |
| 5 | "" |
| 6 | name defined by SetIgorOption poundDefine=name |
| 7 | name undefined by SetIgorOption poundUndefine=name |
Details
In most cases youre BeforeUncompiledHook function should return 0.
Returning non-zero prevents the pending change to the text from taking effect for changeCode = 1, 2, or 3, though only when procedures are already compiled.
The returned value is ignored for other values of changeCode.
BeforeUncompiledHook is not called before a new experiment is opened, before the experiment is reverted, or before Igor quits. Use IgorBeforeNewHook and IgorBeforeQuitHook for those scenarios.
See Also
User-Defined Hook Functions, SetIgorHook, AfterCompiledHook, Operation Queue
HDF5SaveDataHook (s)
HDF5SaveDataHook is a user-defined function that Igor calls when saving a wave to an HDF5 file. It allows advanced users to control compression of the dataset written for the wave.
HDF5SaveDataHook was added in Igor Pro 9.00.
NOTE: HDF5SaveDataHook is an experimental feature for advanced users only. The feature may be changed or removed. If you find it useful, please let us know, and send your function and an explanation of what purpose it serves.
Parameters
s is an HDF5SaveDataHookStruct.
Details
See HDF5SaveDataHookStruct and Using HDF5SaveDataHook for details.
IgorBeforeNewHook (igorApplicationNameStr )
IgorBeforeNewHook is a user-defined function that Igor calls before a new experiment is opened in response to the New Experiment, Revert Experiment, or Open Experiment menu items in the File menu.
You can use IgorBeforeNewHook to clean up the current experiment, or to avoid losing unsaved data even if the user chooses to not save the current experiment.
Igor ignores the value returned by IgorBeforeNewHook.
Parameters
igorApplicationNameStr contains the name of the currently running Igor Pro application.
See Also
IgorStartOrNewHook, SetIgorHook, User-Defined Hook Functions
IgorBeforeQuitHook (unsavedExp, unsavedNotebooks, unsavedProcedures )
IgorBeforeQuitHook is a user-defined function that Igor calls just before Igor is about to quit, before any save-related dialogs have been presented.
Parameters
unsavedExp is 0 if the experiment is saved, non-zero if unsaved.
unsavedNotebooks is the count of unsaved notebooks.
unsavedProcedures is the count of unsaved procedures.
The save state of packed procedure and notebook files is part of unsavedExp, not unsavedNotebooks or unsavedProcedures. This applies to adopted procedure and notebook files and new procedure and notebook windows that have never been saved.
Details
IgorBeforeQuitHook should normally return 0. In this case, Igor presents the "Do you want to save" dialog, and if the user approves, proceeds with the quit, which includes calling IgorQuitHook.
If IgorBeforeQuitHook returns 1, then the normal save-and-quit process is aborted and Igor quits immediately. The current experiment, notebooks, and procedures are not saved, no dialogs are presented to the user, and IgorQuitHook is not called.
If IgorBeforeQuitHook returns 2, then the normal save-and-quit process is aborted and Igor does not quit. The current experiment, notebooks, and procedures are not saved, no dialogs are presented to the user, and IgorQuitHook is not called. This return value was first supported in Igor Pro 8.05.
See Also
IgorQuitHook, SetIgorHook, User-Defined Hook Functions
IgorMenuHook (isSelection, menuStr, itemStr, itemNo, activeWindowStr, wType )
IgorMenuHook is a user-defined function that Igor calls just before and just after menu selection, whether by mouse or keyboard.
Parameters
isSelection is 0 before a menu item has been selected and 1 after a menu item has been selected.
When isSelection is 1, menuStr is the name of the selected menu. It is always in English, regardless of the localization of Igor. When isSelection is 0, menuStr is "".
When isSelection is 1, itemStr is the name of the selected menu item. When isSelection is 0, itemStr is "".
When isSelection is 1, itemNo is the one-based item number of the selected menu item. When isSelection is 0, itemNo is 0.
activeWindowStr identifies the active window. See details below.
wType identifies the kind of window that activeWindowStr identifies. It returns the same values as the WinType function.
activeWindowStr Parameter
activeWindowStr identifies the window to which the menu selection will apply. It can be a window name, a window title, or a special keyword, as follows:
| Window | activeWindowStr |
|---|---|
| Target window | Window name. |
| The target window is the top graph, table, page layout, notebook, control panel, Gizmo window, or XOP target window. | |
| Command window | kwCmdHist (as used with GetWindow). |
| Procedure window Window title as shown in the window title bar. The built-in procedure window is "Procedure". | |
| XOP non-target window | Window title as shown in the window title bar. |
See Window Names and Titles for a discussion of the distinction.
Details
IgorMenuHook is called with isSelection set to 0 after all the menus have been enabled and before a mouse click or keyboard equivalent is handled.
The return value should normally be 0. If the return value is nonzero (1 is usual) then the active window's hook function (see SetWindow) is not called for the enablemenu event.
IgorMenuHook is called with isSelection set to 1 after the menu has been selected and before Igor has acted on the selection.
If the IgorMenuHook function returns 0, Igor proceeds to call the active window's hook function for the menu event. (If the window hook function exists and returns nonzero, Igor ignores the menu selection. Otherwise Igor handles the menu selection normally.)
If the IgorMenuHook function returns nonzero (1 is recommended), Igor does not call the remaining hook functions and Igor ignores the menu selection.
Example
This example invokes the Export Graphics menu item when Ctrl+C is selected for all graphs, preventing Igor from performing the usual Copy.
Function IgorMenuHook(isSel, menuStr, itemStr, itemNo, activeWindowStr, wt)
	Variable isSel
	String menuStr, itemStr
	Variable itemNo
	String activeWindowStr
	Variable wt

	Variable handled= 0
	if( Cmpstr(menuStr,"Edit") == 0 && CmpStr(itemStr,"Copy") == 0 )
		if( wt == 1 )									// graph
			// DoIgorMenu would cause recursion, so we defer execution
			Execute/P/Q/Z "DoIgorMenu \"Edit\", \"Export Graphics\""
			handled= 1
		endif
	endif

	return handled
End
See Also
SetWindow, SetIgorHook, Execute, User-Defined Hook Functions
IgorQuitHook (igorApplicationNameStr)
IgorQuitHook is a user-defined function that Igor calls when Igor is about to quit.
Igor ignores the value returned by IgorQuitHook.
Parameters
igorApplicationNameStr contains the name of the currently running Igor Pro application.
Details
You can determine the full directory and file path of the Igor application by calling the PathInfo operation with the Igor path name. See the IgorStartOrNewHook example.
See Also
IgorBeforeQuitHook, SetIgorHook, User-Defined Hook Functions
IgorStartOrNewHook (igorApplicationNameStr)
IgorStartOrNewHook is a user-defined function that Igor calls when Igor is first launched and then whenever a new experiment is being created.
Igor ignores the value returned by IgorStartOrNewHook.
Parameters
igorApplicationNameStr contains the name of the currently running Igor Pro application.
Details
You can determine the full directory and file path of the Igor application by calling the PathInfo operation with the Igor path name.
Example
This example prints the full path of Igor application whenever Igor starts up or creates a new experiment:
Function IgorStartOrNewHook(igorApplicationNameStr)
	String igorApplicationNameStr

	PathInfo Igor						// puts path value into (local) S_path
	printf "\"%s\" (re)starting\r", S_path + igorApplicationNameStr
End
See Also
IgorBeforeNewHook, SetIgorHook, User-Defined Hook Functions
Related Topics
User-Defined Functions, Experiments, Files and Folders, Symbolic Paths.
Window User Data
The window user data feature provides a way for packages that create or manage windows to keep track of per-window settings. You can store arbitrary data with a window using the userdata keyword with the SetWindow operation.
Each window has a primary, unnamed user data that is used by default.
You can also store an unlimited number of different user data strings by specifying a name for each different user data string. The name can be any legal Igor name. It should be distinct to prevent clashes between packages.
Packages should used named user data.
You can retrieve information from the default user data using GetWindow. To retrieve named user data, you must use GetUserData.
Here is a simple example of user data using the top window:
SetWindow kwTopWin,userdata= "window data"
Print GetUserData("","","")
Although there is no size limit to how much user data you can store, it does have to be stored as part of the recreation macro for the window when experiments are saved. Consequently, huge user data can slow down experiment saving and loading.
You can also attach user data to traces in graphs using the userData keyword of the ModifyGraph operation and to controls using the userData keyword of the various control operations.
Window Hook Functions
A window hook function is a user-defined function that receives notifications of events that occur in a specific window. Your window hook function can detect and respond to events of interest. You can then allow Igor to also process the event or inform Igor that you have handled it.
This section discusses window hook functions that apply to a specific window. For information on general events hooks, see User-Defined Hook Functions.
To handle window events, you first write a window hook function and then use the SetWindow operation to install the hook on a particular window. This example shows how you would detect arrow key events in a particular window. To try it, paste the code below into the procedure window and then execute DemoWindowHook():
Function MyWindowHook(s)
	STRUCT WMWinHookStruct &s

	Variable hookResult = 0	// 0 if we do not handle event, 1 if we handle it.

	switch(s.eventCode)
		case 11:					// Keyboard event
			switch (s.keycode)
				case 28:
					Print "Left arrow key pressed."
					hookResult = 1
					break
				case 29:
					Print "Right arrow key pressed."
					hookResult = 1
					break
				case 30:
					Print "Up arrow key pressed."
					hookResult = 1
					break
				case 31:
					Print "Down arrow key pressed."
					hookResult = 1
					break
				default:
					// The keyText field requires Igor Pro 7 or later. See Keyboard Events.
					Printf "Key pressed: %s\r", s.keyText
					break
			endswitch
			break
	endswitch

	return hookResult	// If non-zero, we handled event and Igor will ignore it.
End

Function DemoWindowHook()
	DoWindow/F DemoGraph				// Does graph exist?
	if (V_flag == 0)
		Display /N=DemoGraph			// Create graph
		SetWindow DemoGraph, hook(MyHook) = MyWindowHook	// Install window hook
	endif
End
The window hook function receives a WMWinHookStruct structure as a parameter. WMWinHookStruct is a built-in structure that contains all of the information you might need to respond to an event. One of its fields, the eventCode field, specifies what kind of event occurred.
If your hook function returns 1, this tells Igor that you handled the event and Igor does not handle it. If your hook function returns 0, this tells Igor that you did not handle the event, so Igor does handle it.
This example uses a named window hook. In this case the name is MyHook. More than one procedure file can install a hook on a given window. The purpose of the name is to allow a package to install and remove its own hook function without disturbing the hook functions of other packages. Choose a distinct hook function name that is unlikely to conflict with other hook names.
Earlier versions of Igor supported only one unnamed hook function. This meant that only one package could hook any particular window. Unnamed hook functions are still supported for backward compatibility but new code should always use named hook functions.
Window Hooks and Subwindows
Except for the modified event (see Modified Events), Igor calls window hook functions for top-level windows only, not for subwindows. If you want to hook a subwindow, you must set the hook on the top-level window. In the hook function, test to see if the subwindow is active. For example, this code, at the start of a window hook function, insures that the hook runs only if a subwindow named G0 is active.
GetWindow $s.winName activeSW
String activeSubwindow = S_value
if (CmpStr(activeSubwindow,"G0") != 0)
	return 0
endif
Exterior panels (see Exterior Control Panels) are top-level windows even though they are subwindows. To hook an exterior subwindow, you must install the hook on the exterior panel using subwindow syntax.
Named Window Hook Functions
A named window hook function takes one parameter - a WMWinHookStruct structure. This built-in structure provides your function with information about the status of various window events.
The named window hook function has this format:
Function MyWindowHook(s)
	STRUCT WMWinHookStruct &s

	Variable hookResult = 0

	switch(s.eventCode)
		case 0:				// Activate
			// Handle activate
			break

		case 1:				// Deactivate
			// Handle deactivate
			break

		// And so on . . .
	endswitch

	return hookResult		// 0 if nothing done, else 1
End
If you handle a particular event and you want Igor to ignore it, return 1 from the hook function. However, you cannot make Igor ignore a window kill event - once the kill event is received the window will be killed.
Named Window Hook Events
Here are the events passed to a named window hook function:
| eventCode | eventName | Notes | |
|---|---|---|---|
| 0 | "activate" | ||
| 1 | "deactivate" | ||
| 2 | "kill" | Returning 1 when you receive this event does not cause Igor to ignore the event. At this point, you cannot prevent the window from being killed. See the killVote event to prevent the window being killed. | |
| 3 | "mousedown" | ||
| 4 | "mousemoved" | ||
| 5 | "mouseup" | ||
| 6 | "resize" | ||
| 7 | "cursormoved" | See Cursors - Moving Cursor Calls Function. | |
| 8 | "modified" | A modification to the window has been made. See Modified Events. | |
| 9 | "enablemenu" | ||
| 10 | "menu" | ||
| 11 | "keyboard" | See Keyboard Events. | |
| 12 | "moved" | ||
| 13 | "renamed" | ||
| 14 | "subwindowKill" | One of the window's subwindows is about to be killed. | |
| 15 | "hide" | The window or one of its subwindows is about to be hidden. See Window Hook Show and Hide Events. | |
| 16 | "show" | The window or one of its subwindows is about to be unhidden. See Window Hook Show and Hide Events. | |
| 17 | "killVote" | Window is about to be killed. Return 2 to prevent the window from being killed, otherwise return 0. | |
note Don't delete data structures during this event, use killVote only to decide whether the window kill should actually happen. Delete data structures in the kill event. See Window Hook Deactivate and Kill Events. | |||
| 18 | "showTools" | ||
| 19 | "hideTools" | ||
| 20 | "showInfo" | ||
| 21 | "hideInfo" | ||
| 22 | "mouseWheel" | ||
| 23 | "spinUpdate" | This event is sent only to windows marked via DoUpdate/E=1 as progress windows. It is sent when Igor spins the beachball cursor. See Progress Windows for details. | |
| 24 | "tableEntryAccepted" | This event is sent to tables only. It is sent when the user manually accepts text entered in the table entry line, for example by clicking the checkmark button or pressing the Enter or Return keys. | |
| It is also sent by a ModifyTable entryMode=1 command. | |||
| This hook event was added in Igor Pro 8.03. | |||
| 25 | "tableEntryCancelled" | This event is sent to tables only. It is sent when the user cancels text entry, for example by clicking the X button or pressing the Escape key. | |
| It is also sent by a ModifyTable entryMode=0 command. | |||
| This hook event was added in Igor Pro 8.03. | |||
| 26 | "earlyKeyboard" | See EarlyKeyboard Events. | |
| 27 | "droppedWaves" | Sent to graph and table windows and subwindows. Sent when the user drags waves from the Data Browser onto the window named by the winName field. | |
| 28 | "waveDragEnter" | Sent to graph and table window and subwindows to indicate that the user is dragging waves, and the drag has entered the window or subwindow named by the winName field. | |
| 29 | "waveDragLeave" | Sent to graph and table window and subwindows to indicate that the user is dragging waves, and the drag has left the window or subwindow named by the winName field. | |
| 30 | "layoutObjAdded" | Sent to a layout window when a new object (such as a graph or table) is added. | |
| 31 | "layoutObjRemoved" | Sent to a layout window when an object (such as a graph or table) is removed. | |
| 32 | "layoutPageAdded" | Sent to a layout window when a new layout page is added. | |
| 33 | "layoutPageRemoved" | Sent to a layout window when a layout page is removed. | |
| 34 | "layoutPageActivated" | Sent to a layout window when active page is changed. | |
| 35 | "tableScrolled" | Sent to a table window when the top-left data cell changes due to scrolling with the scroll bars, by drag-selection, by moving the insertion cell with arrow keys, by executing ModifyTable with the topLeftCell keyword, or any other action that changes the top left cell. | |
WMWinHookStruct
The WMWinHookStruct structure has members as described in the following tables:
Base WMWinHookStruct Structure Members
| Member | Description |
|---|---|
| char winName[MAX_PATH_LENGTH+1] | hcSpec of the affected (sub)window. |
| STRUCT Rect winRect | Local coordinates of the affected (sub)window. |
| STRUCT Point mouseLoc | Mouse location. |
| double ticks | Tick count when event happened. |
| Int32 eventCode | See Named Window Hook Events. |
| char eventName[255+1] | Name-equivalent of eventCode. See Named Window Hook Events. |
| Int32 eventMod | Bitfield of modifiers. See description for MODIFIERS:flags. |
Members of WMWinHookStruct Used with menu Code
| Member | Description |
|---|---|
| char menuName[255+1] | Name of menu (in English) as used by SetIgorMenuMode. |
| char menuItem[255+1] | Text of the menu item as used by SetIgorMenuMode. |
Members of WMWinHookStruct Used with keyboard and earlyKeyboard Code
| Member | Description |
|---|---|
| Int32 keycode | ASCII value of key struck. Function keys are not available but navigation keys are translated to specific values. |
| This field cannot represent non-ASCII text such as accented characters. Use keyText instead. | |
| Int32 specialKeyCode | See Keyboard Events. |
| This field was added in Igor Pro 7. | |
| char keyText[16] | UTF-8 representation of key struck. |
| This field was added in Igor Pro 7. | |
| char focusCtrl[MAX_WIN_PATH+1] | Used only with EarlyKeyboard Events. |
| This field was added in Igor Pro 9. |
Members of WMWinHookStruct Used with cursormoved Code
| Member | Description |
|---|---|
| char traceName[MAX_OBJ_NAME+1] | The name of the trace or image to which the moved cursor is attached or which supplies the X (and Y) values. Can be "" if the cursor is free. |
| char cursorName[2] | Cursor name A through J. |
| double pointNumber | Point number of the trace or the X (row) point number of the image that the cursor is attached to. |
| If the cursor is "free", pointNumber is actually the fractional relative xValue as used in the Cursor/F/P command. | |
| double yPointNumber | Valid only when the cursor is attached to a two-dimensional item such as an image, contour, or waterfall plot or when the cursor is free. |
| If attached to an image, contour, or waterfall plot, yPointNumber is the Y (column) point number of the image that the cursor is attached to. | |
| If the cursor is "free", yPointNumber is actually the fractional relative yValue as used in the Cursor/F/P command. | |
| Int32 isFree | 1 if the cursor is not attached to anything, 0 if it is attached to a trace, image, contour, or waterfall. |
Members of WMWinHookStruct Used with mouseWheel Code
| Member | Description |
|---|---|
| double wheelDy | Vertical lines to scroll. Typically +1 or -1. |
| double wheelDx | Horizontal lines to scroll. Typically +1 or -1. Horizontal mouse wheel requires Windows Vista. |
Members of WMWinHookStruct Used with renamed Code
| Member | Description |
|---|---|
| char oldWinName[MAX_OBJ_NAME+1] | Old name of the window or subwindow. Not the absolute path hcSpec, just the name. |
Members of WMWinHookStruct Used with droppedWaves and waveDragEnter Code
| Member | Description |
|---|---|
| String droppedWaves | Semicolon-separated list of waves that the user is dragging. Note that the waveDragLeave event does not set this member. |
Members of WMWinHookStruct Used with the layout events 30 to 34
| Member | Description |
|---|---|
| Int32 PLPageNumber | For events "layoutObjectAdded" and "layoutObjectRemoved", the page number that contains or contained the object. |
| For events "layoutPageAdded", "layoutPageRemoved" and "layoutPageActivated", the number of the page that was affected. | |
| String PLObjectName | For events "layoutObjectAdded" and "layoutObjectRemoved", the name of the object added or removed. For other events, "_NONE_". |
| String PLObjectType | For events "layoutObjectAdded" and "layoutObjectRemoved", a keyword giving the type of the object added or removed. These are the same as the object type keywords used with AppendLayoutObject. For other events, "_NONE_". |
| Int32 PLObjectIndex | For events "layoutObjectAdded" and "layoutObjectRemoved", the index of the object within the list of objects on that page. The same index as reported by LayoutInfo. |
User-Modifiable Members of WMWinHookStruct Structure
| Member | Description |
|---|---|
| Int32 doSetCursor | Set to 1 to change cursor to that specified by cursorCode. |
| Int32 cursorCode | Set Setting the Mouse Cursor. |
Mouse Events
Igor sends mouse down and mouse up events with the eventCode field of the WMWinHookStruct structure set to 3 or 5. With rare exceptions, your hook function should act on the mouse up event. Consider, for instance, a click on a button- the button's action should occur when you release the mouse button.
One exception is for a contextual click, that is, a right-click. The contextual menu should be shown on mouse-up, but in Igor confoundingly, the mouse-down is not delivered until the mouse-up has occurred. Thus, displaying a contextual menu on mouse-down will do the Right Thing.
A mouse click on a table cell causes Igor to send a mouse down event to your hook function before Igor acts on the click, allowing you to block the action by returning a non-zero result. Igor then sends a mouse down event after Igor has acted on the click.
In Igor 6, the mouse down event was sent only when selection was finished, that is, after the mouse up event occurred. If you have existing code that uses the mouse down event to get a table selection, you need to change your code to use the mouse up event.
Modified Events
A modified event is sent when a modification to the window has been made. This is sent to graph and notebook windows only.
As of Igor Pro 9.00, modified events are sent to both top-level graphs and notebooks and also to graph and notebook subwindows. That means that a window hook on a control panel window could receive a modified event for a notebook or graph subwindow in the panel. In that case, the winName member of the WMWinHookStruct structure is set to the subwindow path.
It is an error to try to kill a graph or notebook window or subwindow from the window hook during the modified event.
The modified event is issued in Igor's outer loop when it is idling (i.e., after any processing is finished). This means that, if you modify a graph or notebook programmatically, the modified event is not sent to hook functions until Igor returns to idling.
Most changes to the graph are reported by the modified event, but not all:
| Action | Sends Modified Event |
|---|---|
| Dragging axis | Yes |
| Dragging plot area | Yes |
| Dragging trace | Sent only after drag ends |
| Dragging annotation | Yes - see note 1 |
| Adding, removing or changing a control | No |
| Showing or hiding drawing tools | No - see note 2 |
| Showing or hiding info panel | No - see note 2 |
-
At present, only in top-level graph windows, not in graph subwindows.
-
But see events 18, 19, 20, and 21 in Named Window Hook Events.
In Igor Pro 9.00 and later, if you modify a notebook from a modified event, this does not cause recursion into your hook function.
If your hook function modifies a graph window, this may trigger another modify event after your function returns from the first. Without something to stop it, this will create a cascade of modified events. Checking for recursion in your hook function does not solve the problem because subsequent hook event calls occur after your hook function has returned.
To break the chain, your hook function needs to modify the graph window only if necessary. For example, assume that your hook function needs to change something when the range of an axis in a graph changes. You need to store the axis range from the last time your function was called using user data (see GetUserData). If, in the current call, the axis range has not changed, your function must return without making any changes, thereby breaking the chain.
Keyboard Events
The WMWinHookStruct structure has three members used with keyboard and earlyKeyboard events. A fourth member, focusCtrl, is used only with earlyKeyboard events, described below.
The keycode field works with ASCII characters and some special keys such as keyboard navigation keys.
The specialKeyCode fields works with navigation keys, function keys and other special keys. specialKeyCode is zero for normal text such as letters, numbers and punctuation.
The keyText field works with ASCII characters and non-ASCII characters such as accented characters.
The specialKeyCode and keyText fields were added in Igor Pro 7. New code that does not need to run with earlier Igor versions should use these new fields instead of the keycode field. See Keyboard Events Example for an example.
Here are the codes for the specialKeyCode and keyCode fields:
| Key | specialKeyCode | keyCode | Note | |
|---|---|---|---|---|
| F1 through F39 | 1 through 39 | Not supported | Function keys | |
| LeftArrow | 100 | 28 | ||
| RightArrow | 101 | 29 | ||
| UpArrow | 102 | 30 | ||
| DownArrow | 103 | 31 | ||
| PageUp | 104 | 11 | ||
| PageDown | 105 | 12 | ||
| Home | 106 | 1 | ||
| End | 107 | 4 | ||
| Return | 200 | 13 | ||
| Enter | 201 | 3 | ||
| Tab | 202 | 9 | ||
| BackTab | 203 | Not supported | Tab with Shift pressed | |
| Escape | 204 | 27 | ||
| Delete | 300 | 8 | Backspace key | |
| ForwardDelete | 301 | 127 | ||
| Clear | 302 | Not supported | ||
| Insert | 303 | Not supported | ||
| Help | 400 | Not supported | ||
| Break | 401 | Not supported | Pause/Break key | |
| 402 | Not supported | |||
| SysReq | 403 | Not supported | ||
Keyboard Events Example
This example illustrates the use of the various keyboard event fields in the WMWinHookStruct structure. It requires Igor Pro 7 or later.
Function KeyboardWindowHook(s)
	STRUCT WMWinHookStruct &s

	Variable hookResult = 0	// 0 if we do not handle event, 1 if we handle it.

	String message = ""

	switch(s.eventCode)
		case 11:	// Keyboard event
			String keyCodeInfo
			sprintf keyCodeInfo, "s.keycode = 0x%04X", s.keycode
			if (strlen(message) > 0)
				message += "\r"
			endif
			message +=keyCodeInfo

			message += "\r"
			String specialKeyCodeInfo
			sprintf specialKeyCodeInfo, "s.specialKeyCode = %d", s.specialKeyCode
			message +=specialKeyCodeInfo
			message += "\r"

			String keyTextInfo
			sprintf keyTextInfo, "s.keyText = \"%s\"", s.keyText
			message +=keyTextInfo

			String text = "\\Z24" + message
			Textbox /C/N=Message/W=KeyboardEventsGraph/A=MT/X=0/Y=15 text

			hookResult = 1	// We handled keystroke
			break
	endswitch

	return hookResult		// If non-zero, we handled event and Igor will ignore it.
End

Function DemoKeyboardWindowHook()
	DoWindow/F KeyboardEventsGraph						// Does graph exist?
	if (V_flag == 0)
		// Create graph
		Display /N=KeyboardEventsGraph as "Keyboard Events"

		// Install hook
		SetWindow KeyboardEventsGraph, hook(MyHook)=KeyboardWindowHook

		String text = "\\Z24" + "Press a key"
		Textbox /C/N=Message/W=KeyboardEventsGraph/A=MT/X=0/Y=15 text
	endif
End
EarlyKeyboard Events
The earlyKeyboard was added in Igor Pro 9.00.
The earlyKeyboard event is like the keyboard event but is sent, to graph and control panel windows only, before other components of those windows get the keyboard event. Its purpose is to let you filter key presses in graphs and panels before they reach a control.
The keycode, specialKeyCode, and keyText fields work the same as with the keyboard event.
The earlyKeyboard event sets the focusCtrl field which was added in Igor Pro 9.00.
If the event is earlyKeyboard and the window or its subwindows have a control with keyboard focus, the focusCtrl field is set to the name of the control and the winName field is set to the path of the window or subwindow that contains the control. If you return a non-zero result from the hook function when it receives the earlyKeyboard event, you prevent the control from receiving the keyboard event.
Only graphs and control panels receive earlyKeyboard events. Other window types receive normal keyboard events before any use is made of the keyboard events, making the earlyKeyboard event redundant.
Setting the Mouse Cursor
An advanced Igor programmer can use a named window hook function to change the mouse cursor.
You might want to do this, for example, if your window hook function intercepts mouse events on certain items (e.g., waves) and performs custom actions. By setting a custom mouse cursor you indicate to the user that clicking the items results in different-from-normal actions.
To set the mouse cursor your window hook function must set the doSetCursor and cursorCode fields of the WMWinHookStruct structure passed to it.
For an example see the "Mouse Cursor Control.pxp" example experiment:
Open the Mouse Cursor Control example experiment
Panel Done Button Example
This example uses a window hook and button action procedure to implement a panel dialog with a Done button such that the panel can't be closed by clicking the panel's close widget, but can be closed by the Done button's action procedure:
Proc ShowDialog()
	PauseUpdate; Silent 1		// building window...
	NewPanel/N=Dialog/W=(225,105,525,305) as "Dialog"
	Button done,pos={119,150},size={50,20},title="Done"
	Button done,proc=DialogDoneButtonProc
	TitleBox warning,pos={131,83},size={20,20},title=""
	TitleBox warning,anchor=MC,fColor=(65535,16385,16385)
	SetWindow Dialog hook(dlog)=DialogHook, hookevents=2
EndMacro

Function DialogHook(s)
	STRUCT WMWinHookStruct &s
	Variable statusCode= 0

	strswitch( s.eventName )
		case "killVote":
			TitleBox warning win=$s.winName, title="Press the Done button!"
			Beep
			statusCode=2				// prevent panel from being killed.
			break
		case "mousemoved":			// to reset the warning
			TitleBox warning win=$s.winName, title=""
			break
	endswitch

	return statusCode
End

Function DialogDoneButtonProc(ba) : ButtonControl
	STRUCT WMButtonAction &ba

	switch( ba.eventCode )
		case 2:									// mouse up
			// turn off the named window hook
			SetWindow $ba.win hook(dlog)=$""
			// kill the window AFTER this routine returns
			Execute/P/Q/Z "KillWindow " + ba.win
			break
	endswitch

	return 0
End
Window Hook Deactivate and Kill Events
The actions caused by these events (eventCode 2, 14, 15, 16 and 17) potentially affect multiple subwindows.
If you kill a subwindow, the root window's hook function(s) receives a subwindowKill event for that subwindow and any child subwindows.
If you kill a root window, the root window's hook function(s) receives a subwindowKill event for each child subwindow, and then the root window's hook function(s) receive a kill event.
Likewise, hiding and showing windows can result in subwindows being hidden or shown. In each case, the window hook function receives a hide or show event for each affected window or subwindow.
The winName member of WMWinHookStruct will be set to the full subwindow path of the subwindow that is affected.
Events for an exterior subwindow are a special case. See Hook Functions for Exterior Subwindows.
The hook functions attached to an exterior subwindow will receive a subwindowKill event if the exterior subwindow is killed as a result of killing the parent window. But it will receive a regular kill event if it is killed directly. Normal subwindows always receive only subwindowKill events.
The kill-related events are sent in this order when a window or subwindow is killed:
-
A killVote event is sent to the root window's hook function(s). If any hook function returns 2, no further events are generated and the window is not killed.
-
If the window is not a subwindow and wasn't created with /K=1, /K=2 or /K=3, the standard window close dialog appears. If the close is cancelled, the window is not killed, the window will receive an activate event when the dialog is dismissed, and no further events are generated. Otherwise, proceed to step 3.
-
If the window being killed has subwindows, starting from the bottom-most subwindow and working back toward the window being killed:
3a. If the subwindow is a panel, action procedures for controls contained in the subwindow are called with event -1, "control being killed".
3b. The root window's hook function(s) receive a subwindowKill event for the subwindow. If any hook function returns 1, no further subwindow hook events or control being killed events are sent, but the window killing process continues.
Steps 3a and 3b are repeated for each subwindow until the window or subwindow being killed is reached.
-
If the killed window is a root window, a kill event is sent to the root window's hook function(s). If any hook function returns 2, no further events are generated and the window is not killed. This method of preventing a window from closing is to be avoided: use the killVote event or the window-equivalent of NewPanel/K=2.
Prior to Igor 7, you could return 2 when the window hook received a kill event to prevent the killing of the window. This is no longer supported. Use the killVote event instead.
There are several ways to prevent a window being killed. You might want to do this in order to enforce use of a Done or Do It button, or to prevent killing a control panel while some hardware action is taking place.
The best method is to use /K=2 when creating the window (see Display or NewPanel). Then the only way to kill the window is via the DoWindow/K command, or KillWindow command. In general, you would provide a button that kills the window after checking for any conditions that would prevent it.
The KillVote event is more flexible but harder to use. It gives your code a chance to decide whether or not killing is allowed. This means the user can close and kill the window with the window close box when it is allowed.
Returning 2 for the window kill event is not recommended. If you have old code that uses this method, we strongly recommend changing it to return 2 for the killVote event. New code should never return 2 for the kill event.
As of Igor Pro 7, returning 2 for the window kill event does not prevent the window from being killed. If you have old code that uses this technique, change it to return 2 for the killVote event instead.
Window Hook Show and Hide Events
Igor sends the show event to your hook function when the affected window is about to be shown but is still hidden. Likewise, Igor sends the hide event when the window is about to be hidden but is still visible. Other events, notably resize or move events, may be triggered by showing or hiding a window and may be sent before the change in visibility actually occurs. Here is an example that illustrates this issue:
Function MyHookFunction(s)
	STRUCT WMWinHookStruct &s

	strswitch(s.eventName)
		case "resize":
			GetWindow $(s.winName) hide
			if (V_value)
				Print "Resized while hidden"
			else
				Print "Resized while visible"
			endif
			break

		case "moved":
			GetWindow $(s.winName) hide
			if (V_value)
				Print "Moved while hidden"
			else
				Print "Moved while visible"
			endif
			break

		case "hide":
			print "Hide event"
			break

		case "show":
			print "Show event"
			break
	endswitch

	return 0				// Don't interfere with Igor's handling of events
End

Function MakePanelWithHook()
	NewPanel/N=MyPanel/HIDE=1
	SetWindow MyPanel, hook(myHook)=MyHookFunction
End
If you run the MakePanelWithHook function on the command line, you see nothing because the panel is hidden. Now select Windows→Other Windows→MyPanel. The following is printed in the history:
Show event
Moved while hidden
Resized while hidden
The hook function receivevd the Move and Resize events after the Show event, but before the window actually became visible.
Window Hook Page Layout Events
There are five event types to give you specialized information about things happening in page layouts. They tell you when a new object was added, an object was removed, a page was added, a page was removed, or a page was activated. There are special members of the WMWinHookStruct that give you information about the objects and pages involved.
The events are 30, "layoutObjAdded"; 31, "layoutObjRemoved"; 32, "layoutPageAdded"; 33, "layoutPageRemoved" and 34, "layoutPageActivated". The WMWinHookStruct members are PLPageNumber, PLObjectName, PLObjectType and PLObjectIndex. The member PLPageNumber member is set for all five events; the members PLObjectName, PLObjectType and PLObjectIndex are set only for events 30 and 31.
The PLPageNumber member of WMWinHookStruct is set for all five event types. The PLObjectName, PLObjectType and PLObjectIndex are set appropriately for events 32, 33, and 34 ("layoutPageAdded", "layoutPageRemoved" and "layoutPageActivated"). Otherwise, those members are set to "_NONE_", "_NONE_", and -1.
Hook Functions for Exterior Subwindows
A regular subwindow lives inside a host window and receives events through a hook function attached to its host window.
An exterior subwindow is different because, although it is a subwindow (it is controlled by a host window), unlike a regular subwindow, it has its own actual window and therefore you can attach a hook function directly to it. A hook function attached to the root window does not receive events for an exterior subwindow. To receive events for an exterior subwindow, you must attach a hook function to the exterior subwindow itself. For example:
// Make a panel
NewPanel/N=RootPanel

// Make an exterior subwindow attached to RootPanel
NewPanel/HOST=RootPanel/EXT=0

// Attach a hook function to the exterior subwindow
SetWindow RootPanel#P0 hook(myhook)=MyHookFunction
Unnamed Window Hook Functions
Unnamed window hook functions are supported for backward compatibility only. New code should use Named Window Hook Functions.
Each window can have one and only one unnamed window hook function. You designate a function as the unnamed window hook function using the SetWindow operation with the hook keyword.
The unnamed hook function is called when various window events take place. The reason for the hook function call is stored as an event code in the hook function's infoStr parameter.
The hook function is not called during experiment creation or load time so as to prevent the hook function from failing because the experiment is not fully recreated.
The hook function has the following syntax:
Function procName (infoStr)
	String infoStr

	String event= StringByKey("EVENT",infoStr)
	...
	return statusCode				// 0 if nothing done, else 1 or 2
End
infoStr is a string which containing a semicolon-separated list of key :value pairs:
| EVENT:eventKey | eventKey identifies the event: | ||||||||||||||||||||||||||||||||||||||||||
| |||||||||||||||||||||||||||||||||||||||||||
| HCSPEC:winName | Absolute path of the window or subwindow. See Subwindow Command Concepts. | ||||||||||||||||||||||||||||||||||||||||||
| MODIFIERS:flags | Bits set based on state of certain keys: | ||||||||||||||||||||||||||||||||||||||||||
| |||||||||||||||||||||||||||||||||||||||||||
| See Setting Bit Parameters for details about bit settings. | |||||||||||||||||||||||||||||||||||||||||||
| OLDWINDOW:winName | Previous name of the window or subwindow (for renamed event). Not the old absolute path hcSpec, just the name. WINDOW and HCSPEC contain the new name and new hcSpec. | ||||||||||||||||||||||||||||||||||||||||||
| WINDOW:winName | Name of the window. | ||||||||||||||||||||||||||||||||||||||||||
| If mouse events are enabled then the following key :value pairs will also be present in infoStr : | |||||||||||||||||||||||||||||||||||||||||||
| MOUSEX:x pixel | X coordinate in pixels of the mouse. | ||||||||||||||||||||||||||||||||||||||||||
| MOUSEY:y pixel | Y coordinate in pixels of the mouse. | ||||||||||||||||||||||||||||||||||||||||||
| TICKS:time | Time event happened. | ||||||||||||||||||||||||||||||||||||||||||
Note that a mouseup event may or may not correspond to a previous mousedown. If the user clicks in the window, drags out and releases the button then the mouseup event will be missing. If the user clicks in another window, drags into this one and then releases then a mouseup will be sent that had no previous mousedown.
In the case of mousedown or mousemoved messages, a nonzero return value will skip normal processing of the message. This is most useful with mousedown.
The cursormoved event is not reported if the Alt key is held down.
If the cursormoved event is enabled then the following key:value pairs will also be present in infoStr:
| CURSOR:A - J | Name of the cursor that moved. | |
| TNAME:traceName | Name of the trace the cursor is attached to (invalid if ISFREE=1). | |
| ISFREE:free | 1 if the cursor is "free" (not attached to a trace), 0 if it is attached to a trace or image. | |
| POINT:pt | Point number of traceName if not a free cursor. If the cursor is attached to an image, pt is the row number of the image. | |
| If a free cursor, pt is the fraction of the plot width, 0 being the left edge of the plot area, and 1 being the right edge. | ||
| YPOINT:yPt | Column number if the cursor is attached to an image, NaN if attached to a trace. | |
| If a free cursor, yPt is the fraction of the plot height, 0 being the top edge, and 1 being the bottom edge. | ||
When the a menu event is reported then the following key:value pairs will also be present in infoStr:
| MENUNAME:menuStr | Name of menu (in English) as used by SetIgorMenuMode. | |
| MENUITEM:itemStr | Text of the menu item as used by SetIgorMenuMode. | |
The enablemenu event does not pass MENUNAME or MENUITEM.
The menu and enablemenu messages are not sent when drawing tools are in use in a graph or layout or when waves are being edited in a graph.
Returning a value of 0 for the enablemenu message is recommended, though the return value is (currently) ignored.
You can use the SetIgorMenuMode operation to alter the enable state of Igor's built-in menus in a way you find appropriate for the window. If you do this, usually you will also handle the menu message and perform your idea of an appropriate action.
Dynamic User-Defined Menus are built and enabled by using string functions in the menu definitions.
Returning a value of 0 for any menu message allows Igor to perform the normal action. Returning any other value (1 is commonly used) tells Igor to skip performing the normal action.
See the IgorMenuHook user function description in User-Defined Hook Functions for details on the sequence of menu building, enabling, and handling.
Custom Marker Hook Functions
You can define custom marker shapes for use with graph traces. To do this, you must define a custom marker hook function, activate it by calling SetWindow with the markerHook keyword, and set a trace to use it via the ModifyGraph operation marker keyword.
A custom marker hook function takes one parameter - a WMMarkerHookStruct structure. This structure provides your function with information you need to draw a marker.
The function prototype used with a custom marker hook has the format:
Function MyMarkerHook(s)
	STRUCT WMMarkerHookStruct &s
	<code to draw marker>
	...
	return statusCode		// 0 if nothing done, else 1
End
Your function can use the DrawXXX operations to draw the marker. The function is called each time the marker is drawn and should not do anything other than drawing the marker. The function should return 1 if it handled the marker or 0 if not.
Because the user-defined function runs during a drawing operation that cannot be interrupted without crashing Igor, the debugger cannot be invoked while it is running. Consequently breakpoints set in the function are ignored. Use Debugging with Print Statements instead.
The marker number range, which you specify via the SetWindow markerHook call, can be any positive integers less than 1000 and can overlap built-in marker numbers.
WMMarkerHookStruct
The WMMarkerHookStruct structure has the following members:
| Member | Description |
|---|---|
| Int32 usage | 0 = normal draw, 1 = legend draw (others reserved) |
| Int32 marker | Marker number minus start (i.e., starts from zero) |
| float x,y | Location of desired center of marker |
| float size | Half width/height of marker |
| Int32 opaque | 1 if marker should be opaque |
| float penThick | Stroke width |
| STRUCT RGBColor mrkRGB | Fill color |
| STRUCT RGBColor eraseRGB | Background color |
| STRUCT RGBColor penRGB | Stroke color |
| WAVE ywave | Trace's y wave |
| double ywIndex | Point number; ywave[wyIndex] is the y value where the marker is being drawn. |
| char winName[MAX_HostChildSpec+1] | Full path to window or subwindow |
| char traceName[MAX_OBJ_INST+1] | Full name of trace or "" if no trace |
When your marker function is called, the pen thickness and colors of the drawing environment of the target window are already set consistent with the penThick, mrkRGB, eraseRGB and penRGB members.
The winName and traceName members were added in Igor Pro 9.00 to provide access to trace userData. See Trace User Data.
Marker Hook Example
Here is an example that draws audiology symbols:
Function AudiologyMarkerProc(s)
	STRUCT WMMarkerHookStruct &s

	if( s.marker > 3 )
		return 0
	endif

	Variable size= s.size - s.penThick/2

	if( s.opaque )
		SetDrawEnv linethick=0,fillpat=-1
		DrawRect s.x-size,s.y-size,s.x+size,s.y+size
		SetDrawEnv linethick=s.penThick
	endif
	SetDrawEnv fillpat= 0		// polys are not filled

	if( s.marker == 0 )			// 90 deg U open to the right
		DrawPoly s.x+size,s.y-size,1,1,{size,-size,-size,-size,-size,size,size,size}
	elseif( s.marker == 1 )		// 90 deg U open to the left
		DrawPoly s.x-size,s.y-size,1,1,{-size,-size,size,-size,size,size,-size,size}
	elseif( s.marker == 2 )		// Cap Gamma
		DrawPoly s.x+size,s.y-size,1,1,{size,-size,-size,-size,-size,size}
	elseif( s.marker == 3 )		// Cap Gamma reversed
		DrawPoly s.x-size,s.y-size,1,1,{-size,-size,size,-size,size,size}
	endif
	return 1
End

Window Graph1() : Graph
	PauseUpdate; Silent 1		// building window...
	Make/O/N=10 testw=sin(x)
	Display /W=(35,44,430,252) testw,testw,testw,testw
	ModifyGraph offset(testw#1)={0,-0.2},offset(testw#2)={0,-0.4},offset(testw#3)={0,-0.6}
	ModifyGraph mode=3,marker(testw)=100,marker(testw#1)=101,marker(testw#2)=102,marker(testw#3)=103
	SetWindow kwTopWin,markerHook={AudiologyMarkerProc,100,103}
EndMacro
Custom Markers Demo
Tooltip Hook Functions
Igor displays tooltips for traces and images in graphs if you have selected Graph→Show Trace Info Tags and for table data cells if you have selected Table→Show Column Info Tags. You can also set help text for user-defined controls. In Igor Pro 9.00 or later, you can create user-defined tooltips by creating a tooltip hook function and activating it for a graph or control panel using SetWindow.
As of Igor Pro 10.00 and later, user-defined tooltips will not be affected by the Show Trace/Column Info Tags settings. It is recommended that any user interface that uses tooltip hook functions has an easy way for the user to turn off the tooltips. Users on small screens often wish to turn tooltips off.
A tooltip hook function is similar to a window hook function (see Named Window Hook Functions). Igor calls the tooltip hook function for a graph when the mouse hovers over a trace or image, and for a table when the mouse hovers over a cell associated with a wave. The tooltip hook function is also called for a graph or control panel when the mouse hovers over a control.
Unlike a window hook function, you can associate a tooltip hook function with either a top-level graph or control panel window or with a control panel subwindow.
A tooltip hook function takes one parameter - a WMTooltipHookStruct structure. The structure contains fields describing the trace, image, wave or control for which tooltip help is being requested and fields that allow you to return information to Igor.
When Igor calls a tooltip hook function, the tooltip field or the structure is preset to the text that Igor has composed for the tooltip. The function can alter it, add to it, or replace it completely. If you want to specify the displayed tooltip, set the tooltip field to your desired text and return 1 from the hook function. Otherwise return 0. Other return values are reserved for future use.
Here is a tooltip hook function that generates tooltips for traces in graphs:
Function MyGraphTraceTooltipHook(s)
	STRUCT WMTooltipHookStruct &s

	Variable hookResult = 0                   // 0 tells Igor to use the standard tooltip

	// traceName is set only for graphs and only if the mouse hovers near a trace
	if (strlen(s.traceName) > 0)
		hookResult = 1                         // 1 tells Igor to use our custom tooltip
		WAVE w = s.yWave                       // The trace's Y wave
		s.tooltip = GetWavesDataFolder(w, 2)   // Replace Igor's tooltip
		if (WaveDims(w) > 0)
			s.tooltip += "[" + num2str(s.row) + "]"
			if (WaveDims(w) > 1)
				s.tooltip += "[" + num2str(s.column) + "]"
			endif
		endif
	endif

	return hookResult
End
Use the SetWindow operation to establish the tooltip hook function for a given window, like this:
SetWindow Graph0, tooltipHook(MyTooltipHook) = MyGraphTraceTooltipHook
You can clear the tooltip function like this:
SetWindow Graph0, tooltipHook(MyTooltipHook) = $""
Because the hook function runs during an operation that cannot be interrupted without crashing Igor, the debugger cannot be invoked while it is running. Consequently, breakpoints set in the function are ignored. Use Debugging with Print Statements instead.
Tooltip Tracking Rectangle
When your function is called, the WMTooltipHookStruct trackRect field is set to a tracking rectangle in local window coordinates. When the tooltip is displayed, the tooltip system tracks the mouse. If the mouse leaves the tracking rectangle, the tooltip is hidden. If the the mouse enters another area appropriate for display of a tooltip, the hook function is called again.
In a graph, the tracking rectangle is a 20x20 point rectangle around the mouse location. In a table, the tracking rectangle corresponds to the bounds of the table cell under the mouse. If the mouse hovers over a control, the tracking rectangle is the bounding box of the control.
The trackRect field is both an input and an output. You can modify it to change when the tooltip disappears, but this is rarely necessary. You might want to do it if, for instance, you want to define help text for different parts of a control.
HTML Tags in Tooltips
You can control the formatting of the tooltip by including certain HTML tags in the text. The subset of supported tags is described here:
https://doc.qt.io/qt-6/richtext-html-subset.html
To use HTML tags, start your text with "", end it with "", and set the structure field isHTML to 1.
For example, this code:
s.tooltip = "<html><font size=\"+2\">Large</font> and <b>bold</b> text</html>"
s.isHTML=1
results in this tooltip: Large and bold text
The Tooltip Row, Column, Layer and Chunk Fields
These fields specify the wave element of the wave associated with the graph trace, graph image, or table cell under the mouse. A value of -1 indicates that the dimension is not used.
Tooltip Display Duration
By default, Igor displays a tooltip for 10 seconds or longer for long messages. After that time, the tooltip disappears.
You can adjust the time by setting the WMTooltipHookStruct duration_ms field. When your function is called, that field is set to -1, which selects the default duration. To get an effectively permanent tooltip, set duration_ms to a large number in units of milliseconds. For example, setting duration_ms to 600000 causes the tooltip to be displayed for ten minutes.
Regardless of the duration, Igor hides the tooltip if you click the mouse or move it out of the tracking rectangle.
Data Acquisition
Igor Pro provides a number of facilities to allow working with live data:
-
Live mode traces in graphs
-
FIFOs and Charts
-
Background task
-
External operations and external functions
-
Controls and control panels
-
User-defined functions
Live mode traces in graphs are useful when you acquiring complete waveforms in a single short operation and you want to update a graph many times per second to create an oscilloscope type display. See Live Graphs and Oscilloscope Displays for details.
FIFOs and Charts are used when you have a continuous stream of data that you want to capture and, perhaps, monitor. See FIFOs and Charts for details.
You can set up a background task that periodically performs data acquisition while allowing you to continue to work with Igor in the foreground. The background operations are not done using interrupts and therefore are easily disrupted by foreground operations. Background tasks are useful only for relatively infrequent tasks that can be quickly accomplished and do not cause a cascade of graph updates or other things that take a long time. See Background Tasks for details.
You can create an instrument-like front panel for your data acquisition setup using user-defined controls in a panel window. Refer to Controls and Control Panels for details. There are many example experiments that can be found in the Examples folder.
Igor Pro comes with an XOP named VDT2 for communicating with instruments via serial port (RS232), another XOP named NIGPIB2 for communicating via General Purpose Interface Bus (GPIB), and another XOP named VISA for communicating with VISA-compatible instruments. See the Igor Pro Folder:More Extensions:Data Acquisition folder.
Sound I/O can be done using the built-in SoundInRecord and PlaySound operations.
The MMI_NewCamera, MMI_GetCamera and MMI_ModifyCamera operations support frame grabbing.
WaveMetrics produces the NIDAQ Tools software package for doing data acquisition using National Instruments cards. NIDAQ Tools is built on top of Igor using all of the techniques mentioned in this section. Information about NIDAQ Tools is available via the WaveMetrics Web site http://www.wavemetrics.com/Products/NIDAQTools/nidaqtools.htm.
Third parties have created data acquisition packages that use other hardware. Information about these is available at https://www.wavemetrics.com/products/thirdparty/thirdparty.htm.
If an XOP package is not available for your hardware you can to write your own. For this, you will need to purchase the XOP Toolkit product from WaveMetrics. See Creating Igor Extensions for details.
FIFOs and Charts
This section will be of interest principally to programmers writing data acquisition packages.
Most people who use FIFOs and chart recorder controls will do so via packages provided by expert Igor programmers. For information on using, as opposed to programming, chart controls, see Using Chart Recorder Controls.
FIFO Overview
A FIFO is an invisible data object that can act as a First-In-First-Out buffer between a data source and a disk file. Data is placed in a FIFO either via the AddFIFOData operation or via an XOP package designed to interface to a particular piece of hardware. Chart recorder controls provide a graphical view of a portion of the data in a FIFO. When data acquisition is complete a FIFO can operate as a bidirectional buffer to a disk file. This allows the user to review the contents of a file by scrolling the chart "paper" back and forth. FIFOs can be used without a chart but charts have no use without a FIFO to monitor.
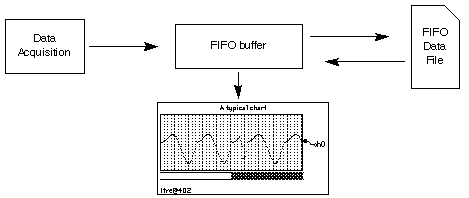
A FIFO can have an arbitrary number of channels, each with its own number type, scaling, and units. All channels of a given FIFO share a common "timebase".
Chart Recorder Overview
Chart recorder controls can be used to emulate a mechanical chart recorder that writes on paper with moving pens as the paper scrolls by under the pens. Charts can be used to monitor data acquisition processes or to examine a long data record. Although programming a chart is quite involved, using a chart is very easy.
Here is a typical chart recorder control:
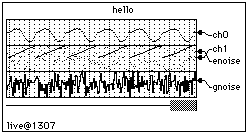
The First-In-First-Out (FIFO) buffer is an invisible Igor component that buffers the data coming from data acquisition hardware and software and also writes the data to a file. The data that is streaming through the FIFO can be observed using a chart recorder control. When data acquisition is finished the process can be reversed with data coming back out of the file and into the FIFO where it can be reviewed using the chart. The FIFO file is optional but if missing then all data pushed out the end of the FIFO is lost.
Chart recorder controls can take on quite a number of forms from the simple to the sophisticated:
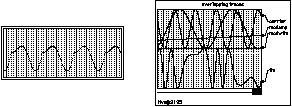
A given chart recorder control can monitor an arbitrary selection of channels from a single FIFO. Each trace can have its own display gain, color and line style and can either have its own area on the "paper" or can share an area with one or more other traces. There can be multiple chart recorder controls active an one time in one or more panel or graph windows.
Chart recorders can display an image strip when hooked up to a FIFO channel defined using the optional vectPnts parameter to NewFIFOChan. An example experiment, Image Strip FIFO Demo, is provided to illustrate how to use this feature.
Chart recorders can operate in two modes -- live and review. When a chart is in live mode and data acquisition is in progress, the chart "paper" scrolls by from right to left under the influence of the acquisition process. When in review mode, you are in control of the chart. When you position the mouse over the chart area you will see that the cursor turns into a hand. You can move the chart paper right or left by dragging with the hand. If you give the paper a push it will continue scrolling until it hits the end.
You can place the chart in review mode even as data acquisition is in progress by clicking in the paper with the hand cursor. To go back to live mode, give the paper a hard push to the left. When the paper hits the end then the chart will go to into live mode. You can also go back to live mode by clicking anywhere in the margins of the chart.
Depending on the exact details of the data acquisition hardware and software you may run the risk of corrupting the data if you use review mode while acquisition is in progress. The person that created the hardware and software system you are using should have provided guidelines for the use of review mode during acquisition. In general, if the acquisition process is paced by hardware then it should be OK to use review mode.
In the chart recorder graphics above, you may have noticed the line directly under the scrolling paper area. This line represents the current extent of data while the gray bar represents the data that is being shown in the chart. The right edge of the gray bar represents the right edge of the section of data being shown in the chart window. The above example is shown in live mode. Here are two examples shown in review mode:
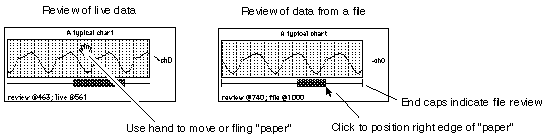
While data acquisition is in progress, the horizontal line represents the extent of the data in the FIFO's memory. After acquisition is over then the line includes all of the data in the FIFO's output file, if any.
If you are in review mode while data acquisition is taking place, you will notice that the gray bar indicates the view area is moving even though the paper appears to be motionless. This is because the FIFO is moving out from under the chart. Eventually it will reach a position where the chart display cannot be valid since the data it wants to display has been flushed off the end of the FIFO. When this happens the view area will go blank. Because it is very time-consuming for Igor to try to keep the chart updated in this situation your data acquisition rate may suffer.
Chart recorder controls sometimes try to auto-configure themselves to match their FIFO. Generally this action is exactly what you want and is unobtrusive. Here are the rules that charts use:
When the FIFO becomes invalid or if it ceases to exist then the chart marks itself as being in auto-configure mode. If the FIFO then becomes valid the chart will read the FIFO information and configure itself to monitor all channels. It tries to set the ppStrip parameter to a value appropriate for the deltaT value of the FIFO. It does so by assuming a desirable update rate of around 10 strips per second. Thus, for example, if deltaT was 1 millisecond then ppStrip would be set to 100. The moral is: deltaT had better be valid or weird values of ppStrip may be created.
Any chart recorder channel configuration commands executed after the FIFO becomes invalid but before the FIFO becomes valid again will prevent auto-configuration from taking place.
Programming with FIFOs
You can create a FIFO by using the NewFIFO operation. When you are done using a FIFO you use the KillFIFO operation. A freshly created FIFO is not useful until either channels are created with the NewFIFOChan operation or until the FIFO is attached to a disk file for review using a variant of the CtrlFIFO operation.
You can obtain information about a FIFO using the FIFOStatus operation and you can extract data from a FIFO using the FIFO2Wave operation. Once a FIFO is set up and ready to accept data, you can insert data using the AddFIFOData operation. Alternately, you can insert data using an XOP package.
Once data is stored in a file you can review the data using a FIFO or extract data using user-defined functions. See the example experiment, "FIFO File Parse", for sample utility routines.
Here are the operations and functions used in FIFO programming:
| NewFIFO | KillFIFO | NewFIFOChan | CtrlFIFO | |||
| FIFO2Wave | AddFIFOData | AddFIFOVectData | FIFOStatus | |||
As with background tasks, FIFOs are considered transient objects -- they are not saved and restored as part of an experiment.
A FIFO does not need to be attached to a file to be useful. Note, however, that the oldest data is lost when a FIFO overflows.
A FIFO set up to acquire data does not become valid until the start command is issued. Chart controls will report invalid FIFOs on their status line. FIFO2Wave will give an error if it is invoked on an invalid FIFO. A stopped FIFO remains valid until the first command is issued that could potentially change the FIFO's setup.
Data in a running FIFO is written to disk when Igor notices that the FIFO is half full or when the AddFIFOData command is issued and the FIFO is full. The amount of time it takes to write data to disk can be quite considerable and at the same time unpredictable. If the computer disk cache size is large then writes to disk will be less frequent but when they do occur they will take a long time. This will matter to you most if you are attempting to take data rapidly using software, perhaps using an Igor background task.
If you are taking data via interrupt transfer to an intermediate buffer of adequate size or if your hardware has an adequate internal buffer then the disk write latency may not be a concern. If dead time due to disk writes is a concern then you may want to decrease the size of the disk cache and you may want to run with a relatively small FIFO. Note that if you change the size of the disk cache you may have to reboot for the change to take effect.
When the stop command is given to a running FIFO then it goes into review mode and remains valid. If the FIFO is attached to a file then the entire contents of the file can be reviewed or be transferred to a wave using the FIFO2Wave command.
The act of attaching a FIFO to an existing file for review using the rfile keyword of the CtrlFIFO command causes the FIFO to read in the file contents and to set itself up for review. You should not use the NewFIFOChan command or any of the other CtrlFIFO keywords except size. Here is all that is required to review a preexisting file:
Variable refnum
Open/R/P=mypath refnum as "my file"
NewFIFO dave
CtrlFIFO dave,rfile=refnum
If any chart controls have been set up to monitor FIFO dave then they will automatically configure themselves to display all the channels of dave using default parameters.
The connection between FIFOs and chart controls relies on Igor's dependency manager. The dependency manager does not automatically run during function execution -- you have to explicitly call it by executing the DoUpdate command.
The dependency manager sends messages to a chart control when:
-
A FIFO is created
-
A FIFO is killed
-
A FIFO becomes valid (start command)
-
Data is added to a FIFO
In particular, if inside a user function, you kill a FIFO and then create it again you should call DoUpdate after the kill so that the chart control notices the kill and can get ready for the creation.
FIFO File Format
This section is provided for programmers who want to create FIFO files as input for Igor with their own programs or to analyze data stored in Igor-generated FIFO files. Such applications require familiarity with C programming.
The FIFO file uses C structures named FIFOFileHeader, ChartChunkInfo, ChartChanInfo, and FIFOSplitFileHeader. These are defined in the file NamedFIFO.h which is shipped in "Igor Pro Folder\Miscellaneous\More Documentation". NamedFIFO.h is the primary documentation for the FIFO file format.
The FIFOFileHeader, ChartChunkInfo, and FIFOSplitFileHeader structures contain version fields. These structures may evolve in the future, so your code should check them and fail gracefully if you encounter an unexpected value.
Igor supports integrated FIFO files, in which the header and data are in the same file, and split FIFO files, in which the header and data are in separate files.
An integrated FIFO file consists of a FIFOFileHeader structure followed by a ChartChunkInfo structure and finally by chunks of data until the end of the file. A user-defined function that can parse an integrated FIFO file can be found in the "FIFO File Parse" example experiment.
The split format uses the FIFOSplitFileHeader structure to allow the raw data to reside in its own file rather than having to be in the same file as the header. This facilitates the use of Igor to review large binary files generated by third-party programs.
See the "Wave Review Chart Demo" example experiment for sample code for both the integrated and split FIFO file formats.
Another way to use a FIFO and chart control to review a raw binary file is to use the rdfile keyword with the CtrlFIFO command.
FIFO and Chart Demos
Using Chart Recorder Controls
The information provided here pertains to using rather than programming a chart recorder control. For information on programming charts, see FIFOs and Charts.
An Igor chart recorder control works in conjunction with a FIFO to display data as it is acquired or to review data that has previously been acquired.
Chart Recorder Control Basics
An Igor chart recorder control is neither an analytical tool nor a presentation quality graphic. It is meant only for real time monitoring of incoming data or to review data from a FIFO file. When you want an analytical or presentation quality graph you must transfer the data to a wave and then use a conventional Igor graph.
An Igor chart recorder control emulates a mechanical chart recorder that writes on paper with moving pens as the paper scrolls by under the pens. It differs from a real chart recorder in that the paper of the latter moves at a constant velocity whereas the "paper" of an Igor chart moves only when data becomes available in the FIFO it is monitoring. If data is placed in the FIFO at a constant rate then the "paper" will scroll by at a constant rate. However, since there can be no guarantee that the data is coming in at a constant rate, we refer to the horizontal axis not in terms of time but rather in terms of data sample number.
A given chart recorder control can monitor an arbitrary selection of channels from a single FIFO. Each chart trace can have its own display gain, color and line style and can either have its own area on the "paper" or can share an area with one or more other traces. There can be multiple charts active an one time in one or more control panel or graph windows.
Operating a Chart Recorder
Here is a typical chart recorder while taking data:
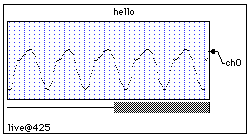
And here is the same chart recorder while reviewing data even though data acquisition is still taking place:
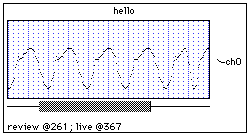
And here we are while reviewing data from the file after data acquisition is complete:

Notice the positioning strip just under the chart and above the status line. It consists of a horizontal line and a horizontal, gray bar. The line, called the positioning line, represents the extent of available data. The bar, called the positioning bar, represents the currently displayed region of this data.
While data acquisition is in progress, the available data is the data in the FIFO's memory. After the acquisition is over then the available data includes all of the data in the FIFO's output file, if any. The vertical bars at the ends of the positioning line indicate we are reviewing from a file.
You can instantly jump to any portion of the data by clicking on the positioning line. The spot that you click on indicates the part of the available data that you want to view. After clicking you can drag the "paper" region around.
The chart recorder will be in one of two modes: live mode or review mode. While data acquisition is under way, the chart recorder will display incoming data if it is in live mode. If it is in review mode, you can review previously acquired data.
Clicking on the positioning line or in the positioning bar puts the chart recorder into review mode even if data acquisition is taking place. To exit review mode and go into live mode, simply click anywhere in the chart recorder outside of the "paper" and the positioning strip. Of course, if you are not acquiring data you cannot go into live mode.
Another way to go into review mode and navigate is to grab the "paper" with the mouse and fling it to the left or right. It will keep going until it hits the end of available data. The speed at which the "paper" moves depends on how hard you fling it.
If you are in review mode while data acquisition is taking place, you will notice that the positioning bar indicates the view area is moving even though the "paper" appears to be motionless. This is because the FIFO is moving out from under the chart. Eventually it will reach a position where the chart display cannot be valid since the data it wants to display has been flushed off the end of the FIFO. When this happens the paper will go blank. Because it is very time consuming for Igor to try to keep the chart updated in this situation, your data acquisition rate may suffer. To get an idea of what kind of data rates can be sustained using an Igor background task, spend some time experimenting with the "FIFO/Chart Overhead" example experiment.
Chart Recorder Control Demos
Background Tasks
Background tasks allow procedures to run periodically "in the background" while you continue to interact normally with Igor. This is useful for data acquisition, simulations and other processes that run indefinitely, over long periods of time, or need to run at regular intervals. Using a background task allows you to continue to interact with Igor while your data acquisition or simulation runs.
Originally Igor supported just one unnamed background task controlled using the CtrlBackground operation. New code should use CtrlNamedBackground to create named background tasks instead, as shown in the following sections. You can run any number of named backgrounds tasks.
In addition to the documentation provided here, the Background Task Demo experiment provides sample code that is designed to be redeployed for other projects. We recommend reading this documentation first and then opening the demo by choosing File→Example Experiments→Programming→Background Task Demo.
Background Task Example #1
You create and control background tasks using the CtrlNamedBackground operation. The main parameters of CtrlNamedBackground are the background task name, the name of a procedure to be called periodically, and the period. Here is a simple example:
Function TestTask(s)		// This is the function that will be called periodically
	STRUCT WMBackgroundStruct &s

	Printf "Task %s called, ticks=%d\r", s.name, s.curRunTicks
	return 0	// Continue background task
End

Function StartTestTask()
	Variable numTicks = 2 * 60		// Run every two seconds (120 ticks)
	CtrlNamedBackground Test, period=numTicks, proc=TestTask
	CtrlNamedBackground Test, start
End

Function StopTestTask()
	CtrlNamedBackground Test, stop
End
You start this background task by calling StartTestTask() from the command line or from another procedure. StartTestTask creates a background task named Test, sets the period which is specified in units of ticks (1 tick = 1/60th of a second), and specifies the user-defined function to be called periodically (TestTask in this example).
You stop the Test background task by calling StopTestTask().
As shown above, the background procedure takes a WMBackgroundStruct parameter. In most cases you wont need to access it.
Background Task Exit Code
The background procedure (TestTask in the example above) returns an exit code to Igor. The code is one of the following values:
0: The background procedure executed normally.
1: The background procedure wants to stop the background task.
2: The background procedure encountered an error and wants to stop the background task.
Normally the background procedure should return 0 and the background task will continue to run. If you return a non-zero value, Igor stops the background task. You can tell Igor to terminate the background task by returning the value 1 from the background function.
If you forget to add a return statement to your background procedure, this acts like a non-zero return value and stops the background task.
Background Task Period
The CtrlNamedBackground operation's period keyword takes an integer parameter expressed in ticks. A tick is approximately 1/60th of a second. Thus the timing of Igor background tasks has a nominal resolution of 1/60th of a second.
You can override the specified period in the background task procedure by writing to the nextRunTicks field of the WMBackgroundStruct structure. This is needed only if you want your procedure to run at irregular intervals.
The actual time between calls to the background procedure is not guaranteed. Igor runs the background task from its outer loop, when Igor is doing nothing else. If you do something in Igor that takes a long time, for example performing a lengthy curve fit, running a user-defined function that takes a long time, or saving a large experiment, Igor's outer loop does not run so the background task will not run. If you do something that causes a compilation of Igor procedures to fail, the background task is not called.
If you need your background task to continue running even if you edit other procedures in Igor, you need to make your project an independent module. See Independent Modules for details.
If you need precise timing that cannot be interrupted, things get much more complicated. You need to do your data acquisition in an Igor thread running in an independent module or in a thread created by an XOP that you write. See ThreadSafe Functions and Multitasking for details.
The shortest supported period is one tick. The minimum actual period for the background task depends on your hardware and what your background task is doing. If you set the period too low for your background task, interacting with Igor becomes sluggish.
It is very easy to bog your computer down using background tasks. If the background task takes a long time to execute or if it triggers something that takes a long time (like a wave dependency formula or updating a complex graph) then it may appear that the system is hung. It is not, but it may take longer to respond to user actions than you are willing to wait.
Background Task Limitations
The principal limitation of Igor background tasks is that they are is stopped while other operations are taking place. Thus, although you can type commands into the command line without disrupting the background task, when you press Return the task is stopped until execution of the command line is finished.
Background tasks do not run if procedures are in an uncompiled state. If you need your background task to continue running even if you edit other procedures in Igor, you need to make your project an independent module. See Independent Modules for details.
Background Tasks and Errors
If a background task procedure contains a bug, it will typically generate an error each time the procedure runs. Normally an error generates an error dialog. If this happened over and over again, it would prevent you from fixing the bug.
Igor handles such repeated errors as follows: The first time an error occurs during the execution of the background task procedure, Igor displays an error dialog. On subsequent errors, Igor prints an error message in the history. After printing 10 such error messages, Igor stops printing messages. When you click a control, execute a command from the command line or execute a command through a menu item, the process starts over.
If the Igor debugger is enabled and Debug on Error is turned on, Igor will break into the debugger each time an error occurs in the background task procedure. You may have to turn Debug on Error off to give you time to stop the background task. You can do this from within the debugger by right-clicking.
Background Tasks and Dialogs
By default, a background task created by CtrlNamedBackground does not run while a dialog is displayed. You can change this behavior using the CtrlNamedBackground dialogsOK keyword.
If you allow background tasks to run while an Igor dialog is present, you should ensure that your background task does not kill anything that a dialog might depend on. It should not kill waves or variables. It should never directly modify a window (except for a status panel) and especially should never remove something from a window (such as a trace from a graph). Otherwise your background task may kill something that the dialog depends on which will cause a crash.
Background Task Tips
Background tasks should be designed to execute quickly. They do not run in separate threads and they hang Igor's event processing as long as they run. For maximum responsiveness, your task procedure should take no more than a fraction of a second to run even when the period is long. If you have to perform a lengthy computation, let the user know what is going on, perhaps via a message in a status control panel.
Background tasks should never attempt to put up dialogs or directly wait for user input. If you need to get the attention of the user, you should design your system to include a status control panel with an area for messages or some other change in appearance. If you need to wait for the user, you should do so by monitoring global variables set by nonbackground code such as a button procedure in a panel.
Your task procedure should always leave the current data folder unchanged on exit.
Background Task Example #2
Here is an example that uses many of the concepts discussed above. The task prints a message in the history area at one second intervals five times, performs a "lengthy calculation", and then waits for the user to give the go-ahead for another run.
The task does its own timing and consequently is set to run at the maximum rate (60 times per second). The task procedure, MyBGTask, tests to see if one second has elapsed since the last time it printed a message. In a real application, you might test to see if some external event has occurred.
To try the example, copy the code below to the Procedure window and execute:
BGDemo()

Function BGDemo()
	DoWindow/F BGDemoPanel                    // bring panel to front if it exists
	if( V_Flag != 0 )
		return 0                               // panel already exists
	endif

	DFREF dfSav= GetDataFolderDFR()           // so we can leave current DF as we found it
	NewDataFolder/O/S root:Packages
	NewDataFolder/O/S root:Packages:MyDemo    // our variables go here


	// still here if no panel, create globals if needed
	if( NumVarOrDefault("inited",0) == 0 )
		Variable/G inited= 1

		Variable/G lastRunTicks= 0             // value of ticks function last time we ran
		Variable/G runNumber= 0                // incremented each time we run
		// message displayed in panel using SetVariable...
		String/G message="Task paused. Press Start to resume."

		Variable/G running=0                   // when set, we do our thing
	endif

	SetDataFolder dfSav

	NewPanel /W=(150,50,449,163)
	DoWindow/C BGDemoPanel                    // set panel name
	Button StartButton,pos={21,12},size={50,20},proc=BGStartStopProc,title="Start"
	SetVariable msg,pos={21,43},size={300,17},title=" ",frame=0
	SetVariable msg,limits={-Inf,Inf,1},value= root:Packages:MyDemo:message
End

Function MyBGTask(s)
	STRUCT WMBackgroundStruct &s

	NVAR running= root:Packages:MyDemo:running

	if( running == 0 )
		return 0                // not running -- wait for user
	endif

	NVAR lastRunTicks= root:Packages:MyDemo:lastRunTicks

	if( (lastRunTicks+60) >= ticks )
		return 0                // not time yet, wait
	endif

	NVAR runNumber= root:Packages:MyDemo:runNumber

	runNumber += 1

	printf "Hello from the background, #%d\r",runNumber

	if( runNumber >= 5 )
		runNumber= 0
		running= 0              // turn ourself off after five runs

		// run again when user says to
		Button StopButton,win=BGDemoPanel,rename=StartButton,title="Start"

		// Simulate a long calculation after a run
		String/G root:Packages:MyDemo:message="Performing lengthy calculation. Please wait."
		ControlUpdate /W=BGDemoPanel msg

		Variable t0= ticks
		do
			if (GetKeyState(0) & 32)
				Print "Lengthy process aborted by Escape"
				break
			endif
		while( ticks < (t0+60*3) )    // delay for 3 seconds

		String/G root:Packages:MyDemo:message="Task paused. Press Start to resume."
	endif

	lastRunTicks= ticks

	return 0
End

Function BGStartStopProc(ctrlName) : ButtonControl
	String ctrlName

	NVAR running= root:Packages:MyDemo:running
	if( CmpStr(ctrlName,"StartButton") == 0 )
		running= 1
		Button $ctrlName,rename=StopButton,title="Stop"
		String/G root:Packages:MyDemo:message=""
		CtrlNamedBackground MyBGTask, proc=MyBGTask, period=1, start
	endif
	if( CmpStr(ctrlName,"StopButton") == 0 )
		running= 0
		Button $ctrlName,rename=StartButton,title="Start"
		CtrlNamedBackground MyBGTask, stop
		String/G root:Packages:MyDemo:message="Task paused. Press Start to resume."
	endif
End
Background Task Example #3
For another example including code that you can easily redeploy for your own project, open the Background Task Demo experiment by choosing File→Example Experiments→Programming→Background Task Demo.
Old Background Task Techniques
Originally Igor supported just one unnamed background task. This is still supported for backward compatibility but new code should use CtrlNamedBackground to create and control named background tasks instead.
The unnamed background task is designated using SetBackground, controlled using CtrlBackground and killed using KillBackground. The BackgroundInfo operation returns information about the unnamed background task.
The SetBackground, CtrlBackground, KillBackground and BackgroundInfo operations work only with the unnamed background task. For named background tasks, the CtrlNamedBackground operation provides all necessary functionality.
By default, a background task created by CtrlBackground does not run while a dialog is displayed. You can change this behavior using the CtrlBackground dialogsOK keyword.
Automatic Parallel Processing With TBB
TBB stands for "Threading Building Blocks". It is an Intel technology that facilitates the use of multiple processors on a given task. The home page for TBB is:
https://www.threadingbuildingblocks.org
Starting with Igor Pro 7, some Igor operations, such as CurveFit, DSPPeriodogram, and ImageProfile, automatically use TBB. To see which operations use TBB, choose Help→Command Help, click Show All, and then check the Automatically Multithreaded Only checkbox.
You don't need to do anything to take advantage of automatic multithreading with TBB. It happens automatically.
Running on multiple threads reduces the time required for number-crunching tasks when the benefit of using multiple processors exceeds the overhead. Operations that use TBB are set to run multiple threads only when the size of the data or the complexity of the problem crosses a certain threshold. Igor is programmed to use a reasonable threshold for each supported operation. You can control the threshold using the MultiThreadingControl operation.
Automatic Parallel Processing with MultiThread
Intermediate-level Igor programmers can make use of multiple processors to speed up wave assignment statements in user-defined functions. To do this, simply insert the keyword MultiThread in front of a normal wave assignment. For example, in a function:
Make wave1
Variable a=4
MultiThread wave1= sin(x/a)
The expression, on the right side of the assignment statement, is compiled as threadsafe even if the host function is not.
Because of the overhead of spawning threads, you should use MultiThread only when the destination has a large number of points or the expression takes a significant amount of time to evaluate. Otherwise, you may see a performance penalty rather than an improvement.
The assignment is, by default, automatically parceled into as many threads as there are processors, each evaluating the right-hand expression for a different output point. You can specify the number of threads that you want to use using MultiThread /NT=(<number of threads). In most cases, you should omit /NT to get the default behavior.
The MultiThread keyword causes Igor to evaluate the expression for multiple output points simultaneously. Do not make any assumptions as to the order of processing and certainly do not try to use a point from the destination wave other than the current point in the expression. For example, do not do something like this:
wave1 = wave1[p+1] - wave1[p-1] // Result is indeterminate
Expressions like that give unexpected results even in the absence of threading.
Here is a simple example to try on your own machine:
Function TestMultiThread(n)
	Variable n			// Number of wave points

	Make/O/N=(n) testWave

	// To prime processor data cache so comparison will be valid
	testWave= 0

	Variable t1,t2
	Variable timerRefNum

	// First, non-threaded
	timerRefNum = StartMSTimer
	testWave= sin(x/8)
	t1= StopMSTimer(timerRefNum)

	// Now, automatically threaded
	timerRefNum = StartMSTimer
	MultiThread testWave= sin(x/8)
	t2= StopMSTimer(timerRefNum)

	Variable processors = ThreadProcessorCount
	Print "On a machine with",processors,"cores, MultiThread is", t1/t2,"faster"
End
Here is the output on a Mac Pro:
•TestMultiThread(100)
  On a machine with  8  cores, MultiThread is  0.059746  faster
•TestMultiThread(10000)
  On a machine with  8  cores, MultiThread is  3.4779  faster
•TestMultiThread(1000000)
  On a machine with  8  cores, MultiThread is  6.72999  faster
•TestMultiThread(10000000)
  On a machine with  8  cores, MultiThread is  8.11069  faster
The first result shows that the MultiThread keyword slowed the assignment down. This is because the assignment involved a small number of points and MultiThread has some overhead.
The remaining results illustrate that MultiThread can provide increased speed for assignments involving large waves.
In the last result, the speed improvement factor was greater than the number of processors. This is explained by the fact that, once running, a threadsafe expression has slightly less overhead than a normal expression.
If the right-hand expression involves calling user-defined functions, those functions must be threadsafe (see ThreadSafe Functions) and must also follow these rules:
-
Do not do anything to waves that are passed as parameters that might disturb memory. For example, do not change the number of points in the wave or change its data type or kill it or write to a text wave.
-
Do not write to a variable that is passed by reference.
-
Note that any waves or global variables created by the function will disappear when then wave assignment is finished.
-
Each thread has its own private data folder tree. You cannot use WAVE, NVAR or SVAR to access objects in the main thread.
Failure to heed rule #1 will likely result in a crash.
Although it is legal to use the MultiThread mechanism in a threadsafe function that is already running in a preemptive thread via ThreadStart, it is not recommended and will likely result in a substantial loss of speed.
Open MultiThread Mandelbrot Demo
Data Folder Reference MultiThread Example
Advanced programmers can use waves containing data folder references and wave references along with MultiThread to perform multithreaded calculations more involved than evaluating an arithmetic expression. Here we use Free Data Folders to facilitate multithreading.
In this example, we extract each of the planes of a 3D wave, perform a filtering operation on the planes, and then finally assemble the planes into an output 3D wave. The main function, Test, executes a multithreaded assignment statement where the expression includes a call to a subroutine named Worker.
Because MultiThread is used, multiple instances of Worker execute simultaneously on different cores. Each instance runs in its own thread, working on a different plane. Each instance returns one filtered plane in a wave named M_ImagePlane in a thread-specific free data folder. The use of free data folders allows each instance of Worker to work on its own M_ImagePlane wave without creating a name conflict.
When the multithreaded assignment is finished, the main function assembles an output 3D wave.
// Extracts a plane from the 3D input wave, filters it, and returns the
// filtered output as M_ImagePlane in a new free data folder
ThreadSafe Function/DF Worker(w3DIn, plane)
	WAVE w3DIn
	Variable plane

	DFREF dfSav= GetDataFolderDFR()

	// Create a free data folder to hold the extracted and filtered plane
	DFREF dfFree= NewFreeDataFolder()
	SetDataFolder dfFree

	// Extract the plane from the input wave into M_ImagePlane.
	// M_ImagePlane is created in the current data folder
	// which is a free data folder.
	ImageTransform/P=(plane) getPlane, w3DIn
	Wave M_ImagePlane		// Created by ImageTransform getPlane

	// Filter the plane
	MatrixFilter/N=21 gauss,M_ImagePlane

	SetDataFolder dfSav

	// Return a reference to the free data folder containing M_ImagePlane
	return dfFree
End

Function Demo(numPlanes)
	Variable numPlanes

	// Create a 3D wave and fill it with data
	Make/O/N=(200,200,numPlanes) src3D= (p==(2*r))*(q==(2*r))

	// Create a wave to hold data folder references returned by Worker.
	// /DF specifies the data type of the wave as "data folder reference".
	Make/DF/N=(numPlanes) dfw /O

	Variable timerRefNum = StartMSTimer

	MultiThread dfw= Worker(src3D,p)

	Variable elapsedTime = StopMSTimer(timerRefNum) / 1E6

	Printf "Statement took %g seconds for %d planes\r", elapsedTime, numPlanes

	// At this point, dfw holds data folder references to 50 free
	// data folders created by Worker. Each free data folder holds the
	// extracted and filtered data for one plane of the source 3D wave.

	// Create an output wave named out3D by cloning the first filtered plane
	DFREF df= dfw[0]
	Duplicate/O df:M_ImagePlane, out3D

	// Concatenate the remaining filtered planes onto out3D
	Variable i
	for(i=1; i<numPlanes; i+=1)
		df= dfw[i]                             // Get a reference to the next free data folder
		Concatenate {df:M_ImagePlane}, out3D
	endfor

	// Redimension out3D to contain the correct number of planes
	Redimension/N=(-1, -1, numPlanes) out3D

	// Assign values to the remaining planes of out3D
	for(i=1; i<numPlanes; i+=1)
		df= dfw[i]                             // Reference to next free data folder
		WAVE thisPlaneWave = df:M_ImagePlane   // Reference to the wave in data folder
		out3D[][][i] = thisPlaneWave[p][q]
	endfor

	// dfw holds references to the free data folders. By killing dfw,
	// we kill the last reference to the free data folders which causes
	// them to be automatically deleted. Because there are no remaining
	// references to the various M_ImagePlane waves, they too are
	// automatically deleted.
	KillWaves dfw
End
To run the demo, execute:
Demo(50)
On an eight-core Mac Pro, this took 4.1 seconds without the MultiThread keyword and 0.6 seconds with the MultiThread keyword for a speedup of about 6.8 times.
Wave Reference MultiThread Example
In the preceding example, free data folders were used to hold data processed by threads. Since each free data folder held just a single wave, the example can be simplified by using free waves instead of free data folders. So here we perform the same threaded filtering of planes using free waves.
Because MultiThread is used, multiple instances of Worker execute simultaneously on different cores. Each instance runs in its own thread, working on a different plane. Each instance returns one filtered plane in a free wave named M_ImagePlane. The use of free waves allows each instance of Worker to work on its own M_ImagePlane wave without creating a name conflict.
This version of the example relies on the fact that a wave in a free data folder becomes a free wave when the free data folder is automatically deleted. See Free Wave Lifetime for details.
ThreadSafe Function/WAVE Worker(w3DIn, plane)
	WAVE w3DIn
	Variable plane

	DFREF dfSav= GetDataFolderDFR()

	// Create a free data folder and set it as the current data folder
	SetDataFolder NewFreeDataFolder()

	// Extract the plane from the input wave into M_ImagePlane.
	// M_ImagePlane is created in the current data folder
	// which is a free data folder.
	ImageTransform/P=(plane) getPlane, w3DIn
	Wave M_ImagePlane		// Created by ImageTransform getPlane

	// Filter the plane
	WAVE wOut= M_ImagePlane
	MatrixFilter/N=21 gauss,wOut

	// Restore the current data folder
	SetDataFolder dfSav

	// Since the only reference to the free data folder created above
	// was the current data folder, there are now no references it.
	// Therefore, Igor has automatically deleted it.
	// Since there IS a reference to the M_ImagePlane wave in the free
	// data folder, M_ImagePlane is not deleted but becomes a free wave.

	return wOut		// Return a reference to the free M_ImagePlane wave
End

Function Demo(numPlanes)
	Variable numPlanes

	// Create a 3D wave and fill it with data
	Make/O/N=(200,200,numPlanes) srcData= (p==(2*r))*(q==(2*r))

	// Create a wave to hold data folder references returned by Worker.
	// /WAVE specifies the data type of the wave as "wave reference".
	Make/WAVE/N=(numPlanes) ww

	Variable timerRefNum = StartMSTimer

	MultiThread ww= Worker(srcData,p)

	Variable elapsedTime = StopMSTimer(timerRefNum) / 1E6

	Printf "Statement took %g seconds for %d planes\r", elapsedTime, numPlanes

	// At this point, ww holds wave references to 50 M_ImagePlane free waves
	// created by Worker. Each M_ImagePlane holds the extracted and filtered
	// data for one plane of the source 3D wave.

	// Create an output wave named out3D by cloning the first filtered plane
	WAVE w= ww[0]
	Duplicate/O w, out3D

	// Concatenate the remaining filtered planes onto out3D
	Variable i
	for(i=1;i<numPlanes;i+=1)
		WAVE w= ww[i]
		Concatenate {w}, out3D
	endfor

	// Create a 3D output wave by concatenating the filtered planes
	Concatenate/O {ww}, out3D

	// ww holds references to the free waves. By killing ww, we kill
	// the last reference to the free waves which causes them to be
	// automatically deleted.
	KillWaves ww
End
To run the demo, execute:
Demo(50)
Structure Array MultiThread Example
In a preceding example, free data folders were used to hold data processed by threads. A somewhat simpler approach is to use one or more structures to pass input data and to receive output data. The following example uses a single structure for both input and output. An array of these structures stored in a wave ensures that each thread works on its own data. After the calculation, the results are extracted. The net result for this simple example is nothing more than: dataOutput = sin(p).
Structure ThreadIOData
	// Input to thread
	double x

	// Output from thread
	double out
EndStructure

Function Demo()
	if (IgorVersion() < 6.36)
		// This example crashes in Igor Pro 6.35 or before because of a bug in StructGet/StructPut
		Abort "Function requires Igor Pro 6.36 or later."
	endif

	STRUCT ThreadIOData ioData

	// Prepare input
	Make/O ioDataArray						// This wave will be redimensioned by StructPut
	Variable i, imax=100
	for(i=0; i<imax; i+=1)
		ioData.x = i							// Set input data
		StructPut ioData, ioDataArray[i]	// Pack structure into wave column
	endfor

	// Generate output
	Make/O/N=(imax) threadOutput
	MultiThread threadOutput = Worker(ioDataArray, p)

	// Extract output
	Make/O/N=(imax) outputData
	for(i=0; i<imax; i+=1)
		StructGet ioData, ioDataArray[i]
		outputData[i] = ioData.out
	endfor

	KillWaves ioDataArray, threadOutput
End

ThreadSafe Function Worker(w, point)
	WAVE w
	Variable point

	STRUCT ThreadIOData ioData
	StructGet ioData, w[point]				// Extract structure from wave column

	ioData.out = sin(ioData.x)				// Calculate of output data

	StructPut ioData, w[point]				// Pack structure into wave column

	// The return value from the thread worker function is accessible via ThreadReturnValue.
	// It is not used in this example.
	return point
End
To run the demo, execute:
Demo()
ThreadSafe Functions and Multitasking
Igor supports two multitasking techniques that are easy to use:
This section discusses the third technique, ThreadSafe Functions, which expert programmers can use to create complex, preemptive multitasking background tasks.
Preemptive multitasking uses the following functions and operations:
- ThreadProcessorCount
- ThreadGroupCreate
- ThreadStart
- ThreadGroupPutDF
- ThreadGroupGetDF (deprecated)
- ThreadGroupGetDFR
- ThreadGroupWait
- ThreadReturnValue
- ThreadGroupRelease
To run a threadsafe function preemptively, you first create a thread group using ThreadGroupCreate and then call ThreadStart to start your worker function. Usually you will use the same function for each thread of a group although they can be different.
The worker function must be defined as threadsafe and must return a real or complex numeric result. The return value can be obtained after the function finishes by calling ThreadReturnValue.
The worker function can take variable and wave parameters. It cannot take pass-by-reference parameters or data folder reference parameters.
Any waves you pass to the worker are accessible to both the main thread and to your preemptive thread. Such waves are marked as being in use by a thread and Igor will refuse to perform any operations that could change the size of the wave.
You can determine if any threads of a group are still running by calling ThreadGroupWait. Use zero for the "milliseconds to wait" parameter to just test if all threads are finished. Use a larger value to cause the main thread to sleep until all threads are finished. If you know the maximum time the threads should take, you can use that value and print an error message or take other action if the threads don't finish in time.
When ThreadGroupWait is called, Igor updates certain internal variables including variables that track whether a thread has finished and what result it returned. Therefore you must call ThreadGroupWait before calling ThreadReturnValue.
Once you are finished with a given thread group, call ThreadGroupRelease.
If your threads can run for a long time, you should detect aborts and make your threads quit. See Aborting Threads for details.
The Igor debugger cannot be used with threadsafe functions. See Debugging ThreadSafe Code for details.
The hard part of using multithreading is devising a scheme for partitioning your data processing algorithms into threads.
Thread Data Environment
When a thread is started, Igor creates a root data folder for that thread. This root data folder and any data objects that the thread creates in it are private to the thread. This constitutes a separate data hierarchy for each thread.
Data is transferred, when you request it, from the main thread to a preemptive thread and vice-versa using input and output queues. The "currency" of these queues is the data folder, which provides considerable flexibility for passing data to threads and for retrieving results. Each thread group has an input queue to which the main thread may post data and an output queue from which the main thread may retrieve results.
The terms "input" and "output" are relative to the preemptive thread. The main thread posts a data folder to the input queue to send input to the preemptive thread. The preemptive thread retrieves the data folder from the input queue. After processing, the preemptive thread may post a data folder to the output queue. The main thread reads output from the preemptive thread by retrieving the data folder from the output queue.
Use ThreadGroupPutDF to post data folders and ThreadGroupGetDFR to retrieve them. These are called from both the main thread and from preemptive threads.
ThreadGroupPutDF clips the specified data folder, and everything it contains, out of the source thread's data hierarchy and puts it in the queue. From the standpoint of the source thread, it is as if KillDataFolder had been called. While a data folder resides in a queue, it is not accessible by any thread. See the documentation for ThreadGroupPutDF for some warnings about its use.
ThreadGroupGetDFR removes the data folder from the queue and returns it, as a free data folder, to the calling thread. Because it is a free data folder, Igor will automatically delete it when there are no more references to it, for example, when the thread returns.
Except for waves passed to the thread worker function as parameters and the thread worker's return value, the input and output queues are the only way for a thread to share data with the main thread. Examples below illustrate the use of these queues.
Parallel Processing - Group-at-a-Time Method
In this example, we attempt to improve the speed of filling columns of a 2D wave with a sin function. The traditional method is compared with parallel processing. Notice how much more complicated the multithreaded version, MTFillWave, is compared to the single threaded STFillWave.
ThreadSafe Function MyWorkerFunc(w,col)
	WAVE w
	Variable col

	w[][col]= sin(x/(col+1))

	return stopMSTimer(-2)		// time when we finished
End

Function STFillWave(dest)
	WAVE dest

	Variable ncol= DimSize(dest,1)
	Variable col

	for(col= 0;col<ncol;col+=1)
		MyWorkerFunc(dest,col)
	endfor
End

Function MTFillWave(dest)
	WAVE dest

	Variable ncol= DimSize(dest,1)
	Variable i,col,nthreads= ThreadProcessorCount
	Variable threadGroupID= ThreadGroupCreate(nthreads)

	for(col=0; col<ncol;)
		for(i=0; i<nthreads; i+=1)
			ThreadStart threadGroupID,i,MyWorkerFunc(dest,col)
			col+=1
			if( col>=ncol )
				break
			endif
		endfor

		do
			Variable threadGroupStatus = ThreadGroupWait(threadGroupID,100)
		while( threadGroupStatus != 0 )
	endfor
	Variable dummy= ThreadGroupRelease(threadGroupID)
End

Function ThreadTest(rows)
	Variable rows

	Variable cols=10

	make/o/n=(rows,cols) jack

	Variable i

	for(i=0;i<10;i+=1)		// get any pending pause events out of the way
	endfor

	Variable ttime= stopMSTimer(-2)

	Variable t0= stopMSTimer(-2)
	MTFillWave(jack)
	Variable t1= stopMSTimer(-2)
	STFillWave(jack)
	Variable t2= stopMSTimer(-2)

	ttime= (stopMSTimer(-2) - ttime)*1e-6

	// Times are in microseconds
	printf "ST: %d, MT: %d; speed up factor: %.3g; total time= %.3gs\r",t2-t1,t1-t0,(t2-t1)/(t1-t0),ttime
End
The empty loop above is necessary because of periodic pauses in execution when Igor checks for user aborts. If a pause was pending, we want to get it out of the way beforehand to avoid it affecting the first timing test.
After starting Igor Pro, there is initially some extra overhead associated with creating new threads. Consequently, in the test results to follow, the first test is run twice.
Results for Mac Mini 1.66 GHz Core Duo, OS X 10.4.6
•ThreadTest(100)
  ST: 223, MT: 1192; speed up factor: 0.187; total time= 0.00146s
•ThreadTest(100)
  ST: 211, MT: 884; speed up factor: 0.239; total time= 0.0011s
•ThreadTest(1000)
  ST: 1991, MT: 1821; speed up factor: 1.09; total time= 0.00381s
•ThreadTest(10000)
  ST: 19857, MT: 11921; speed up factor: 1.67; total time= 0.0318s
•ThreadTest(100000)
  ST: 199174, MT: 113701; speed up factor: 1.75; total time= 0.313s
•ThreadTest(1000000)
  ST: 2009948, MT: 1146113; speed up factor: 1.75; total time= 3.16s
As you can see, when there is sufficient work to be done, the speed up factor approaches the theoretical maximum of 2 for dual processors.
Now on the same computer but booting into Windows XP Pro:
•ThreadTest(100)
  ST: 245, MT: 523; speed up factor: 0.468; total time= 0.000776s
•ThreadTest(100)
  ST: 399, MT: 247; speed up factor: 1.61; total time= 0.000655s
•ThreadTest(1000)
  ST: 3526, MT: 1148; speed up factor: 3.07; total time= 0.00468s
•ThreadTest(10000)
  ST: 34830, MT: 10467; speed up factor: 3.33; total time= 0.0453s
•ThreadTest(100000)
  ST: 350253, MT: 99298; speed up factor: 3.53; total time= 0.45s
•ThreadTest(1000000)
  ST: 2837645, MT: 1057275; speed up factor: 2.68; total time= 3.89s
So, what is happening here? The speed-up factors for Windows XP are greater than for Mac OS X, but mostly because the ST version is much slower. We do not known why the ST version runs more slowly -- the Benchmark 2.01 example experiment shows similar values for OS X vs. XP on this same computer.
Parallel Processing - Thread-at-a-Time Method
In the previous section, we dispatched a group of threads, waited for them to all finish, and then dispatched another group of threads. Using that technique, a slow thread in the group would cause all of the group's threads to wait.
In this section, we dispatch a thread anytime there is a free thread in the group. This technique requires Igor Pro 6.23 or later.
The only thing that changes from the preceding example is that the MTFillWave function is replaced with this MTFillWaveThreadAtATime function:
Function MTFillWaveThreadAtATime(dest)
	WAVE dest

	Variable ncol= DimSize(dest,1)
	Variable col,nthreads= ThreadProcessorCount
	Variable threadGroupID= ThreadGroupCreate(nthreads)
	Variable dummy

	for(col=0; col<ncol; col+=1)
		// Get index of a free thread - Requires Igor Pro 6.23 or later
		Variable threadIndex = ThreadGroupWait(threadGroupID,-2) - 1
		if (threadIndex < 0)
			dummy = ThreadGroupWait(threadGroupID, 50)	// Let threads run a while
			col -= 1				// Try again for the same column
			continue				// No free threads yet
		endif
		ThreadStart threadGroupID, threadIndex, MyWorkerFunc(dest,col)
	endfor

	// Wait for all threads to finish
	do
		Variable threadGroupStatus = ThreadGroupWait(threadGroupID,100)
	while(threadGroupStatus != 0)

	dummy = ThreadGroupRelease(threadGroupID)
End
The ThreadGroupWait statement suspends the main thread for a while so that the preemptive threads get more processor time. The parameter 50 is the number of millisceonds to wait. You should tune this for your application.
Input/Output Queues
In this example, data folders containing a data wave and a string variable that specifies the task to be performed are created and posted to the thread group's input queue. The thread worker function waits for an input data folder to become available. It then processes the input and posts an output data folder to the thread group's output queue from which it is retrieved by the main thread.
ThreadSafe Function MyWorkerFunc()
	do
		do
			DFREF dfr = ThreadGroupGetDFR(0,1000)	// Get free data folder from input queue
			if (DataFolderRefStatus(dfr) == 0)
				if( GetRTError(2) )	// New in 6.2 to allow this distinction:
					Print "worker closing down due to group release"
				else
					Print "worker thread still waiting for input queue"
				endif
			else
				break
			endif
		while(1)

		SVAR todo = dfr:todo
		WAVE jack = dfr:jack

		NewDataFolder/S outDF

		Duplicate jack,outw		// WARNING: outw must be cleared. See WAVEClear below
		String/G did= todo
		if( CmpStr(todo,"sin") )
			outw= sin(outw)
		else
			outw= cos(outw)
		endif

		// Clear outw so Duplicate above does not try to use it and to allow
		// ThreadGroupPutDF to succeed.
		WAVEClear outw

		ThreadGroupPutDF 0,:		// Put current data folder in output queue

		KillDataFolder dfr		// We are done with the input data folder
	while(1)

	return 0
End

Function DemoThreadQueue()
	Variable i,ntries= 5,nthreads= 2

	Variable threadGroupID = ThreadGroupCreate(nthreads)

	for(i=0;i<nthreads;i+=1)
		ThreadStart threadGroupID,i,MyWorkerFunc()
	endfor

	for(i=0;i<ntries;i+=1)
		NewDataFolder/S forThread
		String/G todo
		if( mod(i,3) == 0 )
			todo= "sin"
		else
			todo= "cos"
		endif
		Make/N= 5 jack= x + gnoise(0.1)

		WAVEClear jack

		ThreadGroupPutDF threadGroupID,:	// Send current data folder to input queue
	endfor

	for(i=0;i<ntries;i+=1)
		do
			DFREF dfr= ThreadGroupGetDFR(threadGroupID,1000)	// Get results in free data folder
			if ( DatafolderRefStatus(dfr) == 0 )
				Print "Main still waiting for worker thread results"
			else
				break
			endif
		while(1)

		SVAR did = dfr:did
		WAVE outw = dfr:outw

		Print "task= ",did,"results= ",outw

		// The next two statements are not really needed as the same action
		// will happen the next time through the loop or, for the last iteration,
		// when this function returns.
		WAVEClear outw		// Redundant because of the WAVE statement above
		KillDataFolder dfr	// Redundant because dfr refers to a free data folder
	endfor

	// This terminates the MyWorkerFunc by setting an abort flag
	Variable tstatus= ThreadGroupRelease(threadGroupID)
	if( tstatus == -2 )
		Print "Thread would not quit normally, had to force kill it. Restart Igor."
	endif
End
Typical output:
•DemoThreadQueue()
	task=   sin  results=
outw[0]= {0.994567,0.660904,-0.516692,-0.996884,-0.63106}
	task=   cos  results=
outw[0]= {0.0786631,0.709576,0.873524,0.0586175,-0.718122}
	task=   cos  results=
outw[0]= {-0.23686,0.848603,0.871922,0.0992451,-0.856209}
	task=   sin  results=
outw[0]= {0.999734,0.531563,-0.172071,-0.931296,-0.750942}
	task=   cos  results=
outw[0]= {-0.166893,0.767707,0.925874,0.114511,-0.662994}
	worker closing down due to group release
	worker closing down due to group release
Parallel Processing With Large Datasets
In the preceding section we synthesized the input data. In the real-world, your input data would most-likely be in an existing wave and you would have to copy it to a data folder to put into the input queue.
If your input data is very large, for example, a 3D stack of images, copying would require too much memory. In that case, a good choice is to pass the input directly to the thread using parameters to the thread worker function and use the output queue to return output to the main thread.
To do this you can use the Parallel Processing - Thread-at-a-Time Method and the output queue to return results.
Preemptive Background Task
In this example, we create a single worker thread that runs while the user does other things. A normal cooperative background task retrieves results from the preemptive thread. Although the background task will sometimes be blocked (as described in Background Tasks) the preemptive worker thread will always be running or waiting for data.
Another example of this kind of multitasking can be found in the "Slow Data Acq" demo experiment referenced below under More Multitasking Examples.
In some cases, it may be possible to run two instances of Igor instead of using a preemptive background task. Running two instances is far simpler, so use that approach if it is feasible.
We put the code for the background tasks in an independent module (see The IndependentModule Pragma) so that the user can recompile procedures, which is done automatically when a recreation macro is created, without stopping the background task.
You might use a preemptive background task when you have lengthy computations but want to continue to use Igor to do other things, such as creating graphics for publication. Although you can do anything you want while the task runs in the experiment, if you load a different experiment, the thread is killed.
For this example, our "lengthy computation" is simply creating a wave of sine values which is not lengthy at all and consequently there is no reason for using a preemptive thread in this case. To simulate a lengthy computation, the code delays for a few seconds before posting its results.
The named background task checks the output queue every 10 ticks, when it is not blocked, and updates a graph with data retrieved from the queue.
Independent modules cannot be defined in the built-in procedure window so paste the following code in a new procedure window:
#pragma IndependentModule= PreemptiveExample

ThreadSafe Function MyWorkerFunc()
	do
		DFREF dfr = ThreadGroupGetDFR(0,inf)
		if( DataFolderRefStatus(dfr) == 0 )
			return -1			// Thread is being killed
		endif

		WAVE frequencies = dfr:frequencies	// Array of frequencies to calculate
		Variable i, n= numpnts(frequencies)

		for(i=0;i<n;i+=1)
			NewDataFolder/S resultsDF
			Make jack= sin(frequencies[i]*x)

			Variable t0= ticks
			do
				// waste cpu for a few seconds
			while(ticks < (t0+120))

			// ThreadGroupPutDF requires that no waves in the data folder be referenced
			WAVEClear jack

			ThreadGroupPutDF 0,:		// Send current data folder to input queue
		endfor

		KillDataFolder dfr		// We are done with the input data folder
	while(1)

	return 0
End

Function DisplayResults(s)		// Called from cooperative background task
	STRUCT WMBackgroundStruct &s

	DFREF dfSav= GetDataFolderDFR()

	SetDataFolder root:testdf
	NVAR threadGroupID
	DFREF dfr = ThreadGroupGetDFR(threadGroupID,0)	// Get free data folder from output queue
	if( DataFolderRefStatus(dfr) != 0 )
		// Make free data folder a regular data folder in root:testdf
		MoveDataFolder dfr, :

		// Give data folder a unique name
		String dfName = UniqueName("Results", 11, 0)
		RenameDataFolder dfr, $dfName

		WAVE jack = dfr:jack	// This is the output from the thread
		AppendToGraph/W=ThreadResultsGraph jack
	endif

	SetDataFolder dfSav
	return 0
End
And put this in the main procedure window:
Function DemoPreemptiveBackgroundTask()
	DFREF dfSav= GetDataFolderDFR()

	NewDataFolder/O/S root:testdf			// thread group ID and result datafolders go here

	Variable/G threadGroupID = ThreadGroupCreate(1)

	ThreadStart threadGroupID,0,PreemptiveExample#MyWorkerFunc()

	// MyWorkerFunc is now running and waiting for input data
	// now, let's give it something to do

	NewDataFolder/S tasks
	Make/N=10 frequencies= 1/(10+p/2+enoise(0.2))	// array of frequencies to calculate
	WAVEClear frequencies

	ThreadGroupPutDF threadGroupID,:			// thread is now crunching away

	// Results will be appended to this graph
	Display /N=ThreadResultsGraph as "Thread Results"

	// ...by this named task
	CtrlNamedBackground ThreadResultsTask,period=10,proc=PreemptiveExample#DisplayResults,start

	SetDataFolder dfSav				// restore current df
End

Function PostMoreFreqs()
	NVAR threadGroupID= root:testdf:threadGroupID

	NewDataFolder/S moretasks
	Make/N=50 frequencies= 1/(15+p/2+enoise(0.2))	// array of frequencies to calculate
	WAVEClear frequencies

	ThreadGroupPutDF threadGroupID,:		// thread continues crunching
End
Open the Data Browser and then, on the command line, execute:
DemoPreemptiveBackgroundTask()
After the action stops, demonstrate sending more tasks to the background thread:
PostMoreFreqs()
While this is running, experiment with creating graphs, using dialogs, creating functions etc. Note that both tasks run indefinitely.
To start over you need to stop the preemptive background task, stop the named background task, kill the graph, and delete the data. This function, which you can paste into the main procedure window, will do it.
Function StopDemo()
	NVAR threadGroupID = root:testdf:threadGroupID

	// Stop preemptive thread
	Variable status = ThreadGroupRelease(threadGroupID)

	// Stop named background task
	CtrlNamedBackground ThreadResultsTask, stop

	// Kill graph
	DoWindow /K ThreadResultsGraph

	// Kill data
	KillDataFolder root:testdf
End
Aborting Threads
If a procedure abort occurs, via a user abort or a programmed abort (see Aborting Functions), we would like all pre-emptive threads to stop running. In most cases, this is not something you need to worry about because the threads, by the nature of what they are doing, are guaranteed to stop in a relatively short period of time. It becomes an issue for threads that can run for arbitrarily long periods of time. In such cases, it is a good idea to handle the abort as explained in this section.
To signal running pre-emptive threads stop, the thread-coordinating function, running in the main thread, must detect the abort and call ThreadGroupRelease. ThreadGroupRelease signals the pre-emptive threads to quit. For example:
// A thread worker function that may take a long time
ThreadSafe Function ThreadWorkerFunc(threadNumber, numWaves, numPoints)
	Variable threadNumber, numWaves, numPoints

	Printf "Thread worker %d starting\r", threadNumber

	try
		int i
		for(i=0; i<numWaves; i+=1)
			Make/FREE/N=(numPoints) junk=gnoise(1)	// Busy work to take up time
		endfor
	catch
		// ThreadGroupRelease, called from the main thread, causes this catch block to execute
		Printf "Thread worker %d aborted after %d iterations\r", threadNumber, i
		return -1
	endtry

	Printf "Thread worker %d quitting normally\r", threadNumber
	return 0
End

Function ThreadCoordinatingFunction(numThreads, numWaves, numPoints)	// Runs in main thread
	int numThreads, numWaves, numPoints

	Variable timerRefNum = StartMSTimer
	Variable elapsedTime

	Variable threadGroupID = ThreadGroupCreate(numThreads)

	// Start all threads
	int i
	for(i=0; i<numThreads; i+=1)
		ThreadStart threadGroupID, i, ThreadWorkerFunc(i, numWaves, numPoints)
	endfor

	// Wait for threads to finish or for abort to occur
	Variable threadGroupResult
	try
		do
			Variable threadGroupStatus = ThreadGroupWait(threadGroupID,100)
			DoUpdate		// Needed for Printf output from worker to appear in history
		while(threadGroupStatus != 0)
	catch
		// If a user or programmed abort occurs, this executes and stops the threads
		elapsedTime = StopMSTimer(timerRefNum) / 1E6		// In seconds
		Printf "ThreadCoordinatingFunction aborted after %g seconds\r", elapsedTime
		DoUpdate			// Needed for Printf output from worker to appear in history

		// Signal running threads to stop
		threadGroupResult = ThreadGroupRelease(threadGroupID)
		return -1
	endtry

	// Here if threads ran to normal completion
	threadGroupResult = ThreadGroupRelease(threadGroupID)
	elapsedTime = StopMSTimer(timerRefNum) / 1E6	// In seconds
	Printf "ThreadCoordinatingFunction completed in %g seconds\r", elapsedTime
	return threadGroupResult
End
To try this example, execute this from the command line:
ThreadCoordinatingFunction(5, 1E3, 1E5) // Completes in about 25 seconds
After about 25 seconds, it completes normally. If you click the Abort button in Igor's status bar, the code in the catch block runs. The ThreadGroupRelease call in the catch block signals running threads to quit. After a short period of time, all threads have quit and the coordinating function returns.
If Igor signals a thread to quit but it fails to do so, Igor forces the thread to quit.
Aborting Threads Gracefully
When an abort occurs, whether initiated by the user (see User Abort Key Combinations) or programmatically using the AbortOnValue, AbortOnRTE or Abort operations, Igor sets an internal per-thread abort flag. The abort flag causes Igor to short-circuit loops and subroutine calls so that the function to be aborted finishes quickly.
If a thread worker function needs to run cleanup code in the event of an abort then the it must include a try-catch-endtry block. This section explains what you must do to enable the catch code to run without interference.
By default, ThreadGroupRelease attempts to stop running threads by marking them with an unclearable abort flag. "Unclearable" means that, if a thread worker function has a catch block, when the abort flag is set, the catch block is called but the abort is still in effect which interferes with the code in the catch block.
As of Igor Pro 9, you can provide the optional beGraceful flag when calling ThreadGroupRelease. If you specify beGraceful=1, ThreadGroupRelease sets a clearable abort flag. "Clearable" means that, if a thread worker function has a catch block, the abort flag is cleared when the catch block is called. This allows code in the catch block to execute without interference. The catch block must include a return statement so that the thread worker function returns.
The interaction between Igor and threads when an abort occurs is complex. You don't need to understand more that is explained in the preceding paragraphs of this section. Advanced programmers who want to understand the details can find them in the Threads and Aborts example experiment.
More Multitasking Examples
More multitasking examples can be found in the following example experiments:
Open the Multithreaded LoadWave demo experiment
Open the Multithreaded Mandelbrot demo experiment
Open the Multiple Fits in Threads demo experiment
Open the Slow Data Acq demo experiment
Open the Thread-at-a-Time demo experiment
Cursors - Moving Cursor Calls Function
You can write a hook function which Igor calls whenever a cursor is moved.
Graph-Specific Cursor Moved Hook
The preferred way to do this is to use SetWindow to designate a window hook function for a specific graph window (see Window Hook Functions). In your window hook function, look for the cursormoved event. Your hook function receives a WMWinHookStruct structure containing fields that describe the cursor and its properties.
For a demo of this technique, choose File→Example Experiments→Techniques→Cursor Moved Hook Demo.
Global Cursor Moved Hook
This section describes an old technique in which you create a hook function that is called any time a cursor is moved in any graph. This technique is more difficult to implement and kludgier, so it is no longer recommended.
You can write a hook function named CursorMovedHook. Igor automatically calls it whenever any cursor is moved in any graph, unless Alt is pressed.
The CursorMovedHook function takes one string parameter containing information about the graph, trace or image, and cursor in the following format:
GRAPH:graphName;CURSOR:<A - J>;TNAME:traceName;MODIFIERS:modifierNum; ISFREE:freeNum;POINT:xPointNumber;[YPOINT:yPointNumber;]
The traceName value is the name of the graph trace or image to which the cursor is attached.
The modifierNum value represents the state of some of the keyboard keys summed together:
1: Command is pressed
4: Shift is pressed
8: Caps Lock is pressed
The Alt key is not represented because it prevents the hook from being called.
The YPOINT keyword and value are present only when the cursor is attached to a two-dimensional item such as an image, contour, or waterfall plot or when the cursor is free.
If cursor is free, POINT and YPOINT values are fractional relative positions (see description in Cursor command). If TNAME is empty, fields POINT, ISFREE and YPOINT are not present.
The freeNum value is 1 if the cursor is not attached to anything, 0 if attached to a trace or image.
This example hook function simply prints the information in the history area:
Function CursorMovedHook(info)
	String info

	Print info
End
Whenever any cursor on any graph is moved, this CursorMovedHook function will print something like the following in the history area:
GRAPH:Graph0;CURSOR:A;TNAME:jack;MODIFIERS:0;ISFREE:0;POINT:6;
Cursor Globals
An older technique involving globals named S_CursorAInfo and S_CursorBInfo is no longer recommended. For details, see the "Cursor Globals" subtopic in the Igor 6 help files.
Profiling Igor Procedures
You can find bottlenecks in your procedures using profiling.
Profiling is supported by the FunctionProfiling.ipf file. To use it, add this to your procedures:
#include <FunctionProfiling>
Then choose Windows→Procedures→FunctionProfiling.ipf and read the instructions in the file.
Crashes
A crash results from a software bug and prevents a program from continuing to run. Crashes are highly annoying at best and, at worst, can cause you to lose valuable work.
WaveMetrics uses careful programming practices and extensive testing to make Igor as reliable and bug-free as we can. However in Igor as in any complex piece of software it is impossible to exterminate all bugs. Also, crashes can sometimes occur in Igor because of bugs in other software, such as printer drivers, video drivers or system extensions.
We are committed to keeping Igor a solid and reliable program. If you experience a crash, we would like to know about it.
When reporting a crash to WaveMetrics, please start by choosing Help→Contact Support. This provides us with important information such as your Igor version and your OS version.
Please include the following in your report:
-
A description of what actions preceded the crash and whether it is reproducible.
-
A recipe for reproducing the crash, if possible.
-
A crash log (described below), if possible.
In most cases, to fix a crash, we need to be able to reproduce it.
Crashes On Windows
When a crash occurs on Windows, Igor attempts to write a crash report that may help WaveMetrics determine and fix the cause of the crash. If Igor is able to write a crash report, it displays a dialog showing the location of the crash report on disk. The location is in your Igor preferences folder and will be something like:
C:\Users\<user>\AppData\Roaming\WaveMetrics\Igor Pro 8\Diagnostics\Igor Crash Reports.txt
If the "Igor Crash Reports.txt" file already exists when a crash occurs, Igor appends a new report to the existing file.
Igor may also write a minidump file to the same folder. A minidump file, which has a ".dmp" extension, contains additional information about the crash. There will typically be one minidump file for each crash.
When a crash occurs, Igor attempts to open the Diagnostics folder on your desktop to make it easy for you to find the report and minidump files.
Please send the "Igor Crash Reports.txt" file, along with the minidump files related to the current crash, as email attachments to WaveMetrics support. If possible, include instructions for reproducing the crash and any other details that may help us understand what you were doing leading to the crash.
Once the problem has been resolved, if you want to reduce clutter and reclaim disk space, you can delete the Diagnostics folder and its contents. Igor will recreate the folder if necessary.
There may be cases where Igor is not able to write a crash report. This would happen if a library, security software or the operating system has overridden Igor's crash handler for some reason.